-
Notifications
You must be signed in to change notification settings - Fork 0
Lipsync
VTube Studio can use your microphone to analyze your speech and calculate Live2D model mouth forms based on it.
You can select two lipsync types:
-
Simple Lipsync
- Legacy option, Windows-only, based on Occulus VR Lipsync
- NOT RECOMMENDED, use Advanced Lipsync instead.
-
Advanced Lipsync:
- Based on uLipSync
- Fast and accurate, can be calibrated using your own voice so it can accurately detect A, I, U, E, O phonemes.
- Available on all platforms (desktop and smartphone).
Note: "Simple Lipsync" will not be discussed here. If you're still using it, please consider moving on to "Advanced Lipsync". It supports the same parameters and more, is more performant and works on all platforms.
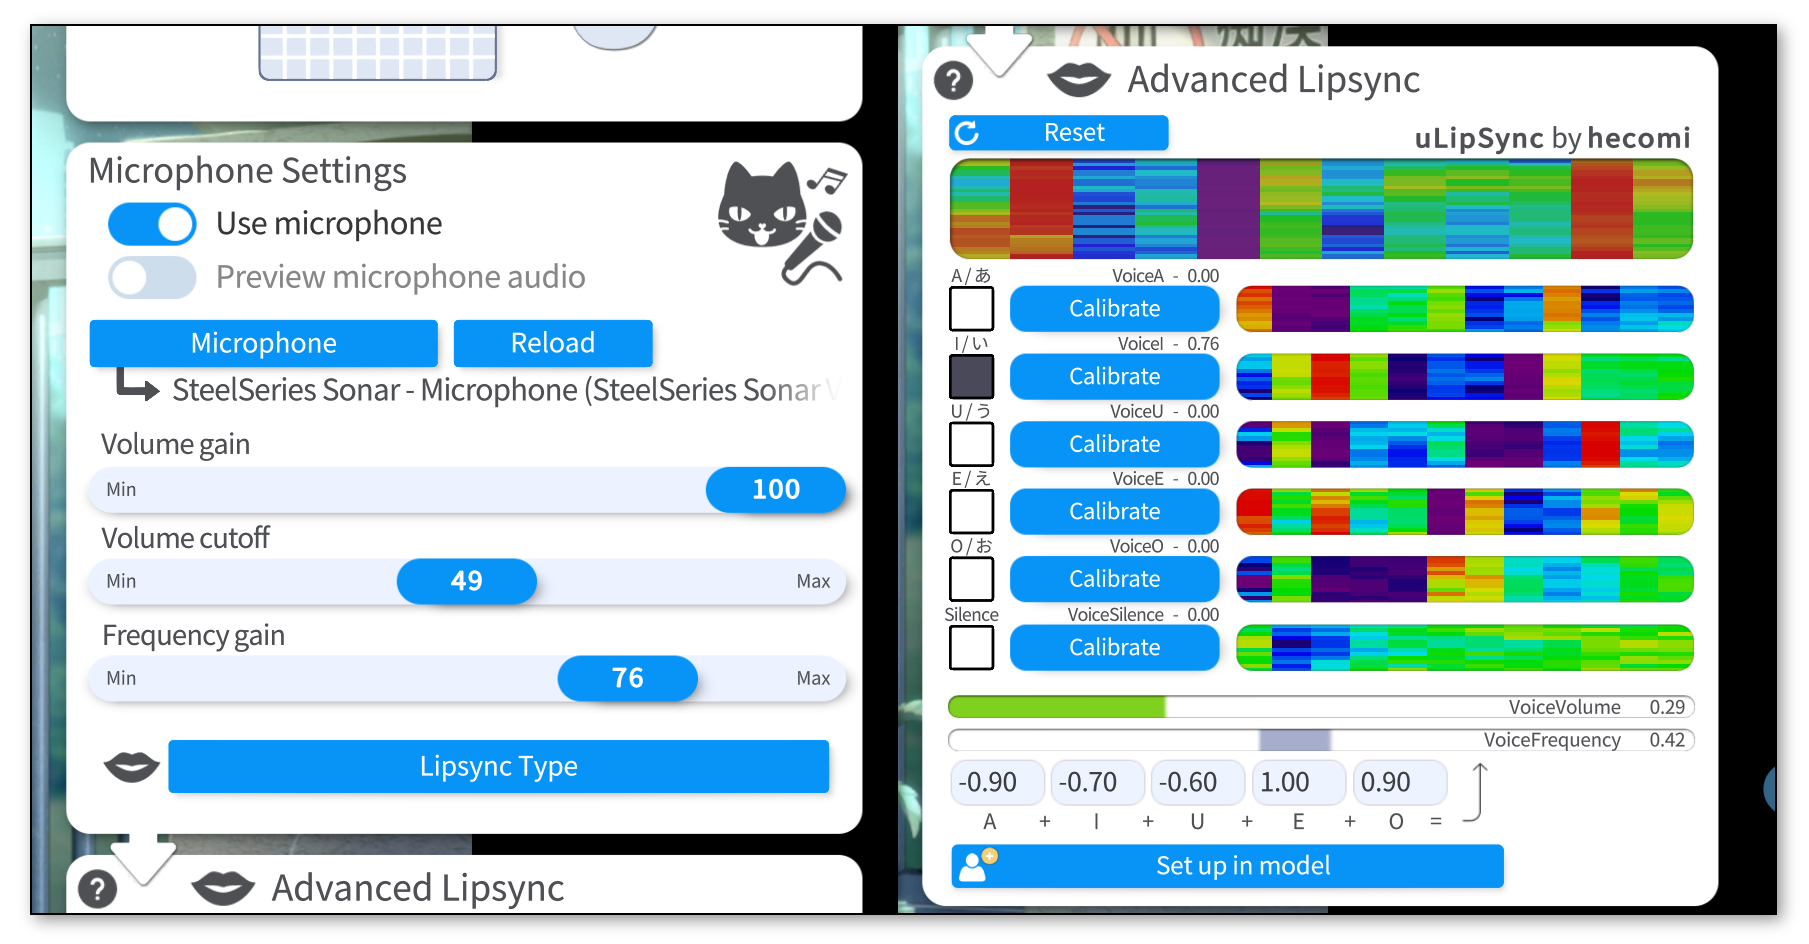
To use Advanced Lipsync select it using the "Lipsync Type" button. Then select your microphone and make sure "Use microphone" is on.
There are three slider on the main config card:
-
Volume Gain: Boost volume from microphone. Will have an effect on the
VoiceVolumeandVoiceVolumePlusMouthOpenparameters as well as allVoiceA/I/U/E/Oparameters. - Volume Cutoff: Noise gate. Eliminates low-volume noise. It's probably best to keep this low or at 0 and have a noise-gate before audio is fed into VTube Studio instead.
-
Frequency Gain: Boost value for
VoiceFrequencyandVoiceFrequencyPlusMouthSmileas well as allVoiceA/I/U/E/Oparameters.
If your microphone lags behind, you can click the "Reload" button to restart the microphone. You can also set up a hotkey for that.

To calibrate the lipsync system, click each "Calibrate" button while saying the respecting vowel until the calibration is over. That way, the lipsync system will be calibrated to your voice. If you change your microphone or audio setup, you might want to redo the calibration.
Clicking "Reset" will reset the calibration to default values.
Make sure the calibration is good by saying all vowels again and checking if the respective vowel lights up on the UI.
The funny colorful visualizations shown next to the calibration buttons are related to the frequency spectrum recorded in your voice during calibration. If you'd like to learn more about the details, check the uLipSync repository.
The lipsync system outputs the following voice tracking parameters:
-
VoiceA- Between 0 and 1
- How much the
Avowel is detected.
-
VoiceI- Between 0 and 1
- How much the
Ivowel is detected.
-
VoiceU- Between 0 and 1
- How much the
Uvowel is detected.
-
VoiceE- Between 0 and 1
- How much the
Evowel is detected.
-
VoiceO- Between 0 and 1
- How much the
Ovowel is detected.
-
VoiceSilence- Between 0 and 1
- 1 when "silence" is detected (based on your calibration) or when volume is very low (near 0).
-
VoiceVolume/VoiceVolumePlusMouthOpen- Between 0 and 1
- How loud the detected volume from microphone is.
-
VoiceFrequency/VoiceFrequencyPlusMouthSmile- Between 0 and 1
- You would NOT use these parameters if you're already using the
VoiceA,VoiceI, ... parameters. This is just an alternative for you if your model only has one mouth shape parameters so you can use this to combine the detected vowels into one single parameter. - Calculated based on the detected vowels. You can set up how the vowel detection values are multiplied to generate this parameter.
An example mouth model can be downloaded here: "aaa_BlendshapeMouthExample.zip"
The example model is simplified (and a bit scuffed) but it shows one possible setup that can be used for combining camera/phone-based lipsync with microphone lipsync.
https://www.youtube.com/watch?v=X2-nHPeF5Q0
The general idea is this:
- When significant sound is picked up from the microphone, fade mouth forms towards the forms generated by microphone lipsync, based on how loud the sound is.
- When very little or no sound is detected, just use the mouth forms based on camera tracking.
To achieve this, we could have the following parameter setup: (here pictured with regular MouthOpen/MouthForm setup, but could include VBridger mouth forms as well)

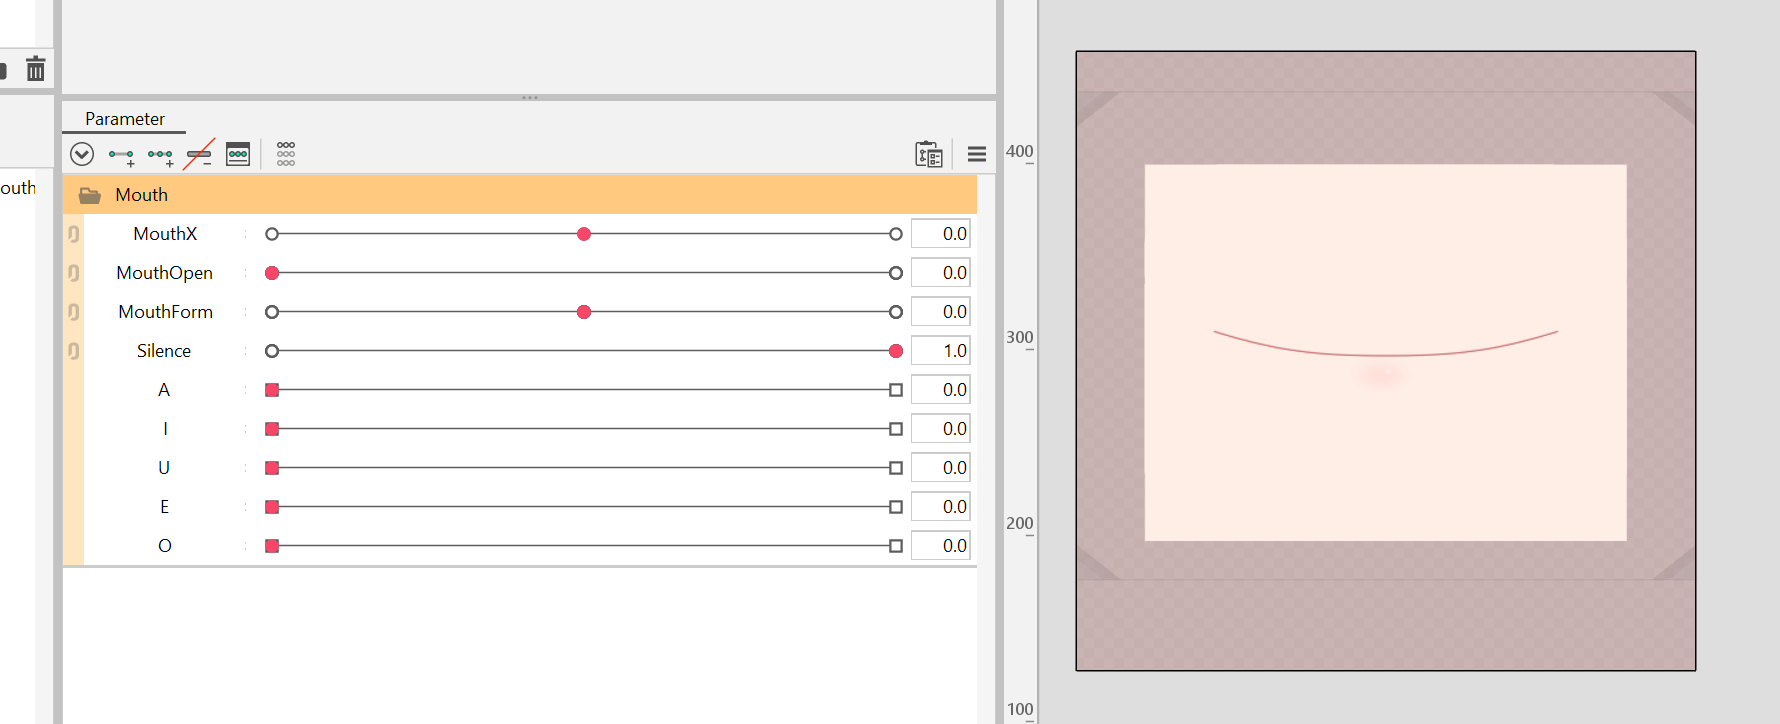
ParamMouthOpen and ParamMouthForm are set up just like usual. In addition, set up a ParamSilence. This parameter will later be hooked up to VoiceSilence, so it will be 1 when the microphone detects no or almost no sound.
Next, add keyforms for ParamSilence to make sure ParamMouthOpen and ParamMouthForm only affect the mouth forms when ParamSilence is at 1. When the parameter is at 0, moving ParamMouthOpen and ParamMouthForm should not deform the mouth at all.
Based on that default neutral mouth form, set up the blendshape parameters ParamA, ParamI, ParamU, ParamE and ParamO.
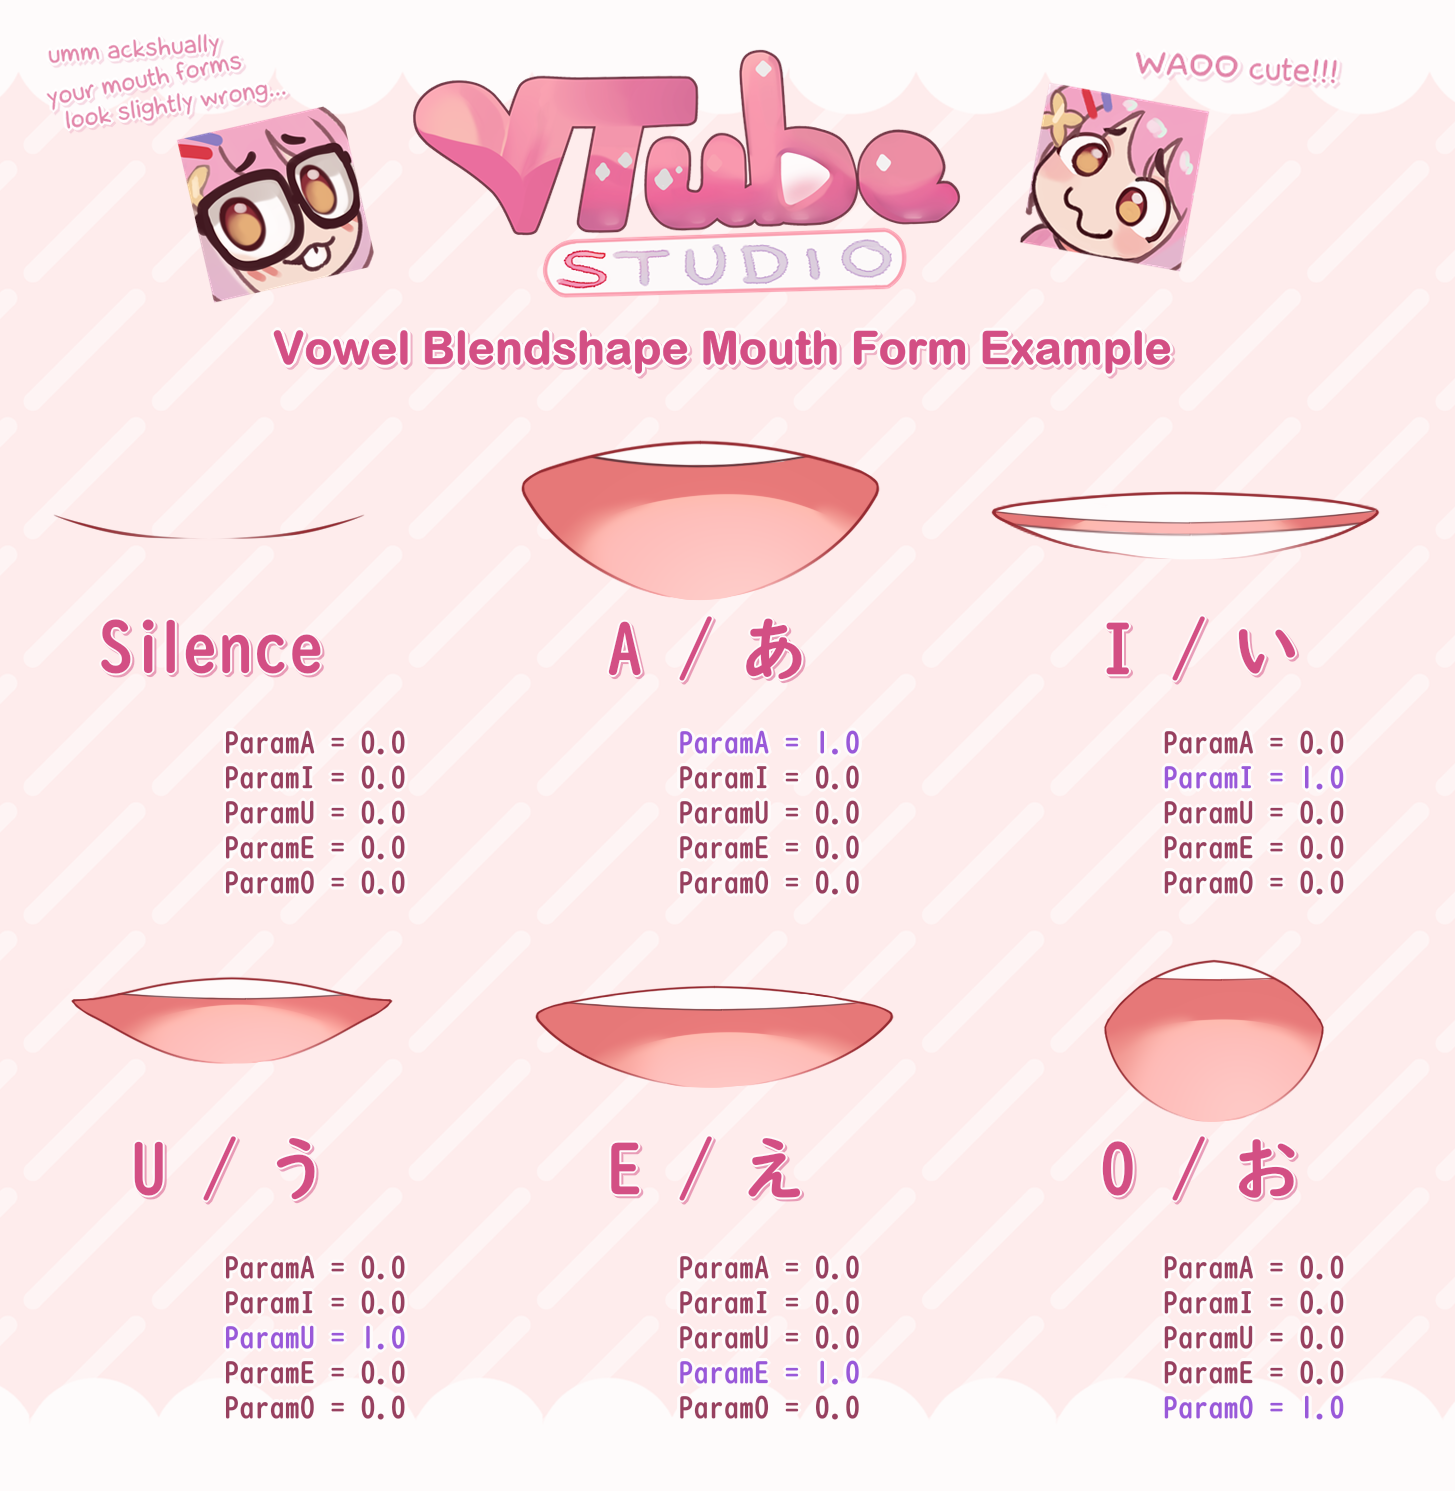
For those 5 blendshape parameters, just imagine what your model's mouth would look like when pronouncing the respective vowels. Just using the typical Japanese pronunciation as reference usually works fine, even for other languages.
Depending on what style your model is drawn in, mouth forms could look drastically different, but here's a reference I made for cute/girly mouth forms. In general, it might be better to make them look less happy and more neutral.

Keep in mind that the blendshapes won't look good (and don't have to look good) if multiple are at 1 at the same time. VTube Studio will make sure that the lipsync parameters that will control these Live2D blendshape parameters (VoiceA, VoiceI, VoiceU, VoiceE, VoiceO) are never 1 at the same time and they only mix at smaller parameter values.
This is all the setup you need. Now, import the model into VTube Studio and run the auto-setup for advanced lipsync (button at the bottom of the lipsync config). This will set up the following mappings (you can also set them up manually of course):
-
MouthOpen→ParamMouthOpen -
MouthSmile→ParamMouthForm -
VoiceSilence→ParamSilence -
VoiceA→ParamA -
VoiceI→ParamI -
VoiceU→ParamU -
VoiceE→ParamE -
VoiceO→ParamO
unhappy mouth forms when sound
The VoiceA/I/U/E/O should be mapped to blendshape-Live2D-parameters called ParamA, ParamI, ParamU, ParamE and ParamO that deform the mouth to the respective shape.
Here's a rough reference for how you could set up your blendshape mouth forms to get the most out of the advanced lipsync setup. Depending on what your model/artstyle looks like, your mouth forms may look different.
If microphone audio lags behind the values shown on the UI, use the "Reload" button to reload the selected microphone. Alternatively, you can use a hotkey to reload the microphone.
The exact parameter and vowel mapping settings strongly depend on your model setup. Just try around a bit and see what works for you. It may take some trial and error, but if set up correctly, this can look really good especially when singing. ♪ ♫ ♬

![]() 如果你遇到了任何该手册中没有回答的问题,请到 VTube Studio Discord
如果你遇到了任何该手册中没有回答的问题,请到 VTube Studio Discord![]() !!
!!
- 使用单个网络摄像头或iPhone Android设备控制多个模型
- 在模型间复制配置
- 载入自定义背景
- 重新着色模型和挂件
- 录制动画
- 使用OBS录制/串流
- 将数据传输至VSeeFace
- 以管理员身份启动
- 不通过Steam启动应用
- 向Mac/PC推流
- 多人联机
- Steam创意工坊
- 截图与分享
- Live2D Cubism Editor 通信
- VTube Studio设置
- VTS模型设置
- VTS模型文件
- 视觉特效
- Twitch互动
- Twitch热键触发器
- Spout2背景
- 按键表情
- 动画
- 动画、表情、面部追踪、物理等之间的交互
- Google Mediapipe面部捕捉
- NVIDIA Broadcast面部捕捉
- Tobii 眼球捕捉
- 手部捕捉
- 音频口型同步
- 挂件系统
- Live2D挂件
- 层间挂件固定
- 挂件场景和挂件热键
- 添加特殊的ArtMesh功能
- 屏幕光源着色
- VNet网络安全
- 插件 (YouTube, Twitch等平台)
- Web挂件
- Web挂件插件


