An insurance assistance web app that uses AI vision models and retrieval‑augmented generation (RAG) to help people recognize and document lost belongings from wildfire‑damage photos. The goal is to speed up inventory creation for insurance claims and reduce the emotional/administrative burden after a disaster.
- HomeWorthAI
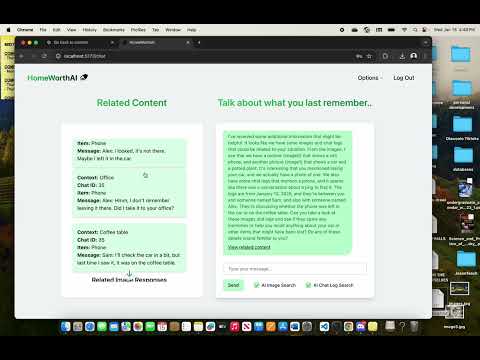
- Upload wildfire‑damage photos and run object detection to identify common household items.
- Capture evidence (detected item, confidence, bounding box) to help build a structured inventory.
- RAG assistant: ask questions about items, categories, typical replacement costs (based on your data sources).
- Local development friendly: run frontend and backend separately; CPU‑only Detectron2 install supported.
ℹ️ Exact capabilities depend on the models and data sources you enable in your environment. This README focuses on getting the app running locally and installing Detectron2.
- Frontend (Web): React app for uploading photos, viewing detections, and chatting with the assistant.
- Backend (Python): endpoints for model inference (Detectron2) and a RAG pipeline that retrieves relevant knowledge (e.g., product catalogs, categories, policy FAQs) and generates helpful text.
- Models:
- Vision: Detectron2 object detection (CPU by default; GPU optional).
- RAG: Your choice of embedding / LLM providers (configure via environment variables).
- Node.js ≥ 18 and npm
- Python 3.10 or 3.11 (recommended)
- git
- Build tools (required by some Python packages):
- macOS: Xcode Command Line Tools (
xcode-select --install) - Windows: MS Build Tools (see Troubleshooting)
- Linux:
build-essential,python3-dev, etc.
- macOS: Xcode Command Line Tools (
# 1) Clone
git clone https://github.com/yousefalwahami/HomeWorthAI.git
cd HomeWorthAI

# 2) Frontend: install deps and start dev server
cd frontend
npm install
npm run dev

# 3) Backend: create venv, install deps, (optionally) detectron2, then run
cd ../backend
python3 -m venv venv
# macOS/Linux
source venv/bin/activate
# Windows (PowerShell)
# .\venv\Scripts\Activate.ps1
pip install -r requirements.txt
# Install Torch & Detectron2 for CPU (see detailed steps below)
# ...
uvicorn main:app --reload # main.py is the entrypoint for the backend, --reload to reload the app upon any changes
Can remove the --reload and do
uvicorn main:app.
In the frontend folder:
npm install
npm run dev
This starts the web app http://localhost:5173. If this port is busy, Vite will pick another and show it in your terminal.
Make sure you run these commands from the
backendfolder.
macOS / Linux
python3 -m venv venv
source venv/bin/activate
Windows (PowerShell)
python -m venv venv
.\venv\Scripts\Activate.ps1
macOS tip (only if you installed Python from python.org): If SSL/certificates cause issues when installing packages, run:
/Applications/Python\ 3.11/Install\ Certificates.command
macOS build tip (older macOS): If you run into wheel compilation issues, try:
export MACOSX_DEPLOYMENT_TARGET=10.13
pip install -r requirements.txtWe install for CPU to keep setup simple. If you have a working CUDA toolchain, see the GPU notes below.
- Install PyTorch
pip install torch
# verify
python -c "import torch; print(torch.__version__)"
You may need
numpyif it is not already installed:pip install numpy.
- Install Detectron2 and required build tools Make sure
gitis installed and available on your PATH.
pip install -U pip setuptools wheel
pip install cython
pip install 'git+https://github.com/facebookresearch/detectron2.git'- Force CPU execution In
backend/controllers/detectron2.py(fixing the file name if needed), ensure:
cfg.MODEL.DEVICE = "cpu"If your repo still has
decetron2.py, rename it todetectron2.py.
If you have an NVIDIA GPU and CUDA installed, you can use CUDA wheels for both PyTorch and Detectron2. Compatibility changes over time, so follow the official installation guides for the specific versions of CUDA, PyTorch, and Detectron2 you plan to use. After enabling GPU, set:
cfg.MODEL.DEVICE = "cuda".env.example files are included so you can copy them:
cp backend/.env.example backend/.env
cp frontend/.env.example frontend/.env
Create backend/.env with the following:
# Server settings
PORT=8000
HOST=0.0.0.0

# API Keys
NEBIUS_API_KEY=replacemewithyourtoken
PINECONE_API_KEY=replacemewithyourtoken

# Database (PostgreSQL)
DATABASE_URL=postgresql://<USERNAME>:<PASSWORD>@localhost:5432/<DB_NAME>

# Secret key (must be 32 characters long)
SECRET_KEY=exampletokenkeythatmustbe32characterslongCreate frontend/.env with the following:
VITE_REACT_APP_API_URL=apiurlgoeshereBackend (from backend):
# Example FastAPI entrypoint
uvicorn main:app --host 0.0.0.0 --port 8000 --reload
# or, if your project uses Flask:
# flask --app app run --host 0.0.0.0 --port 8000 --debug
Frontend (from frontend):
npm run devOpen the frontend URL printed in your terminal. Upload a sample wildfire image and verify that detections appear. If the RAG assistant is enabled, try asking questions about detected items.
HomeWorthAI/
├─ frontend/
│  ├─ src/
│  ├─ public/
│  └─ (package.json, vite.config.js or next.config.js, etc.)
├─ backend/
│  ├─ controllers/
│  │  └─ detectron2.py
│  ├─ models/
│  ├─ services/        # RAG, vector store clients, etc.
│  ├─ data/            # sample assets (do not commit secrets)
│  ├─ main.py
│  ├─ requirements.txt
│  └─ .env.example
└─ README.md
Detectron2 / PyTorch build errors
- Ensure build tools are present:
- macOS:
xcode-select --install - Windows: Install MS Build Tools (C++ workload) and restart the terminal.
- Linux:
sudo apt-get install build-essential python3-dev(Debian/Ubuntu variants)
- macOS:
- Try upgrading pip/setuptools/wheel:
pip install -U pip setuptools wheel. - On macOS with older systems, exporting
MACOSX_DEPLOYMENT_TARGET=10.13can help.
PyTorch didn't install
- PyTorch didn’t install. Re‑run
pip install torchinside the activated virtual environment.
SSL / certificate issues on macOS
- Run
/Applications/Python\ 3.11/Install\ Certificates.commandif using the python.org installer.
still using GPU
- Double‑check you set
cfg.MODEL.DEVICE = "cpu"and that this code path is executed before model creation.
CORS errors in the browser
- Confirm backend allows requests from frontend URL defined in
.env.
Long install times / Memory errors
- Close other heavy apps and increase swap space if needed. You can also try a clean virtualenv.
# From backend folder
python -m venv venv
.\venv\Scripts\Activate.ps1
pip install -r requirements.txt
pip install torch
pip install -U pip setuptools wheel
pip install cython
pip install 'git+https://github.com/facebookresearch/detectron2.git'
# Start server (adjust for your framework)
uvicorn main:app --reload --port 8000# From backend folder
python3 -m venv venv
source venv/bin/activate
pip install -r requirements.txt
pip install torch
pip install -U pip setuptools wheel
pip install cython
pip install 'git+https://github.com/facebookresearch/detectron2.git'
# Start server (adjust for your framework)
uvicorn main:app --reload --port 8000