The objective of this command-line application is to generate and adjust the company's existing employee directory.
In order for the user to deploy the command-line application, they will first need git clone https://github.com/pazjenni04/company_directory.git and proceed to install the following libraries: inquirer, mysql2, console-table and dotenv.
npm init -y
and then type the following to download all necessary packages and create a package.json and a package-lock.json.
npm install
Once all libraries have been downloaded, then the user will proceed in opening a 'New Terminal' in their visual studio code and type the following to initiate the command-line application:
node index.js
Once the user presses enter, they will then be prompted with the main menu.
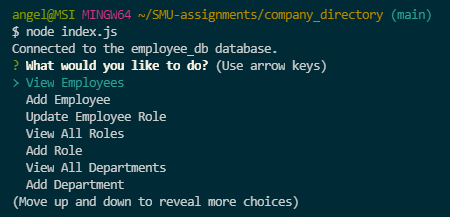
From the main menu, the user can choose multiple options including 'View Employees', 'Add Employee', 'Update Employee Role', 'View All Roles', 'Add Role', 'View All Departments', 'Add Department', or 'Quit' if they do not want to proceed.
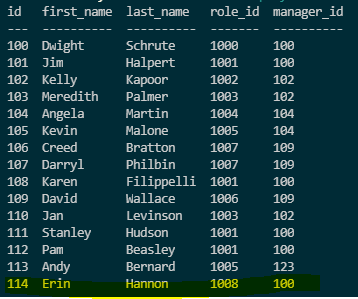
If the user chooses 'View Employees', a table will be created detailing the current employees within the directory and will showcase their employee id, their first and last names, their role id, and the manager that oversees that employee.

The user is then requested to choose an other option from the main menu.
On the main menu, the user can choose to add an employee to the current company directory by choosing 'Add Employee.'
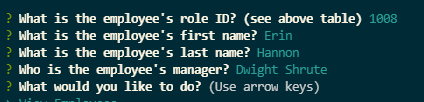
Once the chooses 'Add Employee', a table of the current available roles will be showcased for the user to refer to when entering the new employees current role ID.
Once the user enters the corresponding role ID for the employee, the next series of questions will prompt requesting for the new employee's first name, last name, and their manager. Once completed the terminal will process the employee and will be added into the company directory.
Once completed, the user will then be prompted with the main menu again so that they can choose another option within the directory.
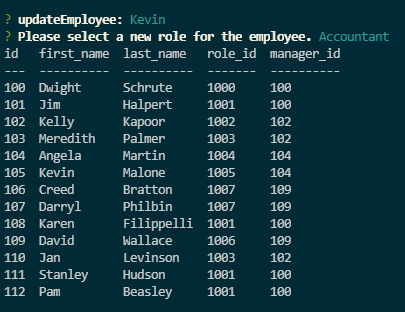
If the user decides to update a current employee's role, they would choose 'Update Employee Role' in the main menu. By choosing 'Update Employee Role', the terminal will prompt the user to choose from a list of employees that's currently in the system to modify and then it will ask them to what role/position they need to be updated to.
Once the user enters the role they wish to update the employee to, they will then be presented with a table with the updated results. At this point, the user will be presented with the main menu to choose another option.
To view all current roles being offered at the company, the user can choose the option 'View All Roles.' This will display all current positions being offered along with their role id, the title of the role, the salary assigned to that role and the department that role belongs to.
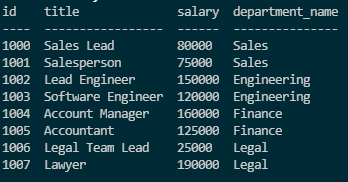
At this time, the user will be presented with the main menu again to choose another option.
On the main menu, if the user decides to add a role into the system they can choose 'Add Role.' Once they click enter, they will be presented with a current table of the current role's being offered at the company and will be prompted with a series of questions to build a new role. Questions that will be prompted includes the title of the new role, the salary for the new role, and the new department the role belongs to. Once complered, the system will generate the new role and it will be an option for any employees being entered into the directory.
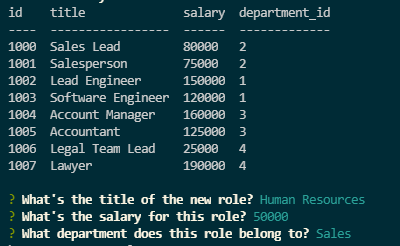
After the user has completed their add-on, they will be presented with the main menu again.
If the user needs to delete a role within the directory, they can choose 'Delete Role'. This will then prompt a list of current roles available in the system in which the user can choose one and the system will proceed with removing it as an option.
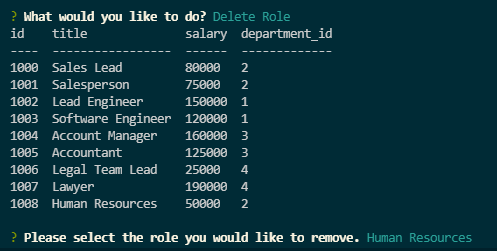
Once the user has deleted their requested role, they will be presented with the main menu to choose another option.
If the user needs to view all existing departments in the directory, they can choose 'View All Departments' on the main menu. Once they click enter, they will be presented with a table that shows all existing departments within the directory along with its corresponding id.

The user is then presented with the main menu again.
To add a department onto the directory, the user would choose 'Add Department' on the main menu. Once the user clicks on this option, they will be presented with a table of current existing deparments within the directory and prompted with a series of questions. In order to build a new department in the system, the user will have to input the new department's name and click enter. This will then create the new department within the system.
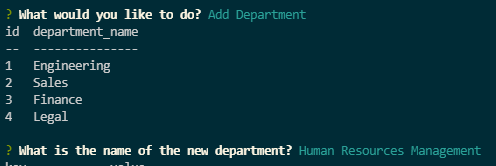
Once completed, the user will be prompted to the main menu again to choose another option.
To delete a department from the directory, the user can choose 'Delete Department' on the main menu. By choosing this option, the user will be presented with a table of existing departments and will be asked to choose a department to remove from the directory. Once the user chooses their department and clicks enter, the department will no longer exist in the system.
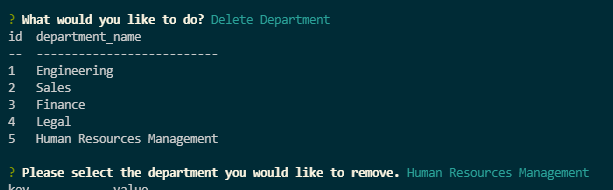
After deleting the department, the user will be presented with the main menu again.
In order for the user to stop running the system, they can choose 'Quit' on the main menu and it will exit the database.
- Javascript
- Node.js
- MySQl2 package
- Inquirer package
- Console-table package
Questions? Feel free to contact me.
To see a demonstration of this application, feel free to watch the following link. https://youtu.be/wfy9AxJFvG4
- Github repo - https://github.com/pazjenni04/company_directory.git