-
Notifications
You must be signed in to change notification settings - Fork 60
User Guide: Devices
Using the Devices section, you can browse the devices that Netshot manage, search for them or their data, start tasks to refresh their status or configure them, etc.
A device is a network equipment as seen by Netshot. Which type of device is supported or not by Netshot (vendor, family, collected data, automatic discovery and snapshots) depends entirely on the loaded device drivers.
Before adding any device, you must have created the required credential sets in the Admin page. You must have a read-write role to be able to add devices.
To add a single device:
- On the Devices page, click on Add device....
- Select the proper domain for the device.
- Enter the IP address of the device (or a name that the DNS engine on the Netshot server can resolve).
- If you check the Autodiscover device type box, Netshot will start with some SNMP requests to guess which type of device it is talking to, in which case you must have declared a valid SNMP credential set. Otherwise you have to select yourself the type of device so Netshot knows which "language" to speak when talking to the device.
- Once the type of device is discovered (either manually or by SNMP polling), the proper driver is assigned, and Netshot will start a Snapshot task, to capture information about the device (including the current configuration).
- If you check the Override connection settings box and enter an IP address, an SSH or a Telnet TCP port, these settings will be used to connect to the device rather than the primary management address. This allows for connection through a port redirection proxy for example.
- By default, Netshot will try and use the globally defined credential sets. Starting with Netshot 0.7.0, you can provide device-specific credentials by selecting Specific SSH account, Specific SSH Key or Specific Telnet account.
To add a bunch of devices:
- On the Devices page, click on Add device... drop down menu, Scan subnet(s) for devices...
- Select the proper domain for these devices.
- Enter the list of IP addresses (e.g. 1.2.3.4) or IP subnets (e.g. 1.2.3.0/24), one by line and click on Scan.
- Netshot will poll each of the IP addresses using the known SNMP credential sets for the domain, and create devices based on the SNMP responses.
You can simply find devices based on their name (or virtual name, e.g. VDC), or their IP address: just type it in the Search... box and type Enter.
To remove the filter, click on the Clear (cross) button.
You can also build advanced searches. Open the Advanced search dialog, and use the buttons to write a logical search string. Note that by selecting a type of device, you can filter on the device fields which are specific to this type.
You can create groups of devices.
You must have a read-write role to be able to add, edit or remove groups.
- You can use groups to easily find/filter your devices.
- You can create tasks to run over groups, instead of creating individual tasks.
- When creating policies, you have to select a target group.
- Some of the reports break down data based on the groups.
To create a group, click on Add devices... drop down menu, and then on Add a group... When creating a group, you select the type of group, either static or dynamic (this can't be changed later). Then edit the group to start adding devices.
Select a group by clicking it in the group tree. The device list will be refreshed, and will display only the devices contained in the selected group. When a group is selected, the Edit and Delete buttons appear.
A static group needs each device to be manually selected and added. A dynamic group is based on a search logical expression. Dynamic groups are automatically refreshed whenever they are edited or devices change.
You can arrange your groups in a hierarchy: enter a folder path, e.g. Backbone A/Core devices/P routers. This will only affect only how groups will be displayed in the Devices page.
If you check the Hide this groups in reports box, the group can be used as any other group to filter devices or to apply compliance policies, but it won't appear in the reports.
You can delete a group, by clicking on the ad hoc button. Any associated policy or scheduled task would be deleted as well.
Click on a device in the left-hand side list to display it.

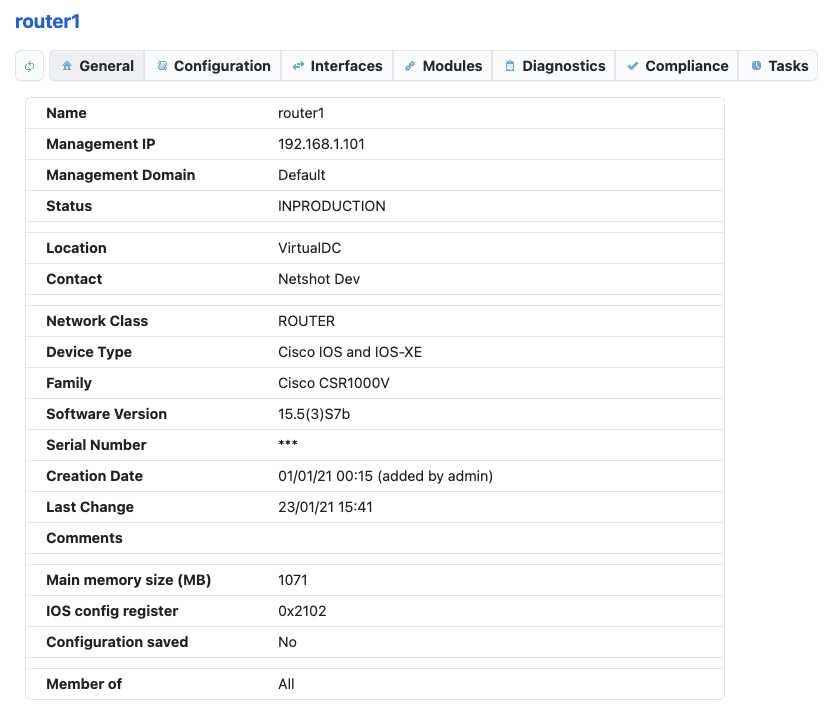
The General tab gives the following information:
- Name: the hostname of the device, captured by the driver during snapshots.
- Management IP: the IP address used by Netshot to access the device.
- Management Domain: the management domain the device belongs to.
- Location: the physical location of the device, captured by the driver during snapshots (it is often the SNMP location).
- Contact: the person or service to contact about the device, captured by the driver during snapshots (it is often the SNMP contact).
- Network Class: the category of equipment, among ROUTER, SWITCH, FIREWALL, LOADBALANCER, etc. as set by the driver during snapshots.
- Device Type: the type of equipment, i.e. the driver used to talk with the device. This cannot be changed without deleting the device.
- Family: the subtype of equipment, set by the driver during snapshots.
- Software Version: the version of OS for this equipment, set by the driver during snapshots.
- Serial Number: the main serial number of the device.
- Creation Date: when the device was created in Netshot (and the login who did it).
- Last Change: when the device was last modified (by a snapshot, or manually edited).
- Comments: free text set by manually editing the device, or by a device script.
- Member of: the groups the device belongs to.
- And additional fields, set at the device level by the specific driver.
The Interfaces and Modules tabs are populated by the device driver during snapshots. The accuracy of this information will depend on how the specific driver for this device is coded and what be understood using the CLI of the device.
The Configurations tab gives the history of configurations of the device.

Which items are contained by a configuration is defined by the device driver. Any information that may change over the time, and which changes are important to track should be stored there.
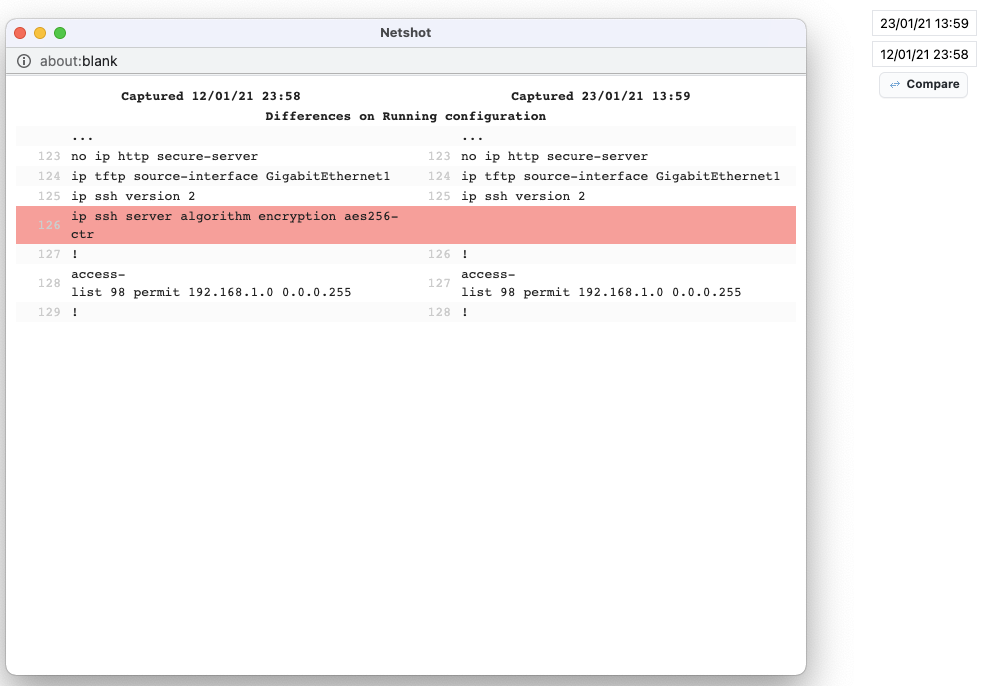
Click on a date to see the content of the configuration. Click on the Compare button to display the differences between two successive configurations, in a new window (ensure your browser is not blocking popups). Items of the configuration defined as comparable in the device driver are automatically compared and differences are displayed. You can navigate through successive changes by using the Previous and Next buttons at the top of the window. You can also compare two non-successive configurations: drag and drop the date of the two configuration entries onto the Drop to Diff targets on the right-hand side of the panel. Then click on the Compare button that should have appeared.

Long text configuration items, like full running configuration of a Cisco IOS device, can be displayed in a new window by clicking on the View link, or can be directly downloaded as a file by using the Download link.
You can edit some of the properties of the device by clicking on the Edit button (wrench icon) in the device view toolbar.
You must have a read-write role to be able to edit devices.
- Name: the name of the device can't be edited, it is filled by the device driver during snapshots.
- IP address: the management IP address of the device, used by Netshot to access it. You can change it if for some reason Netshot should use another IP address to administrate the device.
- Domain: the management domain the device belongs to.
- You can select which credential set(s) should be used to access the device. If several sets are selected, they will be tried in turn until one works.
- In case of failure, also try all known credentials: if you check this box, and Netshot can't connect to the device using the selected credential set(s), other ones will automatically be tried in turn, if they are associated with the same management domain or with no domain at all.
- Override connection settings: check this box and fill any of IP, SSH port or Telnet port to force Netshot to connect to the device via an alternate IP or port.
- Specific SSH account, Specific SSH key and Specific Telnet account: select one of these options, and fill in the corresponding text boxes, to provide specific credentials for this device (instead of using the globally defined credential sets).
- You can store some free-form text in the Comments box.
You can disable a device, by clicking on the relevant button in the device toolbar. No snapshot task will be executed over a disabled device. Click again on the button to enable the device back.
Scheduling snapshot tasks requires read-write permissions.
During a snapshot task, Netshot connects to the device (either by SSH or Telnet, depending on the available credentials, and also on what the specific driver supports.
Once connected to the device, Netshot delegates all the snapshot work to the driver.

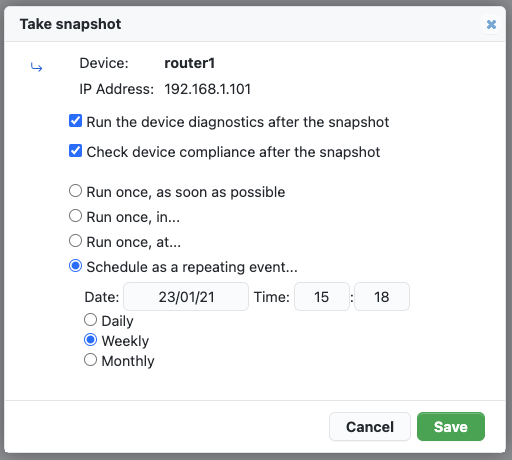
- To force a snapshot, click on the Snapshot button in the device view toolbar.
- As with any other task, you can schedule repeating snapshots.
- You can also schedule or run snapshots onto groups of devices. To do so, click on the Schedule task... button in the main application toolbar.
- If the device supports the sending of specific SNMP traps or syslog messages whenever its configuration changes, and assuming the driver supports it too, then Netshot can detect the change and will schedule a snapshot to be automatically taken a few minutes later. The requirements:
- The device must be configured to send traps or syslog messages to Netshot.
- The SNMP trap receiver or the Syslog server must be enabled in Netshot.
You can write and execute custom scripts on a device (or a set of devices), to perform, for example, configuration changes. To open the run script dialog, click the Play button in the device toolbar.

The script must be written in JavaScript. It must contain a function called run, which will be the main entry point of the script. It receives two objects as arguments:
- The
cliobject purpose is to execute commands on the device (and collect outputs).-
cli.macro("name")executes a macro defined in the device driver (mainly used to switch to another CLI mode on the device). -
cli.command("command")executes the command on the device.
-
- The
deviceobject represents the device, and can be used to retrieve data (as collected by last snapshot).
Since Netshot 0.19, it is possible to define, in the scripts, custom parameters, which will be requested when executing the script. For example, consider the following script, for IOS devices:
const Input = {
    snmpLocation: {
        label: "Location",
        description: "E.g. FR - Toulouse",
        regExp: /[A-Z]{2} - .+/,
    },
    snmpContact: {
        label: "Contact",
        optional: true,
    },
};

function run(cli, device) {
    // Change SNMP location and contact
    const { snmpLocation, snmpContact } = cli.userInputs;
    cli.macro("configure");
    cli.command(`snmp-server location ${snmpLocation}`);
    if (snmpContact) {
        cli.command(`snmp-server contact ${snmpContact}`);
    }
    else {
        cli.command(`no snmp-server contact`);
    }
    cli.macro("end");
    cli.macro("save");
}
When running this script, Netshot will display a form so that the user can fill in values for snmpLocation and snmpContact parameters. These values will then be accessible in cli.userInputs object when the script is actually started.

The Load and Save buttons make it easy to store a script and re-execute it later.