![]()

![]()
![]()
![]()

This is a Go CLI (using Cobra) that automatically grabs the MP4 and VTT URLs from an Adobe Connect recording page, downloads them, merges everything together, and also spits out a nice .txt transcript and other metadata alongside the recording.
I wrote this because my university uses Adobe Connect to host lectures and store recordings, and for some reason you can only view recordings online, not download them. Given that I'm sometimes in places with no Internet access or terrible connectivity, I built this tool to solve my own (and my fellow students') woes so we can watch our lectures anywhere, any time.
For each Adobe Connect recording URL you give it, AdobeConnectDL will:
- 🔻 Locate the backing MP4 and subtitle (VTT) URLs from the recording page
- 📥 Download the recording and subtitles
- 🎛️ Embed subtitles into the video
- 🗂️ Extract and save:
- Transcript (
transcript.txt) - Chat log (
chat_log.txt) - Captions (
captions.vtt) - Attached documents (plus a
documents.txtindex) - Metadata (
metadata.json)
- Transcript (
- 📁 Put everything into a neatly named directory for that recording
-
Download the binary
Grab the binary from the releases page for your platform. ⬇️
I've embedded a copy of
MP4Boxfor most platforms, so you shouldn't need to install any external dependencies.macOS users: See Running on macOS below for instructions on running unsigned binaries.
-
Open the recordings list
For any lecture you want to download, go to the Adobe Connect recordings page (pictured below):

-
CRUCIAL STEP: open the specific recording
Click on the recording you want to download.
In your browser’s URL bar you should see something like:
https://your-domain.adobeconnect.com/recording-id/?session=YOUR_SESSION_TOKENThis is the URL you need to pass to
adobeconnectdl.
(If you use the generic list page URL instead, the tool won’t work.)
-
Run
adobeconnectdlFeed the recording URL into the CLI and let it do its thing:
❯ adobeconnectdl download "<https://acme.adobeconnect.com/p1a2b3c4d5e6/?&session=xyz123sessiontoken>" ╭──────────────────────────────────────╮ │ 🎬 adobeconnectdl dev │ ╰──────────────────────────────────────╯ INFO starting batch download count=1 INFO MP4Box located path=/usr/local/bin/MP4Box INFO download pool started workers=12 INFO processing recording 1/1 url="<https://acme.adobeconnect.com/p1a2b3c4d5e6/?&session=xyz123sessiontoken>" INFO downloading recording data via pool url="<https://acme.adobeconnect.com/p1a2b3c4d5e6/output/p1a2b3c4d5e6.zip?download=zip>" INFO downloading video via pool url="<https://cdn1.adobeconnect.com/static/recordings/10/123456789/9876543210?connect-return-url=https%3A%2F%2Facme.adobeconnect.com%2Fsystem%2Ferror-cas&key=AbCdEfGhIjKlMnOpQrStUvWxYz%3D¶m1=abc123xyz789&recording-version=1&ts=1765369691&sign=ZYXwVuTsRqPoNmLkJiHgFeDcBa%3D>" INFO video download: 5% (16.4/328.0 MB) recording=1/1 INFO video download: 10% (32.8/328.0 MB) recording=1/1 INFO video download: 15% (49.2/328.0 MB) recording=1/1 INFO video download: 20% (65.6/328.0 MB) recording=1/1 INFO video download: 25% (82.0/328.0 MB) recording=1/1 INFO video download: 30% (98.4/328.0 MB) recording=1/1 INFO video download: 35% (114.8/328.0 MB) recording=1/1 INFO video download: 40% (131.2/328.0 MB) recording=1/1 INFO video download: 45% (147.6/328.0 MB) recording=1/1 INFO video download: 50% (164.0/328.0 MB) recording=1/1 INFO video download: 55% (180.4/328.0 MB) recording=1/1 INFO video download: 60% (196.8/328.0 MB) recording=1/1 INFO video download: 65% (213.2/328.0 MB) recording=1/1 INFO video download: 70% (229.6/328.0 MB) recording=1/1 INFO video download: 75% (246.0/328.0 MB) recording=1/1 INFO video download: 80% (262.4/328.0 MB) recording=1/1 INFO video download: 85% (278.8/328.0 MB) recording=1/1 INFO video download: 90% (295.2/328.0 MB) recording=1/1 INFO video download: 95% (311.6/328.0 MB) recording=1/1 INFO video download: 100% (328.0/328.0 MB) recording=1/1 INFO downloaded path=.p1a2b3c4d5e6_temp.zip bytes=1048576 INFO extracting zip path="C:\Users\demo\Documents\Projects\AdobeConnectDL\Course ABC123 - Cohort X_0\raw.zip" INFO zip extracted path="C:\Users\demo\Documents\Projects\AdobeConnectDL\Course ABC123 - Cohort X_0\raw" INFO downloading documents via pool count=5 INFO downloading documents via pool count=5 INFO downloaded path=links.txt bytes=512 INFO downloaded path="ABC123_L12_Notes.pdf" bytes=450000 INFO downloaded path="ABC123_L12_Slides.pdf" bytes=475000 INFO downloaded path="ABC123_Reading_Pack.pdf" bytes=610000 INFO downloaded path="ABC123_L12_Activity.pptx" bytes=4470000 INFO downloaded path=.p1a2b3c4d5e6_temp.mp4 bytes=343597383 INFO embedding subtitles path="C:\Users\demo\Documents\Projects\AdobeConnectDL\Course ABC123 - Cohort X_0\captions.vtt" INFO subtitles embedded successfully INFO download complete title="Course ABC123 - Cohort X_0" location="C:\Users\demo\Documents\Projects\AdobeConnectDL\Course ABC123 - Cohort X_0" INFO video saved path="C:\Users\demo\Documents\Projects\AdobeConnectDL\Course ABC123 - Cohort X_0\recording.mp4" ✓ Saved recording "Course ABC123 - Cohort X_0" to C:\Users\demo\Documents\Projects\AdobeConnectDL\Course ABC123 - Cohort X_0 ━━━━━━━━━━━━━━━━━━━━━━━━━━━━━━━━━━━━━━━━ Download Summary: 1 successful, 0 failed 📊 Download Statistics: Total batch time: 17.359s INFO download pool stopped completed=7 failed=0


For each recording, you'll typically get a directory like:
- 🎥
recording.mp4– the final MP4 with subtitles baked in - 💬
captions.vtt– raw subtitles - 📝
transcript.txt– plain-text transcript - 🗨️
chat_log.txt– chat window contents with names & timestamps - 📄
documents/– any attached documents from the session - 📑
documents.txt– quick index of attached documents - 🧾
metadata.json– assorted recording metadata - 🔍
raw.zip/raw/– original Adobe Connect assets (FLV/XML etc.), if you want to poke at them
With Apple Silicon, macOS became much stricter about running unsigned binaries. Since AdobeConnectDL is not signed & notarised with an Apple Developer certificate, macOS will block execution by default.
If you try to run the binary, you'll see an error like:
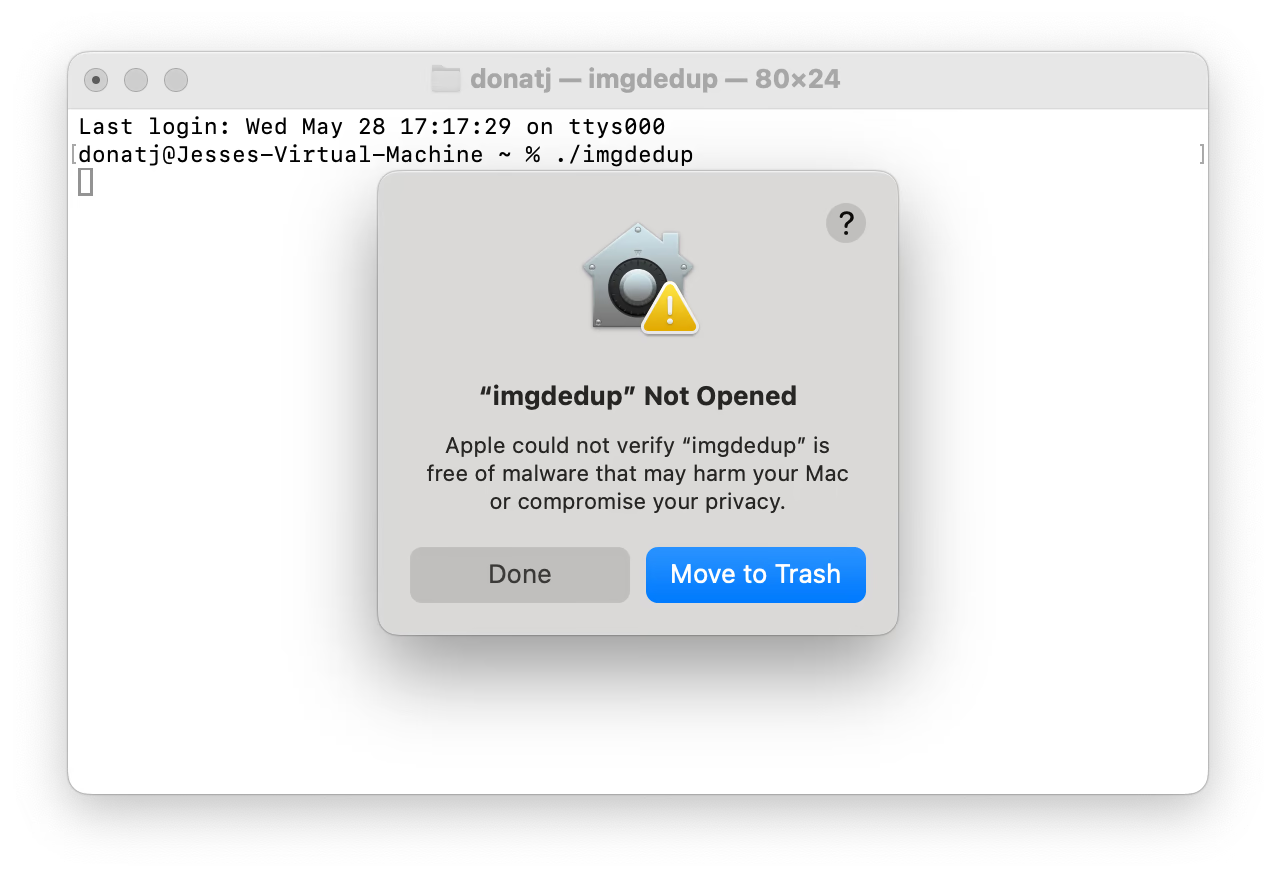
Apple could not verify "adobeconnectdl" is free of malware that may harm your Mac or compromise your privacy
Instead of offering any help, macOS simply offers to move the binary to the trash. Very frustrating!
The cleanest solution is to add Terminal (or your favourite TTY) as a system Developer Tool. This allows it to run any unsigned binary without issues.
Step 1: Open System Settings and search for "developer". Click Allow applications to use developer tools in the sidebar. If Terminal is not listed, click the + button:

Step 2: Search for Terminal in the file dialog and select it:

Step 3: Ensure the toggle next to Terminal is enabled:
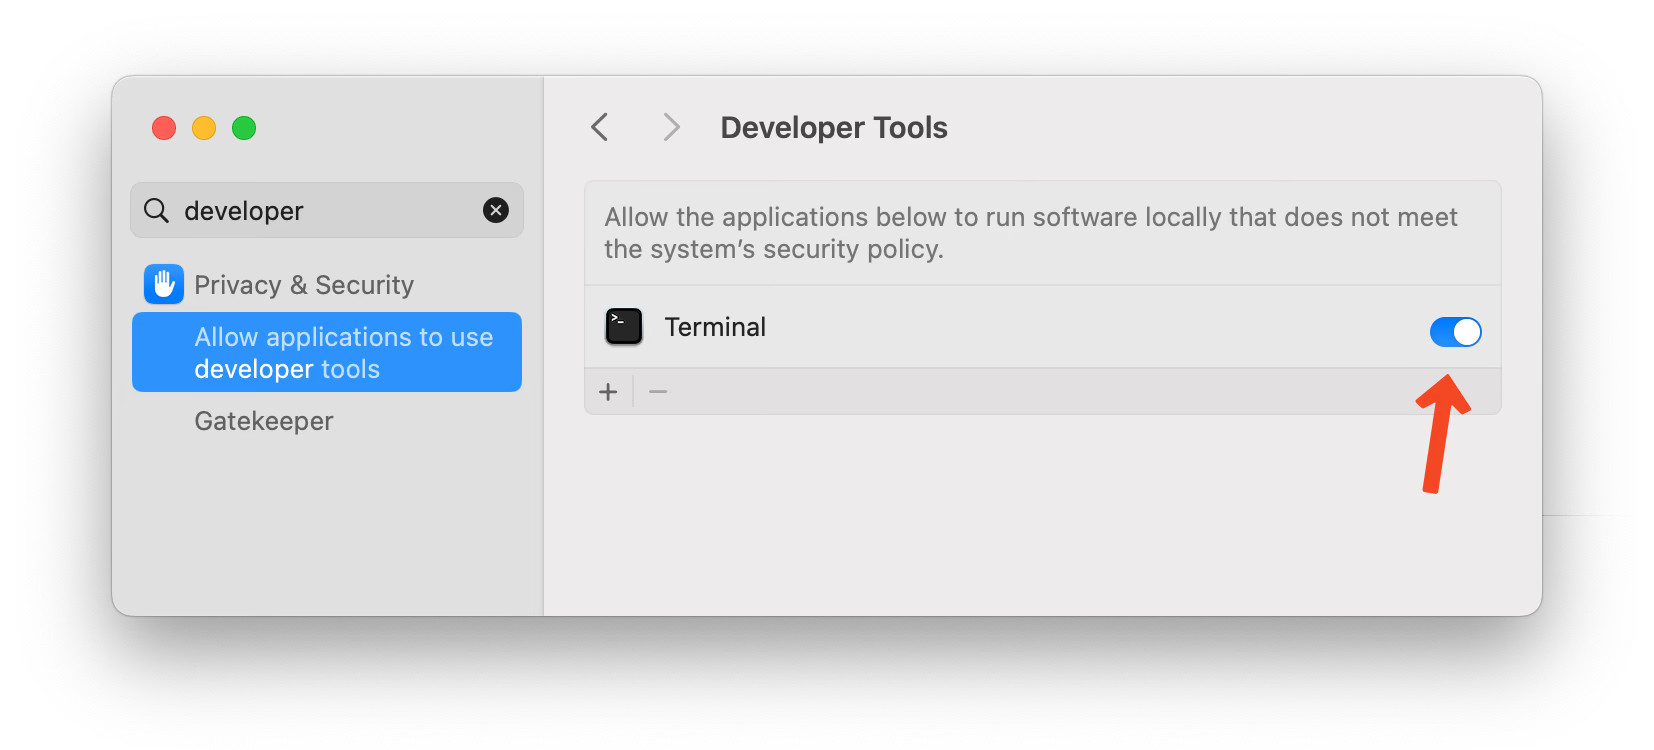
Step 4: Restart Terminal and everything should now work:
You can now run any unsigned binary from Terminal without issues!
Screenshots & text courtesy of Jesse Donat (CC BY-SA 3.0)
If you prefer not to enable developer tools globally, you can remove the quarantine attribute from the binary:
# Remove quarantine from the binary
xattr -dr com.apple.quarantine /path/to/adobeconnectdl

# Optional: self-sign the binary
codesign -s - --deep --force /path/to/adobeconnectdl- Go to Finder > Applications (or wherever you placed the binary)
- Right-click on
adobeconnectdland choose Open from the context menu - In the dialog, click Open
- On macOS 15 (Sequoia) and above, you may also need to go to System Settings > Privacy & Security and click Open Anyway
After any of these steps, the binary should work normally.
AdobeConnectDL uses Go's native HTTP client with concurrent downloads enabled by default for optimal performance. I ran some benchmarks and apparently 12 concurrent workers achieve the best throughput irregardless of network speed. (I also tried testing aria2/curl/wget and the difference between all of them was marginal, with aria2 coming close to native performance).
By default, AdobeConnectDL downloads the MP4, ZIP, and all documents concurrently using 12 workers:
# Concurrent download (default, fastest)
adobeconnectdl download "https://..."

# Sequential download (one file at a time)
adobeconnectdl download --sequential "https://..."By default, the tool will prompt before overwriting existing directories. Use -y to skip the prompt:
# Overwrite without prompting
adobeconnectdl download -y "https://..."There are basically two ways to download Adobe Connect recordings:
-
Direct MP4 & VTT extraction (what AdobeConnectDL uses)
Parse the lecture recording HTML/JavaScript, pull out the MP4 and VTT URLs, and download them directly. -
“Raw assets” ZIP + reconstruction (the painful way)
Download a ZIP file containing all the original Flash Video (FLV) chunks and XML files, then try to reconstruct the timeline from that.
I originally explored option 2 (and so did Codex). It turns out that trying to combine several randomly ordered FLV files into a single mp4 is... not fun.
However, that ZIP does contain some useful extra data: the transcript with unanonymised names and timestamps for the chat window, plus various session metadata and attachments. That’s why the tool still downloads and keeps those raw assets, as they’re handy for preserving captions, chat logs, transcripts, attached documents, and so on.
Since Adobe Connect already provides an MP4 stored in S3 anyway, I found it far easier to:
- Use the MP4 as the canonical recording
- Pull subtitles, chat logs, transcripts, and documents from the raw assets
- Embed the subtitles into the MP4
This gives you a single, portable video file plus all the sidecar data you might want for later processing or archival.