Project Goal
The goal of this project is to test our ability to gather information from a real-world and use our knowledge of statistical analysis, classification and transfer learning to solve a problem that would be difficult or impossible to solve directly using traditional ML methods.
- Python 3.5
- OpenCV
The COCO dataset consists of 80 labels, including, but not limited to:
- People
- Bicycles
- Cars and trucks
- Airplanes
- Stop signs and fire hydrants
- Animals, including cats, dogs, birds, horses, cows, and sheep, to name a few
- Kitchen and dining objects, such as wine glasses, cups, forks, knives, spoons, etc. …and much more!
Our project mainly consists of directories and Python scripts. The directories (in order of importance) are:
- yolo-coco/ : The YOLOv3 object detector pre-trained (on the COCO dataset) model files. These were trained by the Darknet team.
- images/ : This folder contains four static images which we’ll perform object detection on for testing and evaluation purposes.
- videos/ : After performing object detection with YOLO on images, we’ll process videos in real time. This directory contains four sample videos for you to test with.
- output/ : Output videos that have been processed by YOLO and annotated with bounding boxes and class names can go in this folder.
We are reviewing two Python scripts — yolo.py and yolo_video.py . The first script is for images and then we’ll take what we learn and apply it to video in the second script.
YOLO object detection in images
Let’s get started applying the YOLO object detector to images!
All you need installed for this script OpenCV 3.4.2+ with Python bindings. You can find OpenCV installation tutorials here, just keep in mind that OpenCV 4 is in beta right now — you may run into issues installing or running certain scripts since it’s not an official release. For the time being I recommend going for OpenCV 3.4.2+. You can actually be up and running in less than 5 minutes with pip as well.
First, we import our required packages — as long as OpenCV and NumPy are installed, your interpreter will breeze past these lines. Following are the command line arguments include:
- --image : The path to the input image. We’ll detect objects in this image using YOLO.
- --yolo : The base path to the YOLO directory. Our script will then load the required YOLO files in order to perform object detection on the image.
- --confidence : Minimum probability to filter weak detections. I’ve given this a default value of 50% ( 0.5 ), but you should feel free to experiment with this value.
- --threshold : This is our non-maxima suppression threshold with a default value of 0.3 . You can read more about non-maxima suppression here.
Our args variable is a dictionary containing the key-value pairs values.
After we load our class labels and set random colors for each. To load YOLO from disk, we’ll take advantage of OpenCV’s DNN function called cv2.dnn.readNetFromDarknet . This function requires both a configPath and weightsPath which are established via dictionary.
Let’s load the image and send it through the network:
- Load the input image and extract its dimensions.
- Determine the output layer names from the YOLO model.
Once our blob is prepared, we’ll
- Perform a forward pass through our YOLO network
- Show the inference time for YOLO
For bounding box lists include:
- Boxes : Our bounding boxes around the object.
- Confidences : The confidence value that YOLO assigns to an object. Lower confidence values indicate that the object might not be what the network thinks it is. Remember from our command line arguments above that we’ll filter out objects that don’t meet the 0.5 threshold.
- ClassIDs : The detected object’s class label. YOLO does not apply non-maxima suppression for us, so we need to explicitly apply it.
Applying non-maxima suppression suppresses significantly overlapping bounding boxes, keeping only the most confident ones.
NMS also ensures that we do not have any redundant or extraneous bounding boxes.
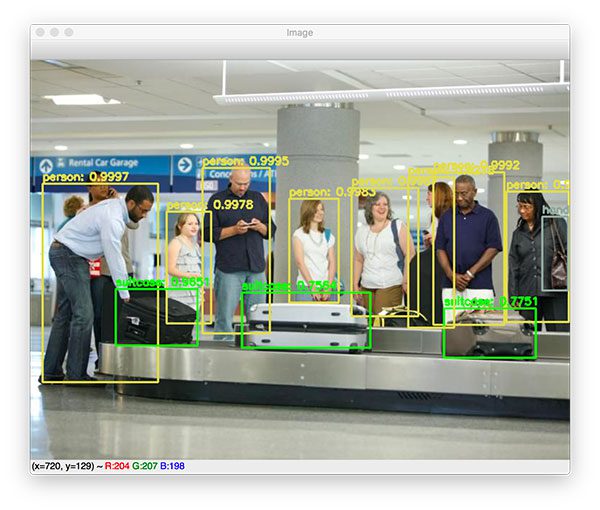
Taking advantage of OpenCV’s built-in DNN module implementation of NMS, we perform non-maxima suppression. All that is required is that we submit our bounding boxes , confidences , as well as both our confidence threshold and NMS threshold. Then, we simply draw the bounding box and text on image using our random class colors. Finally, we display our resulting image until the user presses any key on their keyboard (ensuring the window opened by OpenCV is selected and focused).
YOLO object detection in video streams
