University of Pennsylvania CIS 566 Fall 2022, Final Project
- Megan Reddy, Nick Moon, and Sakshi Rathore
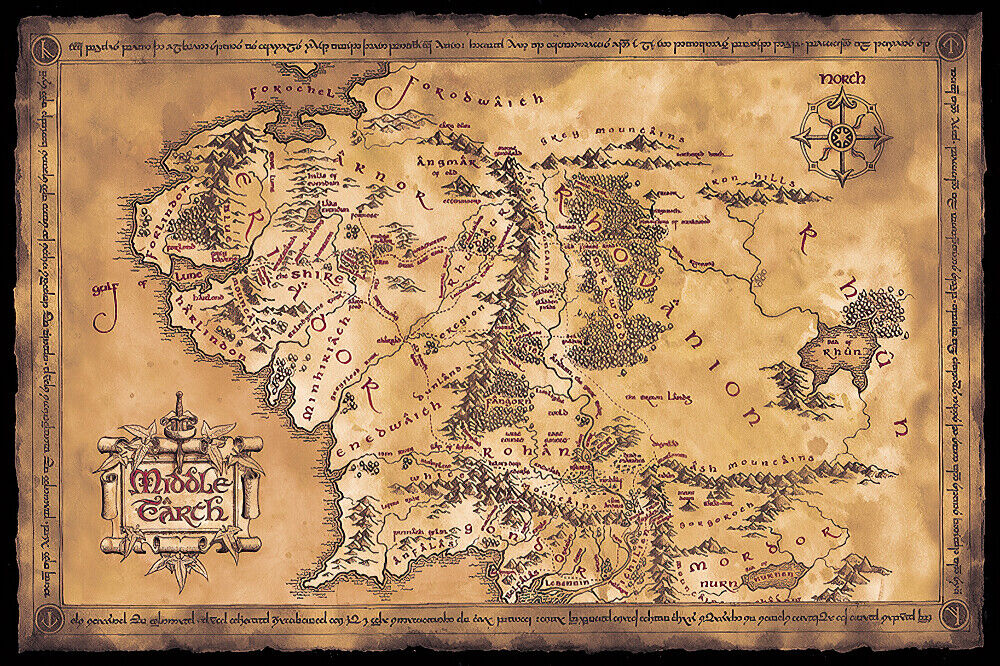
Many fantasy books, movies, and games include a hand-drawn map describing the features of the fictional world. The art style is often influenced by historic medieval cartographic practices and the author's own vision. Our tool is inspired by such maps. For this project our main goal was to develop a tool for visualizing and creating these maps procedurally. Our tool allows users to envision their own world by defining key landmarks and autogenerating the rest of the world automatically in a way that is stylistically and artistically cohesive and similar to these much beloved fantasy maps.
This tool is implemented in Unity 3D. You can try our tool here!
Additionally, you can view our presentation slide deck here.


Introduction
Many fantasy books, movies, and games include a hand-drawn map describing the features of the fictional world. The art style is often influenced by historic medieval cartographic practices and the author's own vision. We would like to develop a tool for visualizing and creating these maps procedurally. We want to allow users to be able to envision their own world by defining key landmarks and autogenerating the rest of the world automatically in a way that is stylistically and artistically cohesive and similar to these much beloved fantasy maps.Goals
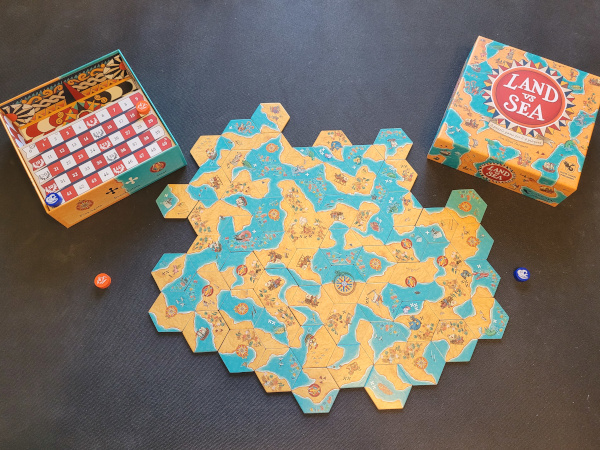
We intend to produce a 2D hexagonal fantasy map generator using Wave Function Collapse in the Unity game engine. We plan to render our procedurally generated map data in the style of the references below.Inspiration/Reference


Specification
- 2D Wave Function Collapse: Implementation of the Wave Function Collapse algorithm
- Hexagonal Tiles: Use hexagonal tiles for the WFC map generation
- Non-photorealistic Rendering: Rendering of assets using shaders that provide features like cross-hatching, paint splotches, and outline generation
- Interactivity: Manual seed placement or autoregeneration of map
Techniques
- 2D Hexagonal Grid made up of 6-sided tiles with a map terrain feature type on each edge of a tile. Each tile has a color mask that defines the feature types that can occupy the tile over its domain.
- Wave Function Collapse to place tiles in the grid based on rules that define what tiles edges can be placed together (i.e. we will only connect two tiles if the neighboring edge is the same feature type like water).
- For rendering, we plan to use common NPR concepts such as cross-hatching, paint splotches, and outline generation. We will most likely write these as Unity shaders. Additionally, we may add post-process render passes for adding rivers, roads, labels, compass, torn edges, and sea monsters.
- Unity built-in modules for cursor-based selection and GUI rendering
Design

Timeline
- Everyone
- Learn Unity scripting and shading
- Understand and design approach to Wave Function Collapse Algorithm
- Nick & Sakshi
- Basic Asset Creation (i.e. basic combination of sea, shore, and land tiles)
- Creation of hexagonal grid and tiles
- 2D Hexagonal Wave Function Collapse development
- Megan
- Shade based on color map from 2D hexagonal tiles in Unity
- Initial prototype of NPR post-process techniques in Unity
- Research and prototype how to represent advanced features on tiles (mountains, forests, etc.)
- Everyone
- Polish leftover features from the previous milestone
- Asset creation and polish (more advanced terrain and sea features such as mountain ranges, forests, lakes, castles, etc.)
- Nick
- More post-processing filters (roads, rivers, labels, compass, etc.)
- Sakshi
- UI features and tooling - clear canvas, regeneration of map, and inventory to select tiles
- Megan
- Continue working on shaders for extra features (mountains, forests, lakes, antique painterly look, etc.)
- If time permits
- Inifinite map generation :O
- Extra shader types (e.g. Lord of the Rings or Narnia style)
- Everyone
- Polish leftover features from the previous milestones
- Polish assets and add any extra visual features
- Finish UI
- Look into ways to publish project online (live demo)
- Finalize README and presentation
Basic assets
We started the project with basic assets that are hexagonal textures. Any edge of a tile may be associated with just one feature. Each feature on a tile is identifiable by a color. The idea is that these textures define the space that any feature encompasses on a tile, and not the end look( which would be achieved in post-processing).
Initially we had just 2 features - land & water. There are tiles for each feature with all edges belonging to that same feature, and there are 5 tiles for any 2 features that interface with eachother. Later on we added mountains (as you will see below). We ended up with 13 tiles in all.
3 features - land(green), water(blue), mountains(brown)

Hexagonal Grid and Tiles
Tile
A Tile is a pointed hexagon prefab that has a texture applied to it. Every Tile stores the edge map specific to that tile. An edge map stores which feature each edge maps to and is generated procedurally at run time using texture lookup.
Cell
A Cell is a placeholder for a Tile in the grid. A Cell also stores information to aid the Wave Function Collapse algorithm such as, whether the cell collasped, list of compatible tiles that could fill the cell, index of the cell in the grid, etc.
Grid
We setup a grid in Unity composed of Cells. Every other row of Cells is offset in order to properly tesselate the hexagon grid pattern. The grid also holds values used in the Wave Function Collapse algorithm like, number of cells collapsed and functions that access or modify multiple cells.
Creating a grid and filling it with random tiles

Some references we used: Catlike Coding Hex Grid, Red Blob Games Hexagonal Grid
Wave Function Collapse
Entropy: Entropy of a cell is the total number of tiles that could be placed in the cell, while maintaining the neighboring cells' constraints. The available tiles start as all the tiles. As cells collapse, the entropy starts to decrease and incompatible tiles are removed from the available tiles list.Collapse: A cell is collapsed if it contains an instance of a tile. The goal is to collapse all cells. Thus, once a cell is collapsed, its entropy is set to a very large value so that it does not impact the search for cells with minimum entropy.
Propagate Entropy: This happens after a cell collapses. As part of propagate, we update the avaiable tiles list for each neighboring cell of the collapsed cell. Once the tile list is updated, the cell's entropy is updated to the size of the tile list. Generate Seeds
We start with placing random seeds on the grid, i.e. collapse some random cells with random tiles. Then we propogate the entropy from the seeds.
Main loop
- Get cells with minimun entropy.
- For each of those cells, pick a random tile from the list of available compatible tiles.
- Collpase the cell with the picked tile.
- Propagate entropy accross the grid.
- Break if all cells are collapsed.
This is a grid filled with the inital 7 tiles using the Wave Function Collapse Algorithm. Number of seeds = 5

This output is after we added procedural rotation to the 7 inital tiles (resulting in 42 total tiles). Number of seeds = 10

We wanted to extend the implementation to more features, so we introduced mountain tiles. For this we just added 7 new textures and prefabs, and a new feature color value in the lookup.

During this process we noticed some holes appearing in our output. Upon analysis we noticed the following 2 possible enhacements to get rid of these artifacts:
- Added more assets for special cases like rivers, etc.
- Adding backtracking to our WFC implementation to avoid a case where a cell has no possible tile it could pick.
Another feature step we would like to implement is adding probability to our features & tiles. We noticed the output right now is more or less a uniform distribution of each feature. As this is undesireable for the look we want, adding varied probability should help us get larger landmasses and oceans.
Rendering Prototype
The rendering work for this milestone can be found in the "Milestone_1_Rendering" branch. The basic rendering process consists of three passes to get the desired output. Although the order of these passes may change, the current sequence is:
1. Color pass
2. Asset pass
3. Edge/Outline pass
The Wave Function Collapse algorithm will output a grid with colored hexagonal tiles. Each color serves as an ID representing distinct terrain features such as land, water, mountains, forests, etc. The color pass will take these ID colors and map them to the desired output color for that feature. The asset pass will scatter assets in designated areas according to color (e.g. a brown area indicates mountains in which several mountains will be scattered). The outline pass will draw outlines around each feature.
Unity Setup
Step 1. Create basic grid setup and camera for rendering
I started by creating a new Unity project so that I could test out rendering techniques without affecting the main Wave Function Collapse project. Using the basic assets (tiles) we created, I manually placed and constructed a hexagon grid for testing the post-process effects. Since the post-process effects would operate on a camera, I created a new Orthographic camera called "Top Down Camera" so that I could attach any scripts and shaders I made to it.

Step 2. Create post-process script and setup color pass shader
In order to apply a post-process effect to the camera image, I needed a script that would tell the camera to pass the output image through a shader before rendering the result to the screen. To do this, I made a very simple script that sends the camera output to a shader, and then sends the result to the screen. To see if this worked, I created a new shader that would take the base color of the tiles and apply FBM to it.

Step 3. Create edge/outline shader
Now that one shader was setup, I added another shader to test outlines. I created a basic Sobel filter that would create outlines based on color differences within an image.

Step 4. Execute both shaders at the same time
After I got each individual shader working, I tested them together. Each shader is executed sequentially and uses the output of the previous shader as its input. In this case, the output of the color pass will be used as the input to the edge pass. This was a critical step because our pipeline depends on the ability to execute multiple passes at once. The look of the Unity shaders will be refined more in the following milestone, but the infrastructure is in place to handle multiple effects at once.

Shadertoy Prototype
I made a Shadertoy prototype to further experiment with different looks and algorithms without worrying about the Unity shader interface. I mimicked the shader pipeline that I had setup by using different Buffers. The shader can be viewed here.
Step 1. Color output from Wave Function Collapse
Buffer A outputs a possible result from the Wave Function Collapse algorithm. In our setup, green areas are land, blue areas are sea, and brown areas are mountains. The brown areas are not meant to show up in the final rendering; they are simply a mask to indicate where we should scatter mountain assets.

Step 2. Grid pass
In order to randomly place assets within an area, I first split the screen into a uniform grid using fract(GRID_SIZE * uv). I used an approach similar to stratified sampling in path tracing and to the grid layout described in this Art of Code tutorial. Modifying the grid size will control the density of assets placed in the masked areas.

Step 3. Uniformly sample grid
To start, I placed one sample in the center of each grid cell. Each of the circles is an SDF, which I am planning to use to procedurally draw the assets for the next milestone.

Step 4. Stratified sampling of grid
Instead of placing the sample in the cell center, I jittered the position using a 1D noise function to create a more organic look.

Here is the same result without the grid lines:

Step 5. Constrain to masked areas
Now that the samples were randomly placed, I needed to constrain them to the desired areas. I have implemented the naive way of doing this, which simply looks at the base color, decides whether or not it matches the mask color, and places a circle SDF there if it does. I am trying to figure out a more advanced way of doing this, since it cuts off portions of the SDF that lie outside of the mask. The desired output would finish drawing those pieces, even if they are out of bounds. My first solution was to iterate through each cell's neighbors and add the SDF contribution from the neighboring cells. This worked, but when I added the mask back in, the cutoff problem persisted.

Step 6. Coloring and outlines
Here are some example outputs with more interesting coloring and outlines. The color and outline passes are the same as the ones in Unity. The main difference is that this outline pass operates on a greyscale version of the image, to create black outlines instead of colored outlines.
In the next milestone, these circles will be replaced with more advanced assets and shapes that represent actual terrain features.


Observations & Next steps
For the next milestone, I will first focus on porting the Shadertoy prototype to my Unity setup. Then, I will work on refining each of the post-process effects and asset drawings. This includes creating SDFs for mountains, forests, and a compass, as well as refining the color and edge passes to include more effects from our reference images. Some effects I hope to incorporate are the burnt-edge look, the hatching next to coastlines, and an erosion effect to create a smudged/painterly paper look.
Assets
In this milestone we added another feature for forests, which interfaces with the land feature only (much like the mountain feature).
We also changed the colors we used for our textures to use colors that were as distinct from each other as possible, to avoid artifacts in the post-process rendering steps.
4 features - land(green), water(blue), mountains(red), forests(yellow)
(Sakshi)

Wave Function Collapse
Backtracking (Nick & Sakshi)
As mentioned in the observations and outputs of Milestone 1, we were seeing some scenarios where we end up with holes. To avoid this, we implemented a simple backtracking method that checks ahead for one level of propagation before making a decision. This method seems to works for majority of the scenarios.
WFC logic with backtracking:
- Get cells with minimun entropy.
- For each of those cells, pick a random tile from the list of available compatible tiles.
- Before collapsing the cell, check if using the picked tile will make any of the neighboring cells' entropy 0.
- If yes, pick a different random tile from the list of available compatible tiles.
- If no, collpase the cell with the picked tile.
- Propagate entropy accross the grid.
- Break if all cells are collapsed or if we've retried picking a random tile a certain number of times.
Output with backtracking, 4 features and randomly generated seeds. Number of seeds = 5

Our current backtracking solution still doesn't solve all problems and we do sometimes end up with an uncollapsable grid. This happens in situations where there is a need for a tile that does not exist (e.g., a tile with both mountain and forest edges). We do not intend to fix this by adding the "missing" tile assets, as we do not want to such interfacing between features to exist on the map.
We plan to use a brute force solution to get by this issue, for example - placing a tile (that may not match the constraints) to update the entropy of the grid so that the WFC can resume to collapse the whole grid.
Tile Weighting (Nick & Sakshi)
One big addition to the Wave Function Collapse made for this milestone was a tile weighting system. Now, each tile is assigned a weight, integer value greater that 0, and that weight is used when determing which tile to pick of the available tiles while collapsing a cell. For example, if all tiles default to weight 1, and the 6 sided land tile is given weight 100, then that will be 100x more likely to be picked as a tile to collapse into during the WFC loop. The way a tile is picked now utilizes an algorithm to the lottery scheduling algorithm taught in OS classes, where a total weight of all available tiles is computed, an rng number is generated in the range 0 to the total weight, and the tiles are looped over, adding their weight to the accumulated sum. If the addition for a tile causes the accumulated sum to go over or equal the random number, then the tile is picked. This ensures that tiles with more weights will have appropriately a higher chance of being picked.
Coastline tiles have a much higher weight that the rest of the tiles:

A large river or sea is generated with high weighting for 6-sided land and ocean tiles:

Island map is generated giving really high weighting to 6-sided land and ocean tiles:

Plausible looking coastline is generated giving really high weighting to 6-sided land, ocean, mountain, forest tiles:

User Interface
Placing seeds (Sakshi)
To add some interactivity, we let the user place tiles as seeds for the WFC. The user can use the mouse by clicking & draging to populate the grid cells with tiles of any of the 4 features. The user can cycle through the tiles by clicking on the active seed tile preview on the upper right corner or by pressing tab on the keyboard.
Once the user is satisfied with the seed placements, they can start the WFC by pressing enter on the keyboard.
seeds.mov
Restart and Clear Buttons (Nick)
Buttons were added in this milestone as GUI elements for the tool. These are made using the UIDocument Unity feature, and expose two functions to the user: Restart and Clear. Clear empties the wave function collapse and grid, and thus results in a blank screen that the user can then paint different seeds onto. The Restart button restarts the wave function collapse algorithm with the same seeds, but due to the RNG nature of the algorithm and the possible tiles to place, generates a new board. Alternatively, if no seeds have been manually placed by the user, the button instead also regenerates the seeds randomly each button press.
The "Restart" and "Clear" buttons used in the Game mode:

The UI Document viewer and editor inside Unity:

Rendering Updates
This milestone, we worked on porting the first milestone's Shadertoy work to Unity, polishing the color and edge post-processes, and working on asset placement and rendering.
During the first milestone, I made a Shadertoy protoype to test how each post-process pass would interact with each other. The shader can be viewed here. Once this was finished, I integrated it into the basic Unity shader setup I had created for Milestone 1. After integration, the initial result looked like this:
The color matching was quite off in the initial run. In order to assign a color to a fragment, I checked to see how similar the fragment color was (by using a distance metric) to each feature color (light green, light blue, brown, and dark green). If it matched, then I would assign the appropriate map color to that fragment. Since I was using a distance metric, some fragments matched to multiple colors since the mathematical distance could be close even if they were visually different. To fix this, we made the Wave Function Collapse tile colors drastically different (red, yellow, green, blue) so that they would not overlap much when using the distance metric. This made the result a lot cleaner:

Another minor detail I fixed was the screen-space coordinate calculation in the shaders. Beforehand, the uv calculation was causing the objects to look "stretched" onscreen.

Here is the result after the fix:
 Most of the core functionality of these shaders was in place during Milestone 1, however, there are a couple of key updates that I made to the look. The largest update was the tile color and ID matching described above, which helped make the render much cleaner. The second is that the edge post-process skips any areas that are designated as "mountain" or "forest" since we do not want these areas to be demarcated. Unfortunately, there is still a thin outline at the boundaries of these areas since it is hard to properly detect the fragment's color ID at transition zones.
The last area I worked on was updates to the asset placement and mountain rendering. The main issue I saw from Milestone 1 was that assets were being cut off when they went outside of the masked area. There were two solutions I thought of to this problem: cull the mountains that were too close to the edges or continue drawing outside of the boundaries. For the first approach, I did another edge pass to determine the boundaries of the masked areas, then culled all the assets that were within some distance from the boundary. Unfortunately, this still led to some assets being cut off. For the second solution, I attempted to take each local random grid cell point I was drawing at and convert it to a global coordinate relative to the bounds of the screen. If the point fell within the mask, I would draw an asset at that global point. This worked to some extent, but there are still some bugs I have to resolve. Therefore, I left the current scheme as is (with the cut offs) until I work out a better solution.
For the mountain asset, I created a new Shadertoy to test out the look and placement. The body of the mountain is an equilateral triangle centered at a point p. The center point p will be the global coordinate described above. Once we know p, we can calculate the distance to each vertex, which we can use to find vertices A, B, and C of the triangle. All fragments that lie to the left of p.x are in shadow, whereas fragments that are to the right of p.x are illuminated. To create the central ridge, I added a slight sine-wave jitter to p.x. I noticed that points closer to the ridge are more in shadow than points farther away, so I added a gradient from right to left on the shadowed part of the ridge. The outlines on the top two edges of the triangle are created with line segment SDFs from Inigo Quilez. The Shadertoy can be viewed here.
Shadertoy prototype:
Most of the core functionality of these shaders was in place during Milestone 1, however, there are a couple of key updates that I made to the look. The largest update was the tile color and ID matching described above, which helped make the render much cleaner. The second is that the edge post-process skips any areas that are designated as "mountain" or "forest" since we do not want these areas to be demarcated. Unfortunately, there is still a thin outline at the boundaries of these areas since it is hard to properly detect the fragment's color ID at transition zones.
The last area I worked on was updates to the asset placement and mountain rendering. The main issue I saw from Milestone 1 was that assets were being cut off when they went outside of the masked area. There were two solutions I thought of to this problem: cull the mountains that were too close to the edges or continue drawing outside of the boundaries. For the first approach, I did another edge pass to determine the boundaries of the masked areas, then culled all the assets that were within some distance from the boundary. Unfortunately, this still led to some assets being cut off. For the second solution, I attempted to take each local random grid cell point I was drawing at and convert it to a global coordinate relative to the bounds of the screen. If the point fell within the mask, I would draw an asset at that global point. This worked to some extent, but there are still some bugs I have to resolve. Therefore, I left the current scheme as is (with the cut offs) until I work out a better solution.
For the mountain asset, I created a new Shadertoy to test out the look and placement. The body of the mountain is an equilateral triangle centered at a point p. The center point p will be the global coordinate described above. Once we know p, we can calculate the distance to each vertex, which we can use to find vertices A, B, and C of the triangle. All fragments that lie to the left of p.x are in shadow, whereas fragments that are to the right of p.x are illuminated. To create the central ridge, I added a slight sine-wave jitter to p.x. I noticed that points closer to the ridge are more in shadow than points farther away, so I added a gradient from right to left on the shadowed part of the ridge. The outlines on the top two edges of the triangle are created with line segment SDFs from Inigo Quilez. The Shadertoy can be viewed here.
Shadertoy prototype:

Unity render:

Forest assets were prototyped in ShaderToy, based off the mountain asset creation file. The trees are made using the egg sdf and the uneven capsule sdf from Inigo Quilez. The outline of the trees is generated based on the value of the sdf within the negative value space of the function: if a position has a negative value above a threshold, it is made a dark grey color. Otherwise, if the SDF value is negative and not an outline case, the trees have a hard-coded shading based on the x value of the position. Positions on the right relative to the center position of the SDF inherit the background color, while positions on the left gradually fade to dark grey based on distance from the center.
ShaderToy prototype of the tree assets:
The tree assets used in Unity on the map where the forest tiles are.

Bug Fixes
Some of the bugs we fixed in this milestone are:- Asset cutoff issue:
Previously, assets were being cutoff at mark boundaries. To fix this issue, we changed the calculation of the asset position and added an extra check to ensure that the center point of the asset is contained within the mask. With these additions, the assets that go beyond the boundary edge are fully drawn. - Seed generation accounts for tile weights:
Earlier, the seeds were being picked randomly from the processed list of tile prefabs. This did not account for the weights associated with the tile. The weighting system affected only the tile selection in the WFC logic. Now, we account of the weights of the tile when picking input seeds for WFC as well. - Issues with Clear button:
We fixed a bug that did not clear all the seed tiles placed by the user manually (using the clear button) after the restart button was used.
Asset Updates
We cleaned up the basic assets to make the lines more organic and continuous. This changed the look of the output to be more smooth. In addition, we included tiles for rivers, i.e., tiles with 2 water edges not adjacent to each other. We included a way to enable & disable the river tiles in the output using the UI.
Rendering Updates
For this milestone we worked on polishing the basic shaders as well as adding some more post-process effects.Coastline Hatching
In our reference images, we noticed that the coastline contours have a horizontal hatched line effect. In order to create this effect in the shader, we used the mod operation to create horizontal lines across the entire screen, and then masked out the areas that we did not want to be affected by the contours. We used the sobel filter with a thick radius to create this mask and perturbed it using FBM so that the contours would be of varying lengths. Any area that was not within this mask and not above water, would not receive contouring. Additionally, we mixed the contour color with worley noise to create a more hand-drawn look.
Animated Water
 The water feature of the map was animated using a post-process. Before the addition of animation, the procedural water texture simply looked like this static image:

The water is animated using a sine function based on time, as well as fractal brownian motion and multiple time, amplitude and phase offsets to get the motion. To have the white water waves repeating, the result of the fract function using this animated sine function is compared with line width and repeat variables. Then, a series of worley noise and FBM layer on top of each other to get a more heterogeneous look to the coloring and fading of the water texture.
Compass
The compass was created with 2D SDFs. Specifically, we used isosceles triangles to represent the directions and circles for the center & other larger shapes. We also used a 2D rotation matrix to correctly orient and place the SDFs around the center circles. The compass is positioned relative to the right edge of the map frame to ensure it does not go out of view.
Map Frame
Every reference map we saw had a frame that adds to the look of the map. To bring that same aesthetic to our tool, we wanted to add a frame. Our frame is made using 2D SDFs for the outlines and FBM for the rough edges. We included some layered FBM to give the borders a weathered look based on the distance from the center of the screen as well as the distance from the screen edges. The placement of the frame is relative to screen size. |
 |
 |
 |
UI Updates
Some UI additions are as follows:- Number of seeds input
- Sliders to control the weights of land, water, coastline, mountain, forest and river tiles. All slider values range from 1 - 200 (except river, which ranges from 0 - 50, so you can choose to have no rivers in your scene).
- Press Space bar to toggle UI
- Press C key to enable free camera movement
- Press and hold Middle mouse button to pan the camera while in free camera mode
- Scroll the Middle mouse button to zoom the camera in and out while in free camera mode
Camera
The camera is able to be controlled when the "free camera" toggle is enabled (i.e. by hitting "C" key). This allows for panning and zooming the camera. This level of control is especially appreciated when the grid size of the map is enlarged to enable traversal of a procedurally generated large-scale land mass.Zoomed out image of a large map:

Zoomed in image of a large map:

Publishing to Unity Play
We built and published our project to Unity Play as a WebGL app, which can be viewed live and played in-browser here. This WebGL version runs a bit slower than our local Unity build, but still includes the full functionality of our tool. The deployment process was simple; we installed the WebGL Publisher package in Unity and then used this to build and run our application. Once this step was completed, we published to Unity Play using the "Publish" tab in the Unity editor.Overall, we really enjoyed working on this project. In the end, we accomplished all the main goals we set out from the beginning including
- hexagonal Wave Function Collapse,
- non-photorealistically rendered map, and
- basic user interactivity
We planned out our tasks and goals for each milestone, which helped the project progress smoothly. Additionally, each person was given clear tasks which allowed us to make good progress in both the WFC and the Rendering parts of the project simultaneously. We maintained a task board throughout which made project management easy and kept everyone up to speed with the progress. For the most part, we did not pivot from the development plan we set out with. Though there are still a lot of ideas, features and feedback we would have liked to implement, we are still happy with what we have accomplished within the time frame of the project.
Some of the features we would like to implement as we continue to work on this project are:
- Options to select from various artistic map styles.
- Better backtracking for the WFC.
- More assets and features such as - castles, villages, roads, sea monsters, etc.
- More geographically accurate feature/biome placement.
- Advanced interactivity, e.g. infinite map generation based on the camera movement.
Catlike Coding Hex Grid Tutorials
Red Blob Games Hexagonal Grid Tutorial
Wave Function Collapse by Robert Heaton
Wave Function Collapse by Maxim Gumin