- Tự động điền ngôn ngữ, múi giờ, layout bàn phím
- Tự động nhập tên người dùng, mật khẩu Administrator (User: Administrator; Password: admin)
- Tự động chia phân vùng ổ đĩa, chọn ổ cài đặt, bỏ qua màn hình OOBE (Out-of-box experience)
- Tự động tham gia domain, cài đặt drivers, chạy scripts sau khi cài
- Chuẩn bị USB bootable với Windows ISO.
- Gắn USB và copy file
autounattend.xmlvào thư mục gốc (root) của USB — không đặt trong thư mục con.
Cấu trúc thư mục USB nên như sau:
USB:\
├── autounattend.xml
├── setup.exe
├── sources\
├── boot\
- Boot máy từ USB.
- Quá trình cài đặt Windows sẽ tự động đọc file
autounattend.xmlvà bắt đầu cài đặt mà bạn chỉ cần ngồi rung đùi chờ.
- Bung (extract) file ISO của Windows ra một thư mục trên máy tính.
- Copy file
autounattend.xmlvào thư mục gốc của ISO đã bung (thường là thư mục chứasetup.exe). - Sử dụng công cụ
oscdimg.exe(từ Windows ADK) để pack lại thành file ISO mới.
Ví dụ lệnh pack lại:
oscdimg.exe -m -o -u2 -udfver102 -bootdata:2#p0,e,b<boot_folder>\etfsboot.com#pEF,e,b<boot_folder>\efisys.bin <source_folder> <output_iso>
Trong đó:
<boot_folder>: Thư mục boot trong ISO đã bung.<source_folder>: Thư mục chứa nội dung ISO đã bung và fileautounattend.xml.<output_iso>: Đường dẫn file ISO mới.
- Sử dụng file ISO mới để cài đặt Windows, có thể tạo Rufus, Ventoy hoặc đưa vào Proxmox, VM
Cho ai không biết thì index của file ISO là cái này
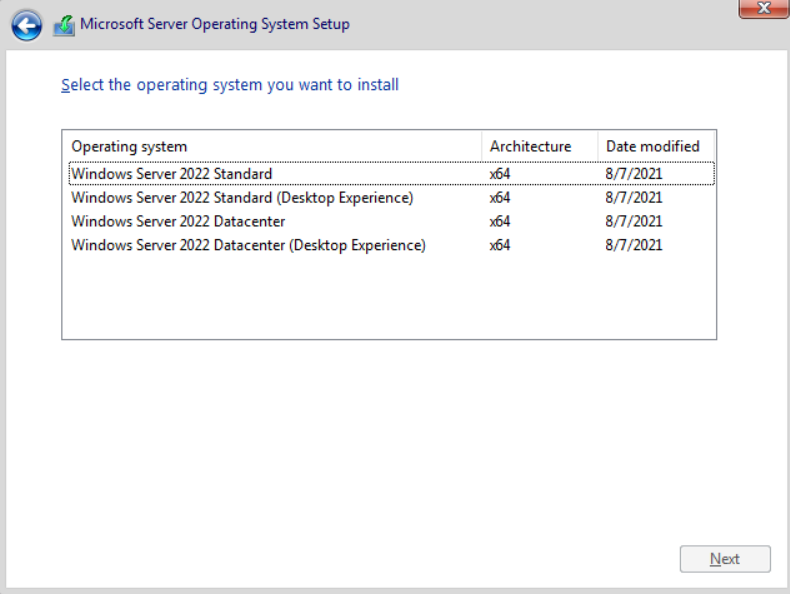
Mình luôn cài bản số 4 là Datacenter (Desktop Experience), ứng với số index bên dưới, bạn có thể thay đổi để phù hợp.
            <MetaData wcm:action="add">
              <Key>/IMAGE/INDEX</Key>
              <Value>4</Value>
</MetaData>Ở đây mình đang đặt là admin, bạn có thể thay đổi theo trường mà mình muốn
      <UserAccounts>
        <AdministratorPassword>
          <Value>admin</Value>
          <PlainText>true</PlainText>
        </AdministratorPassword>
      </UserAccounts>
      <AutoLogon>
        <Username>Administrator</Username>
        <Password>
          <Value>admin</Value>
          <PlainText>true</PlainText>
        </Password>
        <Enabled>true</Enabled>
        <LogonCount>1</LogonCount>
</AutoLogon>Có một đoạn như thế này, bình thường mình sẽ sử dụng irm link | iex để tiến hành cài đặt, bạn có thể modify lại nếu muốn. còn không thì nên giữ nguyên thì hơn
<CommandLine>powershell -ExecutionPolicy Bypass -Command "echo Hello Powershell"</CommandLine>- Script này chỉ hoạt động ở các bản Windows Server Evaluation, nếu sử dụng Windows 10, Windows 11 và các bản Windows Server khác => bạn có thể tham khảo bên đây
- Được thiết kế riêng cho Windows 2022 nên hoạt động tốt nhất trên Windows Server 2022
- Có hai phiên bản cho SeaBIOS và UEFI
- Automatically fills in language, time zone, and keyboard layout
- Automatically enters username and Administrator password (User: Administrator; Password: admin)
- Automatically partitions disk, selects installation drive, skips OOBE (Out-of-box experience) screen
- Automatically joins domain, installs drivers, and runs post-installation scripts
- Prepare a bootable USB with Windows ISO.
- Connect the USB and copy the
autounattend.xmlfile to the root directory of the USB — do not place it in a subdirectory.
The USB directory structure should look like this:
USB:\
├── autounattend.xml
├── setup.exe
├── sources\
├── boot\
- Boot the computer from USB.
- The Windows installation process will automatically read the
autounattend.xmlfile and start the installation while you just sit back and wait.
- Extract the Windows ISO file to a folder on your computer.
- Copy the
autounattend.xmlfile to the root directory of the extracted ISO (usually the folder containingsetup.exe). - Use the
oscdimg.exetool (from Windows ADK) to repack it into a new ISO file.
Example repack command:
oscdimg.exe -m -o -u2 -udfver102 -bootdata:2#p0,e,b<boot_folder>\etfsboot.com#pEF,e,b<boot_folder>\efisys.bin <source_folder> <output_iso>
Where:
<boot_folder>: The boot folder in the extracted ISO.<source_folder>: The folder containing the extracted ISO content and theautounattend.xmlfile.<output_iso>: The path to the new ISO file.
- Use the new ISO file to install Windows, you can create it with Rufus, Ventoy, or use it in Proxmox, VM
For those who don't know, the index in the ISO file is this
I always install version 4, which is Datacenter (Desktop Experience), corresponding to the index number below. You can change it to suit your needs.
            <MetaData wcm:action="add">
              <Key>/IMAGE/INDEX</Key>
              <Value>4</Value>
</MetaData>Here I'm setting it to admin, you can change it according to your preference
      <UserAccounts>
        <AdministratorPassword>
          <Value>admin</Value>
          <PlainText>true</PlainText>
        </AdministratorPassword>
      </UserAccounts>
      <AutoLogon>
        <Username>Administrator</Username>
        <Password>
          <Value>admin</Value>
          <PlainText>true</PlainText>
        </Password>
        <Enabled>true</Enabled>
        <LogonCount>1</LogonCount>
</AutoLogon>There's a section like this - normally I use irm link | iex to proceed with installation. You can modify it if you want, otherwise it's better to keep it as is
<CommandLine>powershell -ExecutionPolicy Bypass -Command "echo Hello Powershell"</CommandLine>- This script only works with Windows Server Evaluation editions. If using Windows 10, Windows 11, or other Windows Server editions => you can refer to here
- Specifically designed for Windows 2022, so it works best on Windows Server 2022
- Two versions available for SeaBIOS and UEFI