Oauth proxy

The original docx is here: Documentation Oauth2
But we want to have it in a
wiki form!
The purpose of this documentation is to install configure and Nginx with Oauth2 and add create a Google Provider.
Nginx is a web server that can also be used as a reverse proxy, load balancer, mail proxy and HTTP cache
Once everything done you can connect to the VM using ssh, this part will allow us to install nginx, certbot, Oauth2 and configure them. Next you will need to install nginx:
$ sudo dnf install nginx -ySecondly you will have to modify the following files:
vim /etc/nginx/nginx.conf# For more information on configuration, see:
# * Official English Documentation: http://nginx.org/en/docs/
# * Official Russian Documentation: http://nginx.org/ru/docs/
user nginx;
worker_processes auto;
error_log /var/log/nginx/error.log;
pid /run/nginx.pid;
# Load dynamic modules. See /usr/share/doc/nginx/README.dynamic.
include /usr/share/nginx/modules/*.conf;
events {
worker_connections 1024;
}
http {
log_format main '$remote_addr - $remote_user [$time_local] "$request" '
'$status $body_bytes_sent "$http_referer" '
'"$http_user_agent" "$http_x_forwarded_for"';
access_log /var/log/nginx/access.log main;
sendfile on;
tcp_nopush on;
tcp_nodelay on;
keepalive_timeout 65;
types_hash_max_size 2048;
include /etc/nginx/mime.types;
default_type application/octet-stream;
# Load modular configuration files from the /etc/nginx/conf.d directory.
# See http://nginx.org/en/docs/ngx_core_module.html#include
# for more information.
include /etc/nginx/conf.d/*.conf;
# HTTPS server
#
server {
listen 443 ssl http2 default_server;
listen [::]:443 ssl http2 default_server;
server_name yourdomain.com;
ssl_certificate /etc/letsencrypt/live/yourdomain.com/fullchain.pem;
ssl_certificate_key /etc/letsencrypt/live/yourdomain.com/privkey.pem;
root /usr/share/zabbix;
index index.php;
#Oauth part
location /oauth2/ {
proxy_pass https://127.0.0.1:8443;
proxy_set_header Host $host;
proxy_set_header X-Real-IP $remote_addr;
proxy_set_header X-Scheme $scheme;
proxy_set_header X-Auth-Request-Redirect $request_uri;
# or, if you are handling multiple domains:
# proxy_set_header X-Auth-Request-Redirect $scheme://$host$request_uri;
}
location = /oauth2/auth {
proxy_pass https://127.0.0.1:8443;
proxy_set_header Host $host;
proxy_set_header X-Real-IP $remote_addr;
proxy_set_header X-Scheme $scheme;
# nginx auth_request includes headers but not body
proxy_set_header Content-Length "";
proxy_pass_request_body off;
}
location /oauth/callback {
proxy_pass https://127.0.0.1:8443;
#proxy_set_header X-Auth-Name $email;
proxy_set_header Host $http_host;
proxy_set_header X-Real-IP $remote_addr;
proxy_set_header X-Forwarded-For $proxy_add_x_forwarded_for;
proxy_set_header X-Forwarded-Proto http;
proxy_set_header X-Forwarded-Scheme http;
proxy_set_header X-Scheme http;
}
location / {
auth_request /oauth2/auth;
error_page 401 = /oauth2/sign_in;
# pass information via X-User and X-Email headers to backend,
# requires running with --set-xauthrequest flag
auth_request_set $user $upstream_http_x_auth_request_user;
auth_request_set $email $upstream_http_x_auth_request_email;
proxy_set_header X-User $user;
proxy_set_header X-Email $email;
# if you enabled --pass-access-token, this will pass the token to the backend
auth_request_set $token $upstream_http_x_auth_request_access_token;
proxy_set_header X-Access-Token $token;
# if you enabled --cookie-refresh, this is needed for it to work with auth_request
auth_request_set $auth_cookie $upstream_http_set_cookie;
add_header Set-Cookie $auth_cookie;
# When using the --set-authorization-header flag, some provider's cookies can exceed the 4kb
# limit and so the OAuth2 Proxy splits these into multiple parts.
# Nginx normally only copies the first `Set-Cookie` header from the auth_request to the response,
# so if your cookies are larger than 4kb, you will need to extract additional cookies manually.
auth_request_set $auth_cookie_name_upstream_1 $upstream_cookie_auth_cookie_name_1;
# Extract the Cookie attributes from the first Set-Cookie header and append them
# to the second part ($upstream_cookie_* variables only contain the raw cookie content)
if ($auth_cookie ~* "(; .*)") {
set $auth_cookie_name_0 $auth_cookie;
set $auth_cookie_name_1 "auth_cookie_name_1=$auth_cookie_name_upstream_1$1";
}
# Send both Set-Cookie headers now if there was a second part
if ($auth_cookie_name_upstream_1) {
add_header Set-Cookie $auth_cookie_name_0;
add_header Set-Cookie $auth_cookie_name_1;
}
proxy_pass https://localhost:7443/;
# or "root /path/to/site;" or "fastcgi_pass ..." etc
}
}
}
Certbot to be able to create a website and to get a certificate from Cloudflare using certbot for this execute the following commands:
$ sudo dnf install certbot python3-certbot-nginx python3-certbot-dns-cloudflare -y Once the installation is done you can create certificate for that you will need to create a /root/.secrets/cloudflare.ini you can take example as the file below
mkdir /root/.secrets
vim /root/.secrets/cloudflare.ini
dns_cloudflare_email = "[email protected]"
dns_cloudflare_api_key = "75ba053db5c43c58e0fb05e47513ce97"
chmod 0400 /root/.secrets/cloudflare.ini Once create you can execute the following command to create a certificate:
sudo certbot certonly --dns-cloudflare --dns-cloudflare-credentials /root/.secrets/cloudflare.ini -d yourdomain.caA reverse proxy and static file server that provides authentication using Providers (Google, GitHub, and others) to validate accounts by email, domain or group
Once the certificate creates you git clone the following folder:
sudo yum install wget
mkdir /opt/oauth2-proxy
cd /opt/oauth2-proxy
wget https://github.com/oauth2-proxy/oauth2-proxy/releases/download/v7.4.0/oauth2-proxy-v7.4.0.linux-amd64.tar.gz
tar xzvf oauth2-proxy-v7.4.0.linux-amd64.tar.gz
md5sum -b oauth2-proxy-v7.4.0.linux-amd64/oauth2-proxy
Compare it with the md5sum => https://github.com/oauth2-proxy/oauth2-proxy/releases/download/v7.4.0/oauth2-proxy-v7.4.0.linux-amd64-sha256sum.txt
cp -r oauth2-proxy-v7.4.0.linux-amd64/oauth2-proxy /usr/bin
rm -rf oauth2-proxy-v7.4.0.linux-amd64/First you will need to create a configuration file /opt/oauth2-proxy/oauth2-proxy-nginx.cfg :
## OAuth2 Proxy Config File
## https://github.com/oauth2-proxy/oauth2-proxy

## <addr>:<port> to listen on for HTTP/HTTPS clients
 https_address = ":8443"


## Are we running behind a reverse proxy? Will not accept headers like X-Real-Ip unless this is set.
 reverse_proxy = true

## TLS Settings
 tls_cert_file = "/etc/letsencrypt/live/yourdomain/fullchain.pem"
 tls_key_file = "/etc/letsencrypt/live/yourdomain/privkey.pem"

## the OAuth Redirect URL.
# defaults to the "https://" + requested host header + "/oauth2/callback"
 redirect_url = "https://dev-nginx.sd4h.ca:8443/oauth2/callback"

## the http url(s) of the upstream endpoint. If multiple, routing is based on path
 upstreams = [
     "https://upstream"
 ]

 allowed_roles = [
    "role"
 ]
 skip_provider_button=true

## pass HTTP Basic Auth, X-Forwarded-User and X-Forwarded-Email information to upstream
# pass_basic_auth = true
# pass_user_headers = true
## pass the request Host Header to upstream
## when disabled the upstream Host is used as the Host Header
# pass_host_header = true

## Email Domains to allow authentication for (this authorizes any email on this domain)
## for more granular authorization use `authenticated_emails_file`
## To authorize any email addresses use "*"
 email_domains = [
     "*"
 ]

## The OAuth Client ID, Secret
 provider = "keycloak"
 scope = "openid"
 login_url = "https://keycloak-dev:8443/realms/Your-Realms/protocol/openid-connect/auth"
 redeem_url = "https://keycloak-dev:8443/realms/Your-Realms/protocol/openid-connect/token"
 profile_url = "https://keycloak-dev:8443/realms/Your-Realms/protocol/openid-connect/userinfo"
 validate_url = "https://keycloak-dev:8443/realms/Your-Realms/protocol/openid-connect/userinfo"

 client_id = "Client-Id"
 client_secret = "Client-Secret"

## Pass OAuth Access token to upstream via "X-Forwarded-Access-Token"
 pass_access_token = true


## Cookie Settings
## Name     - the cookie name
## Secret   - the seed string for secure cookies; should be 16, 24, or 32 bytes
##            for use with an AES cipher when cookie_refresh or pass_access_token
##            is set
## Domain   - (optional) cookie domain to force cookies to (ie: .yourcompany.com)
## Expire   - (duration) expire timeframe for cookie
## Refresh  - (duration) refresh the cookie when duration has elapsed after cookie was initially set.
##            Should be less than cookie_expire; set to 0 to disable.
##            On refresh, OAuth token is re-validated.
##            (ie: 1h means tokens are refreshed on request 1hr+ after it was set)
## Secure   - secure cookies are only sent by the browser of a HTTPS connection (recommended)
## HttpOnly - httponly cookies are not readable by javascript (recommended)
 cookie_secret = "qcwqqDhq4CMiQ/AP1nQFpQPU"
# cookie_domains = ""
# cookie_expire = "168h"
# cookie_refresh = ""
 cookie_secure = true
# cookie_httponly = true
Secondly you will need to create the file /etc/systemd/system/oauth2-proxy-service for that follow the instruction below:
The following information are:
[Unit]
Description=oauth2-proxy service
After=syslog.target network.target

[Service]
# www-data group and user need to be created before using these lines
User=root
Group=root

ExecStart=/usr/bin/oauth2-proxy --config=/opt/oauth2-proxy/oauth2-proxy-nginx.cfg
ExecReload=/bin/kill -HUP $MAINPID

KillMode=process
Restart=always

[Install]
WantedBy=multi-user.target
After that you will need to start the service with the command:
service oauht2-proxy-service start
Once you’ve done that the website is online (if you want to keep the button below you will have to delete the --skip-provider-button=true ):

For Google, the registration steps are:
- Create a new project: https://console.developers.google.com/project (as below)

- Choose the new project from the top right project dropdown (only if another project is selected)
- In the project Dashboard center panel, choose "APIs & Services"
- In the left Nav panel, choose "Credentials"
- In the center panel, choose "OAuth consent screen" tab. Fill in "Product name shown to users" and hit save.
- In the center pane, choose "Credentials" tab. o Open the "New credentials" drop down o Choose "OAuth client ID" o Choose "Web application" o Application name is freeform, choose something appropriate o Authorized JavaScript origins is your domain ex: https://internal.yourcompany.com o Authorized redirect URIs is the location of oauth2/callback ex: https://internal.yourcompany.com/oauth2/callback o Choose "Create"
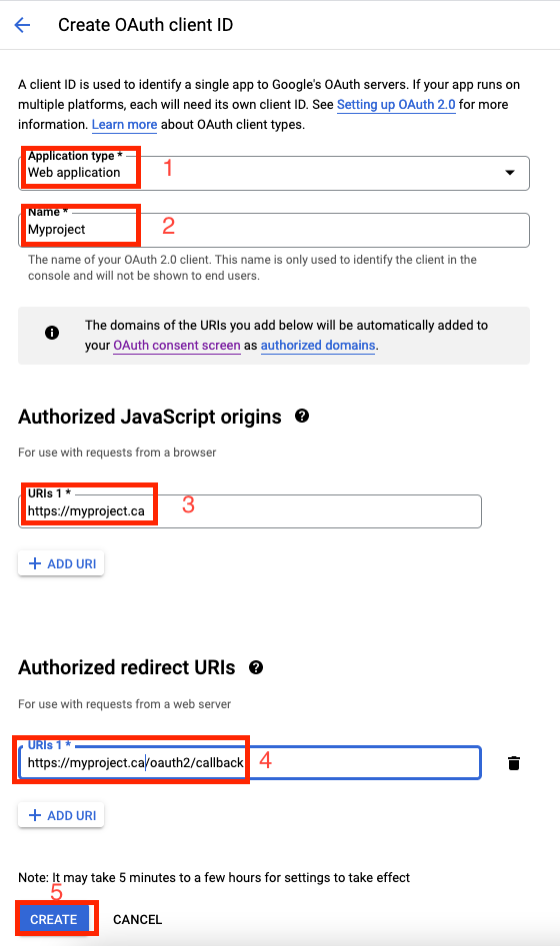
- Take note of the Client ID and Client Secret (it will be automatically saved on your computer)
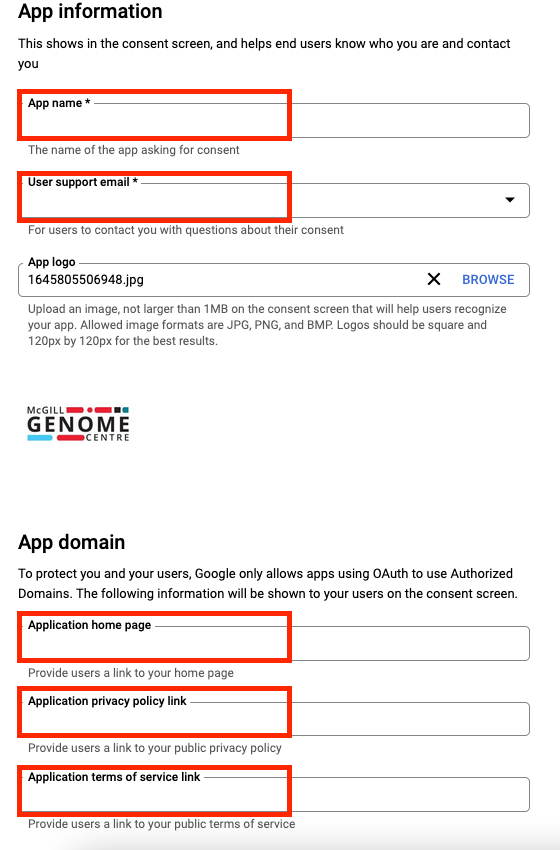
Once the API Key is configured you will have other things to make its to allow the Oauth2 Consent page and make it external for that follow the instructions below. You will have to enter all information below:
App Name: MyProject User support email: [email protected] Application home page: https://mycompany.ca/ Application privacy policy link: https://mycompany.ca/privacy Application terms of services link: https://mycompany.ca/tos
You will have to put the Authorized domain, for example: my.company.ca
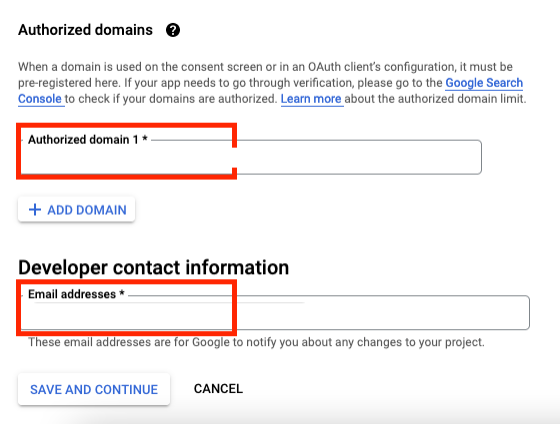
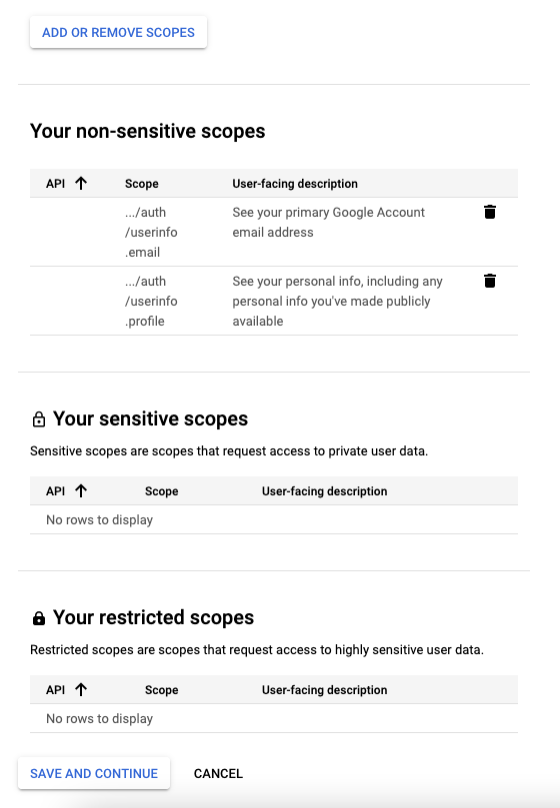
You will need to add the following non-sensitives scopes: auth/userinfo.email and auth/userinfo.profile.
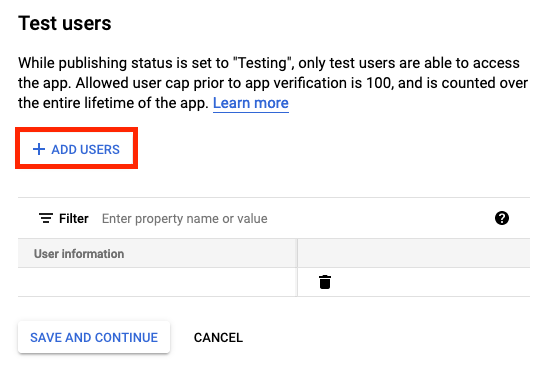
To be allow your api and website to be visible outside but only by specific account you will need to create multiple users.