

![]()
PyDynamicReporting is the Python client library for Ansys Dynamic Reporting, previously documented as Nexus. Ansys Dynamic Reporting is a service for pushing items of many types, including images, text, 3D scenes, and tables, into a database, where you can keep them organized and create dynamic reports from them. When you use PyDynamicReporting to connect to an instance of Ansys Dynamic Reporting, you have a Pythonic way of accessing all capabilities of Ansys Dynamic Reporting.
Documentation for the latest stable release of PyDynamicReporting is hosted at PyDynamicReporting documentation.
In the upper right corner of the documentation's title bar, there is an option for switching from viewing the documentation for the latest stable release to viewing the documentation for the development version or previously released versions.
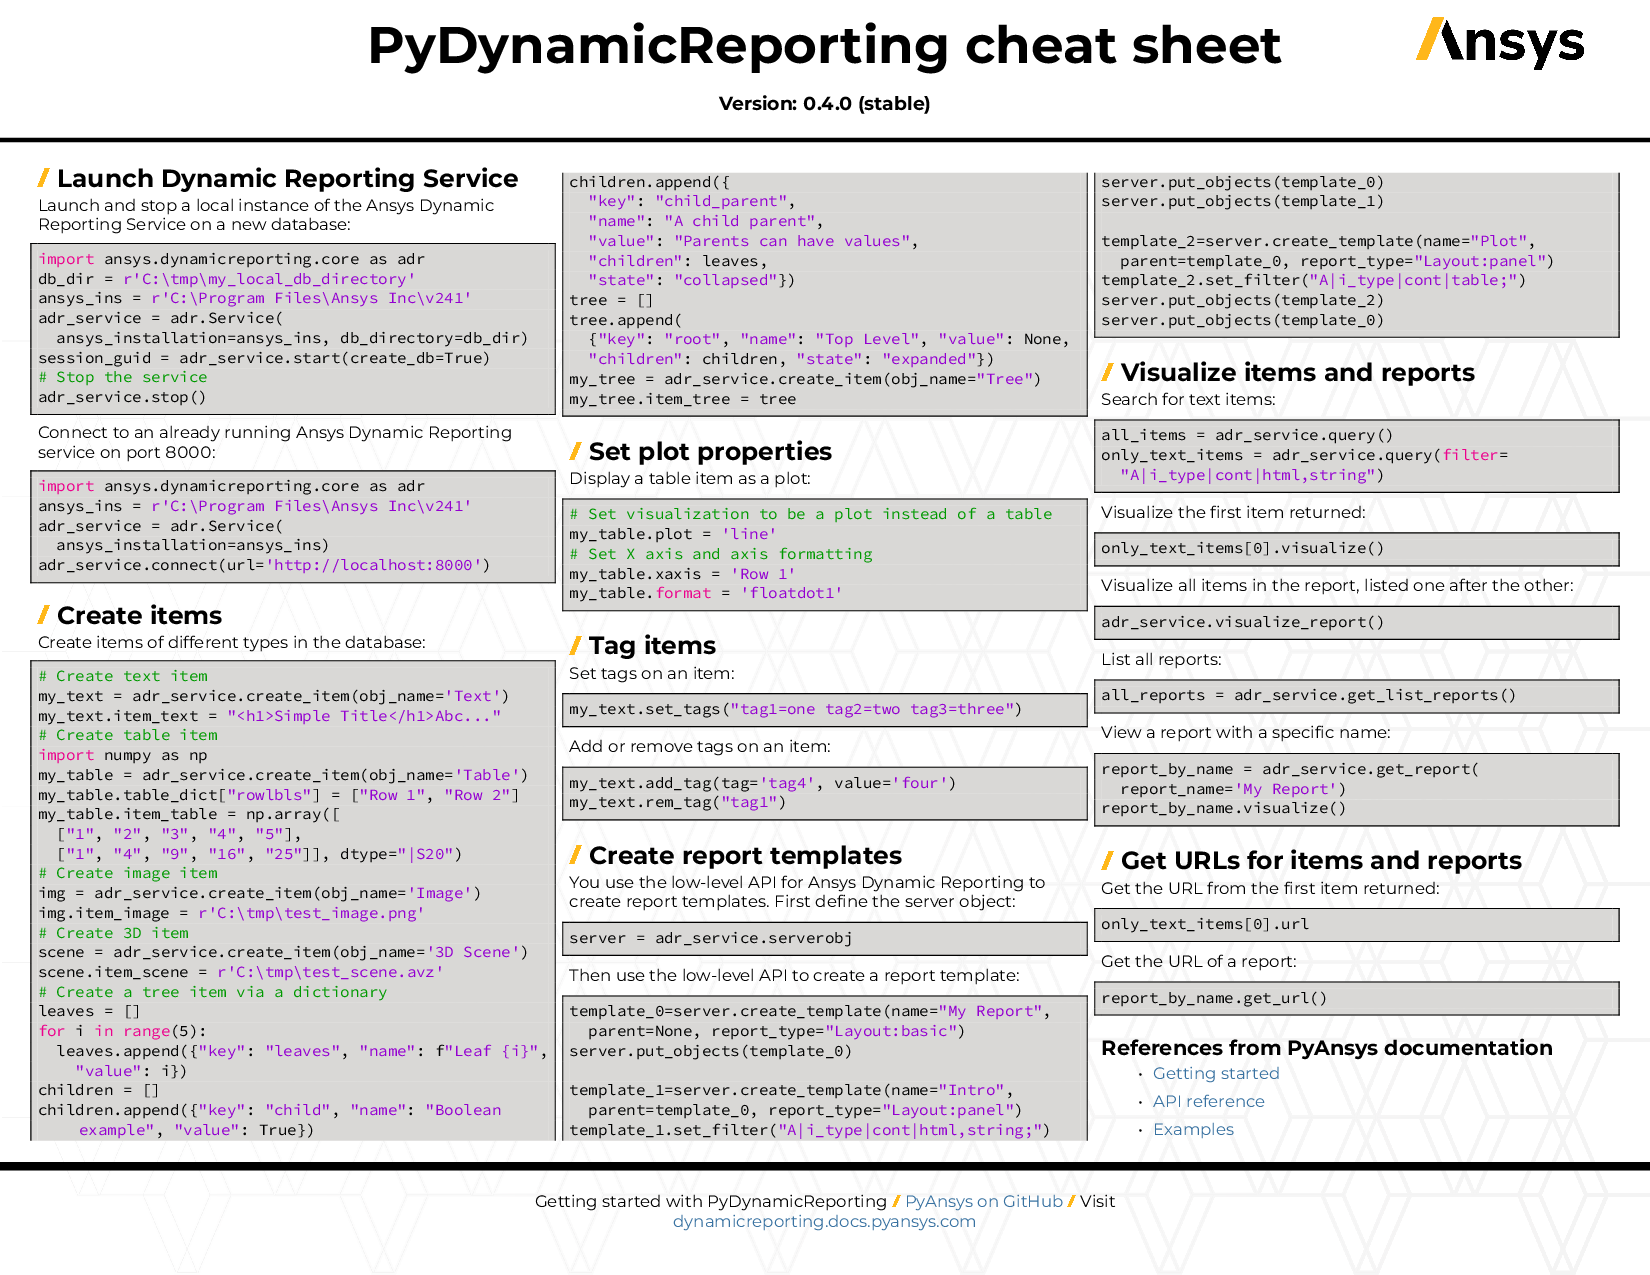
You can also view or download the PyDynamicReporting cheat sheet. This one-page reference provides syntax rules and commands for using PyDynamicReporting.
On the PyDynamicReporting Issues page, you can create issues to report bugs and request new features. On the Discussions page on the Ansys Developer portal, you can post questions, share ideas, and get community feedback.
To reach the project support team, email [email protected].
The pydynamicreporting package supports Python 3.10 through 3.12 on
Windows and Linux. It is currently available on the PyPi
repository.
To install the package, simply run
pip install ansys-dynamicreporting-core
To clone and install the pydynamicreporting package in development mode,
run this code:
git clone https://github.com/ansys/pydynamicreporting
cd pydynamicreporting
pip install virtualenv
virtualenv venv  # create virtual environment
source venv/bin/activate  # (.\venv\Scripts\activate for Windows shell)
make install-dev  # install pydynamicreporting in editable mode
The preceding code creates an "editable" installation that lets you develop and test PyDynamicReporting at the same time.
To build and create a production-like installation on Windows (not required on other OSes), first install chocolatey. Then:
choco install make  # install make on Windows
make clean  # clean
make build   # build
# this replaces the editable installation done previously. If you don't want to replace,
# switch your virtual environments to test the new install separately.
make install
# you can skip the steps above and just do 'make all'
make smoketest  # test import
To run GitHub Actions on your local desktop (recommended), install the act package.
choco install act-cli
To run a job, such as the style job from the ci_cd.yml file, use
this command, where style is the job name:
act -W '.github/workflows/ci_cd.yml' -j style --bind
Deploy and upload steps must always be ignored. If they are not ignored,
before running GitHub Actions locally, add if: ${{ !env.ACT }} to the
workflow step and commit this change if required.
This project now uses tag-driven releases and dynamic versions powered by hatch-timestamp-version (based on hatch-vcs). Stable releases are cut from Git tags (vX.Y.Z). Development builds use UTC timestamped versions derived from the most recent tag.
Release branches are no longer needed; the version is always derived from tags.
- Stable releases: The version is the exact Git tag (for example,
v0.10.0→ package version0.10.0). - Development builds: Version is computed from the latest tag plus a timestamp, e.g.
0.10.1.devYYYYMMDDHHMMSS. - No manual editing of
pyproject.tomlfor versions —[tool.hatch.version]drives everything.
- Create Draft Release (on tag push): builds wheels/sdist and opens a draft GitHub Release attaching artifacts.
- Publish Release (when the GitHub Release is published): uploads artifacts to PyPI via Trusted Publisher, then builds & deploys stable docs.
- Failure notifications: posts to Microsoft Teams on workflow failure.
- Ensure
CHANGELOG.mdhas a section for the release dated today (the helper script validates this). - Working tree must be clean (no uncommitted changes).
- CI secrets for publishing and docs deploy are configured in GitHub.
Make sure your
CHANGELOG.mdentry for the version is dated today (this check runs automatically frommake tag).Create and push the release tag:
make tag
This runs all safety checks, validates the changelog date, and pushes the Git tag (for example,
v0.10.0).Once the tag is pushed: - The Create Draft Release workflow builds the package and opens a draft GitHub Release with artifacts. - After reviewing and finalizing notes, publish the GitHub Release.
Publishing the release automatically triggers the Release workflow, which: - Uploads artifacts to PyPI using Trusted Publisher. - Builds and deploys the stable documentation.
- For a patch, update the changelog, ensure the working tree is clean, then run
make tagagain (which tags the next patch version determined byhatch versionfrom your last tag). - No separate “release branch” is required; the version is derived from tags.
You can use act to exercise non-publishing parts locally. Steps that publish or deploy are already guarded in workflows (e.g., with if: ${{ !env.ACT }}). Build and validation steps still run:
act -W '.github/workflows/release.yml' -j release --bind- .github/workflows/create_draft_release.yml
- Triggers on: tag push
v*, or manual dispatch. - Builds artifacts and opens a draft GitHub Release attachingdist/*. - .github/workflows/release.yml - Triggers on: published GitHub Release, or manual dispatch. - Rebuilds/validates, downloads artifacts, publishes to PyPI, builds docs, and deploys stable docs.
Print the resolved version (dev or stable):
make version
Build locally (sdist + wheel):
make build
make check-dist
Clean:
make clean
Releases are blocked if today’s dated entry is missing:
❌ ERROR: CHANGELOG.md is not ready for release.
   Expected line: ## [0.10.0] - YYYY-MM-DD
   Tip: Check if it's still marked as '[Unreleased]' and update it to today's date.
- “No Git tag found” during checks: Create a tag via
make tag(orgit tag vX.Y.Z && git push origin vX.Y.Z). - Draft already exists: The draft release is unique per tag. Delete or publish the existing one, or bump the tag properly.
- Version mismatch:
hatch versiondetermines the version from the last tag; ensure you pushed the intended tag and your clone has all tags (git fetch --tags).
To use PyDynamicReporting, you must have a locally installed and licensed copy of Ansys 2023 R2 or later.
To use PyDynamicReporting Serverless (ansys.dynamicreporting.core.serverless), you must have a locally installed and licensed copy of Ansys 2025 R1 or later.
This code shows how to start the simplest PyDynamicReporting session:
>>> import ansys.dynamicreporting.core as adr
>>> adr_service = adr.Service(ansys_installation=r"C:\Program Files\ANSYS Inc\v232")
>>> ret = adr_service.connect()
>>> my_img = adr_service.create_item()
>>> my_img.item_image = "image.png"
>>> adr_service.visualize_report()PyDynamicReporting is licensed under the MIT license.
PyDynamicReporting makes no commercial claim over Ansys whatsoever. This library extends the functionality of Ansys Dynamic Reporting by adding a Python interface to Ansys Dynamic Reporting without changing the core behavior or license of the original software. The use of PyDynamicReporting requires a legally licensed copy of an Ansys product that supports Ansys Dynamic Reporting.
To get a copy of Ansys, visit the Ansys website.