Exploration of TTN and LoRa devices
Explore the docs »

The code is for testing and development purposes only, and is not meant for production usage.
Was forked from @hallard https://github.com/hallard/single_chan_pkt_fwd
Was forked from @ChrisSamuelson https://www.hackster.io/ChrisSamuelson/lora-raspberry-pi-single-channel-gateway-cheap-d57d36
The following description of single channel gateway has been tested in Asia using the following.
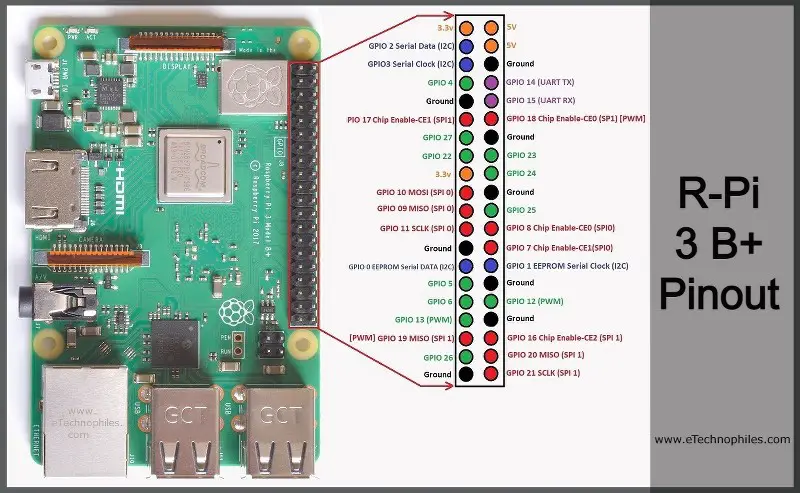
- 1x Raspberry Pi 3 Model B+ Single Board Computer
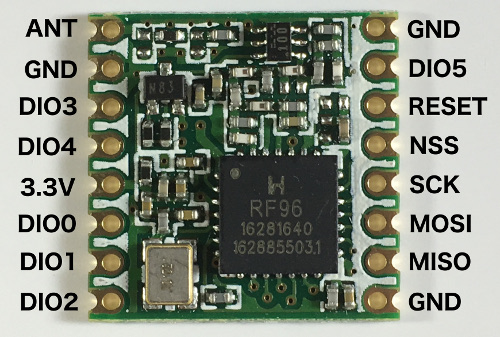
- 1x HopeRF RFM95W-915S2 RF Transceiver Module, 915MHz
- 8x Jumper Wires (Male-to-Female pin)
- 2x3.3inch 1mm Copper Wire
- 4x 1x8 Female Header Socket
- 2x 1x8 Male Connector Header
- 1x CAT 6 UTP 4PR 24AWG
- 1x ASUS Wireless-N300 USB Adapter
- 1x USB 3.0 to Ethernet Adapter 1GBps
- 1x HDMI to Monitor Cable
- 1x Micro USB Cable
- 1x Micro SD Card 32GB
Let's start with the RaspPi 3 B+. Now assuming you have completely setup the RaspPi 3 B+, we shall continue on the next bit with no problems.
If you have not setup the RaspPi 3 B+, I suggest you go to Caroline Dunn and learn, she will provide you with valid up-to-date information on how to install the "driver" as most others would tell you to install NOOBS Lite but it is no longer available. You should use a card reader for your Micro SD card to your pc/laptop.
I will also suggest you to download VNC Viewer, go to Caroline Dunn to learn more. It is much easier to use VNC Viewer to control your RaspPi wirelessly through the network than manually having to plug a HDMI cable to your pc/laptop.
Voilà, you have completed setting up RaspPi 3 B+!
TTN Frequency by Country Dipole Calculator -> Type in Frequency > Change '1/4 Wavelength' from m to inch/cm > Wire Length Required for each pole
Since I like my work tidy, I made a super simple design on my Copper PCB Stripboard with 2 1x8 Female Header Socket, 6 dots apart from each other. Then add additional 2 more of the same kind to each sides like shown below.
For the HopeRF RFM95 itself, there are multiple methods of installing this module. You can choose to either solder wires which can get messy but quick and efficient, or with a plate adapter which is tidy but require delivery time. If you so choose for the plate adapter, here's the link for the plate and video1 video2 for the best way to solder it together!
I used trimmings(excess connectors) from the female headers to solder onto it. Do note you can also use exposed wires with a solid core, DO NOT use exposed stranded wires. Afterwards, just use a pair of plyers and bend them slowly and gently to fit into the inner female headers.
Lastly the dipole antenna, two copper wires connected in 'ANA' and 'GND' side by side. If you find it hard to push the copper wire through the holes, here's my tips:
- Use a cutter to pinch the end together just a bit.
- Use a plyer on the wire and hands on the board to grip.
- As you are pushing the wire into the board(non-copper), twist the wire in a reciprocating motion like you're pushing a cork into a wine bottle.
- In the end you should have enough wire in the protruding side(copper) to hold it in place and solder.
- Just bend it in opposite sides and...
Voilà, you have completed setting up HopeRF RFM95.
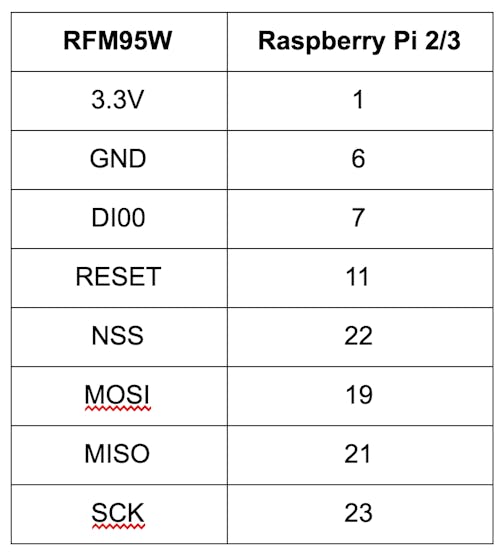
The following diagram shown below is the pin connections required for this build from the RaspPi with the HopeRF RFM95 that we will be using. Use jumper wires instead of standard wires. (Taken from ChrisSamuelson)
| RaspPi Pinout | HopeRF Pinout |
|---|---|
 |
 |
JUMPER WIRE CONFIGURATION
Voilà, you have completed the pins assembly.
Power up RaspPi with microUSB cable and make sure there is an internet connection. You can tell whether it has or not by going to VNC Viewer and open up the RaspPi Window. I use an USB adapter with UTP 6 Cable for direct internet source.
Proceed to install dependencies as indicated below.
SPI needs to be enabled on the Raspberry Pi (Advanced Options > SPI).
sudo raspi-configReboot.
sudo shutdown -r nowInstall WiringPi.
sudo apt-get install wiringpisee http://wiringpi.com/download-and-install/ for more info about updating software.
Getting the Single Channel Packet Forwarder.
cd /home/pi
git clone https://github.com/hallard/single_chan_pkt_fwd
cd single_chan_pkt_fwd
make
sudo make install "pin_nss": 6,
"pin_dio0": 7,
"pin_rst": 0
- Go to:
cd ~/single_chan_pkt_fwd
nano main.cpp-
Scroll to * Configure these values! * (line 78).
-
Edit
ssPindio0RSTvalues into abovepin_nsspin_dio0pin_rstvalues. -
Up to you
SpreadingFactor_t sfcan be SF7 to SF12. (Default SF7)(The larger the SF, the longer it takes therefore high power usage.) More info about SF: SF. -
Make sure
bwis 125. (Not compatible for 250 yet) -
For
freq, go to Frequency Plans by Country first, then Frequency Plans and choose 1 frequency plan. Example:I'm somewhere from Asia and I want to only use uplink messages so I go to AS1, which is AS920-923. In the list of uplink frequency bands, I can choose any one that suits my needs.
-
The rest like
latlonaltplatformm[24]email[40]description[64]are entirely up to you, it is recommended to put for the TTN. -
Save File by
Ctrl + X>Enter.
You should be able to see these imporant details in your main.cpp file:
// SX1272 - Raspberry connections
int ssPin = 6;
int dio0  = 7;
int RST   = 0;

// Set spreading factor (SF7 - SF12)
SpreadingFactor_t sf = SF7;
uint16_t bw = 125;

// Set center frequency
uint32_t freq = 922400000; // in Mhz! (868.1)- Go to:
cd ~/single_chan_pkt_fwd
nano global_conf.json- Set the same
freqspread_factorpin_nsspin_di0pin_rstref_latitudered_longituderef_altitudenameemaildescas before. - For the two addresses under
servers, go to Semtech UDP Packet Forwarder for router address or Cloud Addresses for network clusters.
I used 'au1.cloud.thethings.network' though I'm in Asia as there are no Asia network cluster ready available.
- Save File by
Ctrl + X>Enter.
Starting service and check the status.
If you do not wish to log in password repeatedly, you may add a sudo in the front of the commands below.
systemctl start single_chan_pkt_fwd
systemctl status single_chan_pkt_fwd
To stop service.
systemctl stop single_chan_pkt_fwdSee the gateway log in real time.
journalctl -f -u single_chan_pkt_fwdIMPORTANT Record down your gateway EUI which should look like 61:79:5f:61:6c:70:68:61.
Ctrl + C to exit.
Voilà, a well running LoRaWAN gateway.
- Go to: https://www.thethingsnetwork.org/
- Create your account.
- Click Profile icon > Console > Select your cluster (same as previous address location).
- Click
Go to gateways> Add gateway - Type in:
- Gateway ID -> Unique name of your new gateway
- Gateway EUI -> ALL CAPS 61795F616C706861 (Remove ':' and no spaces, copy and paste into the blank)
- Gateway name -> optional name
- Gateway description -> optional description, kidding go ham on it.
- Gateway Server address -> Same as before, same address.
- The rest should be okay.
- At LoRaWAN options:
- Frequency plan -> Your country's frequency plan IMPORTANT not to choose another country's other than your own.
- Don't enable automatic updates, it sometimes ruin the location finder, even if you allow it always.
- The rest don't touch.
Make sure you are checking the sending process by sudo journalctl -f -u lora-packet-forwarder.service .
Voilà, you should be able to connect to the TTN.
Fret not, I personally use an ASUS Wireless-N300 USB Adapter which is essentially a mini router. I personally will test if it still works without it or perhaps its better with a standard router than a dipole makeshift antenna, I will update shortly.
But that is if your gateway still unable to connect to the TTN in which you can see in your TTN console. If you have any problems during the build of this project, do enquire me in the handles below and I will personally assist you.
I would like to take this lovely portion of this file to thank my mentor, Argeorun, in providing me the necessary information and research on LoRa devices, LoRaWAN gateways and TTN protocols. Without him I would not have anything to do during the dreadful holidays of Covid Summer and learn how to sew using a sewing machine. Since young I have managed to store tons of broken down electronic boards, at least now I know what to do with them; sell or use in my builds. With this great knowledge, comes great responsibility, perhaps I could interest my school to take part in Singapore's LoRa network establishment, afterall what done by us can be done by anyone else.