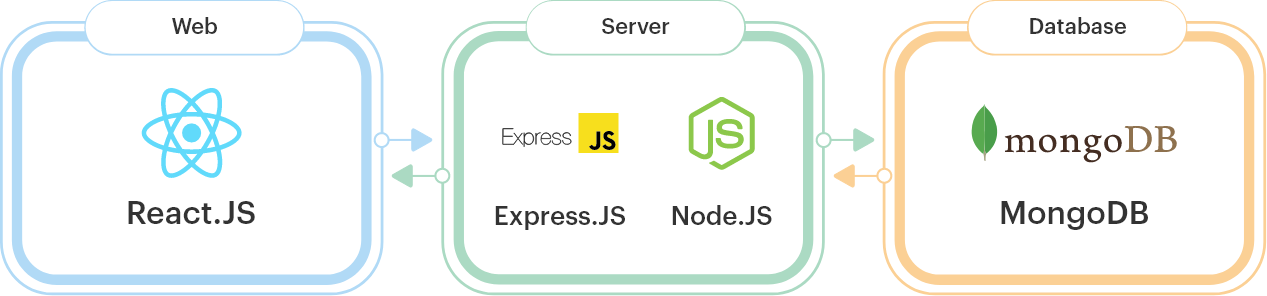
- MongoDB :- NoSQL-Database (database)
- Express.js :- Routing-MiddlewareIntegration-ErrorHandling (backend)
- React.js :- Reusable-UI-components (frontend)
- Node.js :- JavaScript-Code-On-The-Server-Side (backend)
Following installation -
- Node.js and npm
- MongoDB(locally /cloud-based solution like MongoDB Atlas)
- Code editor (eg - VS Code)
- Git (optional but recommended)
Every website has 3 pillars - Frontend Backend Database
mkdir mern-project
cd mern-project
npm init -y
npm i express mongoose body-parser cors
- express - For building the RESTfull API.
- mongoose - MongoDB object modeling tool designed to work in an asynchronous environment.
- body-parser - To parse incoming request bodies.
- cors: Middleware for enabling Cross-Origin Resource Sharing.
- Create a file server.js :
const express = require('express');
const mongoose = require('mongoose');
const bodyParser = require('body-parser');
const cors = require('cors');

const app = express();
const PORT = process.env.PORT || 5000;

// Middleware
app.use(bodyParser.json());
app.use(cors());

// Routes
app.use('/api', require('./routes/api'));

// MongoDB Connection
mongoose.connect('mongodb://localhost:27017/mern_demo', {
  useNewUrlParser: true,
  useUnifiedTopology: true,
});

mongoose.connection.on('connected', () => {
  console.log('Connected to MongoDB');
});

// Start Server
app.listen(PORT, () => {
  console.log(`Server started on port ${PORT}`);
});
- Create a directory routes and a file api.js inside it:
const express = require('express');
const router = express.Router();
// Define routes here
module.exports = router;
npx create-react-app client
cd client
npm install axios
- Create components for your application like List.js, Add.js, Edit.js.
- Use react-router-dom to define routes in App.js.
- In each component, implement CRUD operations using Axios to communicate with the backend API.
- Make HTTP requests from React components to the Express backend using Axios.
-
Backend Deployment Deploy your Express server to a cloud platform like Heroku or AWS Elastic Beanstalk.
-
Frontend Deployment Deploy your React app to platforms like Netlify, Vercel, or GitHub Pages.
This guide provides a basic structure for building a MERN stack application from scratch. You can further enhance it by adding authentication, authorization, validation, error handling, and other features based on your project requirements.
- Models (database schema)
- Authentication & Authorization
- Validation
- Error handling
- Some additional features.
- Create a User model in MongoDB using Mongoose.
const mongoose = require('mongoose');
const bcrypt = require('bcryptjs');

const userSchema = new mongoose.Schema({
  email: { type: String, unique: true, required: true },
  password: { type: String, required: true },
  role: { type: String, enum: ['user', 'admin'], default: 'user' }
});

userSchema.pre('save', async function(next) {
  const user = this;
  if (!user.isModified('password')) return next();
  const hashedPassword = await bcrypt.hash(user.password, 10);
  user.password = hashedPassword;
  next();
});

userSchema.methods.comparePassword = async function(candidatePassword) {
  return await bcrypt.compare(candidatePassword, this.password);
};

module.exports = mongoose.model('User', userSchema);
---- Implement routes for user registration, login, logout, and authentication using JWT (JSON Web Tokens) ----
- Use middleware to protect routes that require authentication.
- Implement role-based access control if needed.
const express = require('express');
const router = express.Router();
const jwt = require('jsonwebtoken');
const User = require('../models/User');

router.post('/register', async (req, res) => {
  try {
    const { email, password } = req.body;
    const user = new User({ email, password });
    await user.save();
    res.status(201).json({ message: 'User registered successfully' });
  } catch (error) {
    res.status(400).json({ error: error.message });
  }
});

router.post('/login', async (req, res) => {
  try {
    const { email, password } = req.body;
    const user = await User.findOne({ email });
    if (!user) throw new Error('User not found');
    const isMatch = await user.comparePassword(password);
    if (!isMatch) throw new Error('Invalid credentials');
    const token = jwt.sign({ userId: user._id }, 'secret', { expiresIn: '1h' });
    res.status(200).json({ token });
  } catch (error) {
    res.status(401).json({ error: error.message });
  }
});

module.exports = router;
- Implement validation for user input on the server-side using libraries like express-validator.
- Validate request bodies before processing.
const { validationResult } = require('express-validator');

const validate = (req, res, next) => {
  const errors = validationResult(req);
  if (!errors.isEmpty()) {
    return res.status(400).json({ errors: errors.array() });
  }
  next();
};

module.exports = validate;
- Implement client-side validation using libraries like formik or plain JavaScript.
- Validate user input before submitting forms.
import React, { useState } from 'react';

const RegisterForm = () => {
  const [formData, setFormData] = useState({
    email: '',
    password: ''
  });
  const [errors, setErrors] = useState({});

  const handleChange = (e) => {
    setFormData({ ...formData, [e.target.name]: e.target.value });
  };

  const handleSubmit = (e) => {
    e.preventDefault();
    // Perform client-side validation
    if (!formData.email || !formData.password) {
      setErrors({ message: 'Please fill in all fields' });
      return;
    }
    // Send form data to backend
    // ...
  };

  return (
    <form onSubmit={handleSubmit}>
      <input type="email" name="email" value={formData.email} onChange={handleChange} />
      <input type="password" name="password" value={formData.password} onChange={handleChange} />
      <button type="submit">Register</button>
      {errors.message && <p>{errors.message}</p>}
    </form>
  );
};

export default RegisterForm;
- Implement centralized error handling middleware in Express to catch errors.
- Return appropriate error responses to the client with descriptive error messages.
Centralized Error Handling Middleware (backend/middleware/errorHandler.js)

const errorHandler = (err, req, res, next) => {
  console.error(err.stack);
  res.status(500).json({ message: 'Internal server error' });
};

module.exports = errorHandler;
- Handle errors returned from API requests on the client-side.
- Display error messages to users in a user-friendly manner.
const express = require('express');
const errorHandler = require('./middleware/errorHandler');

const app = express();

// Middleware
app.use(express.json());
app.use(errorHandler);

// Routes
app.use('/api/auth', require('./routes/auth'));

module.exports = app;
- Implement pagination for listing items (e.g., paginating through a list of products).
router.get('/products', async (req, res) => {
  const page = parseInt(req.query.page) || 1;
  const limit = parseInt(req.query.limit) || 10;
  const skip = (page - 1) * limit;
  try {
    const products = await Product.find().skip(skip).limit(limit);
    res.status(200).json(products);
  } catch (error) {
    res.status(500).json({ error: error.message });
  }
});
- Allow users to upload files (e.g., images) and store them in MongoDB using GridFS or a cloud - storage service like AWS S3.
const multer = require('multer');
const upload = multer({ dest: 'uploads/' });

router.post('/upload', upload.single('file'), (req, res) => {
  const file = req.file;
  if (!file) return res.status(400).json({ message: 'No file uploaded' });
  // Process file and save to database
});
By incorporating authentication, authorization, validation, error handling, and additional >features into your MERN application, you can create a robust and secure web application that >meets the needs of your users. Remember to continuously iterate on your application, gather >feedback, and make improvements based on user requirements and best practices.