A highly configurable and low-cost ROM replacement solution for vintage computers. Replace failed ROMs in Commodore 64s, VIC-20s, PETs, and other retro systems with a $2 microcontroller.
Emulates 2364, 2332 and 2316 ROMs using the STM32F4 family of microcontrollers. Replaces kernel, BASIC, character set, diagnostic, and application ROMs.
- 💰 Based on sub $2 microcontroller.
- ⚡ Fast enough for PETs, VIC-20s, C64s, 1541s, IEEE drives, etc. Support faster systems with STM32F405R.
- 📐 Same footprint as original ROMs - doesn't overhang the socket like other solutions.
- 🚀 Quick programming - just connect 4 wires and
make run. No programming jigs necessary. - 🔌 Use a $5 programmer - no expensive EEPROM programmer required.
- 🛠️ Reflash in situ - no need to remove the ROM from the host when reprogramming.
- ⚙️ Software configurable chip select lines - no hardware jumpers required.
- 💾 Stores up to 16 ROM images of different sizes and chip select configurations. Image selectable via jumpers.
- 🧩 Images combined automatically - no need to manually build up your own larger PROM image containing multiple retro ROMs.
- 🏭 Two layer PCB, component on single-side, limited BOM for low manufacturing cost/complexity.
- 🎯 Supports multiple STM32F4xxR variants: F401, F411, F405, F446 (others can be added).
- 🔓 Open source software and hardware - see License
The video below provides an introduction to the Software Defined Retro ROM:
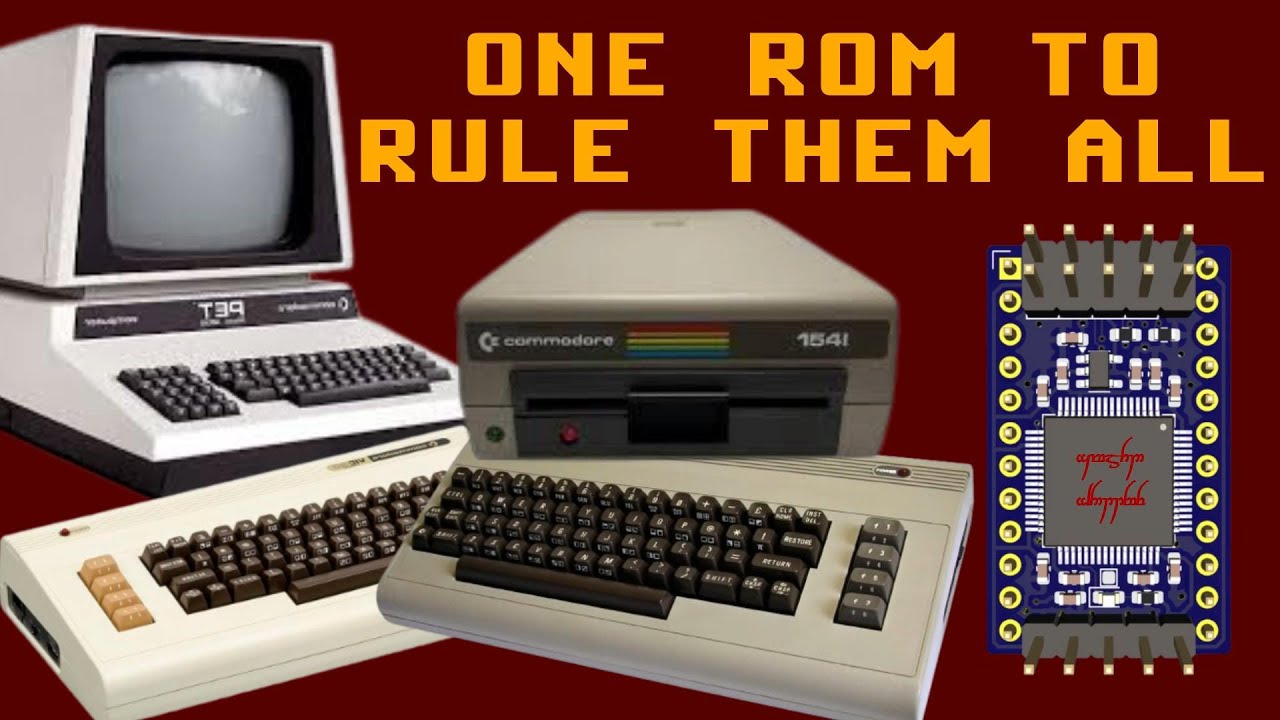
This is the 24-pin version, hardware revison F. See sdrr-pcb for the hardware designs and documentation.

You have two options
Use your favourite STM32 programmer to flash the pre-built binaries from the project's releases page. Scroll down to the "Assets" section of the latest release, and download the bin-*.zip or elf-*.zip file for your STM32 variant. These zip files contain pre-built binaries for the various SDRR image collections, including the C64, VIC-20, PET, and 1541 disk drive.
Once you have the project cloned, and the required dependencies installed, you can build and flash an SDRR image using the following commands - replace f411re with your target STM32 variant, and config/c64.mk with the configuration you want to use.
# C64
STM=f411re CONFIG=config/c64.mk make run
# VIC-20 (PAL)
STM=f411re CONFIG=config/vic20-pal.mk make run# PET 40 column 50Hz
STM=f411re CONFIG=config/pet-4-40-50.mk make runThis will download the desired ROM images automatically, generate the required firmware, and flash it to the SDRR device.
Set the SDRR jumpers to select the desired ROM image (see the config file, or logs from your SDRR device, for which # corresponds to which image) and you're now ready to install the SDRR device in your retro system.
For configuration options, see Configuration and the Makefile.
- Frequently Asked Questions - Answers to common questions about SDRR.
- Installation - Installation of dependencies.
- Programming - How to program the SDRR device.
- Available Configurations - Various pre-collated ROM collection configurations.
- STM32 Selection - How to select the appropriate STM32 variant for your application.
- Image Selection - How to tell SDRR which of the installed ROM images to serve.
- Configuration - SDRR configuration options.
- Logging - How to enable and use logging in SDRR.
- Technical Summary - Overview of the SDRR architecture, operation and design decisions.
- Technical Details - Technical details of the SDRR firmware and hardware.
- Build System - How the SDRR build system works.
- Voltage Levels - How the SDRR supports the required logic voltage levels.
- Pi Pico Programmer - How to use a $5 Raspberry Pi Pico as a programmer for SDRR.
- Future Enhancements - Possible future enhancements under consideration.
- License - SDRR software and hardware licenses.
Most STM32F4xxR (LQFP-64) variants will work, but the following are supported out of the box by the build system:
| Model | Max ROM Images | Build variant |
|---|---|---|
| STM32F401RBT6 | 6 | f401rb |
| STM32F401RCT6 | 14 | f401rc |
| STM32F401RET6 | 16 | f401re |
| STM32F411RCT6 | 14 | f411rc |
| STM32F411RET6 | 16 | f411re |
| STM32F405RGT6 | 16 | f405rg |
| STM32F446RCT6 | 16 | f446rc |
| STM32F446RETx | 16 | f446re |
The highest performance supported variant is the STM32F446RET6, primarily because it has the fastest max clock speed (180MHz vs 168MHz for the F405, 100MHz for the F411 and 84MHz for the F401). This means it will support the widest range of retro systems. However, it costs more, and will draw more power and generate more heat.
The largest flash capacity is the STM32F405RGT6, but this extra space if currently unused, and the F405 is also only supported from PCB rev E onwards.
For more details about selecting the appropriate STM32 variant for your application, see docs/STM32-SELECTION.md.
If you'd like another variant supported, raise an issue via github.
The best place to start with debugging is Logging. This will help you see what the SDRR is doing, and why it may not be working as expected.
See LICENSE for software and hardware licensing information.