容器技术随着 docker 的出现炙手可热,所有的技术公司都积极拥抱容器,促进了 docker 容器的繁荣发展。容器一词虽然口口相传,但却没有统一的定义,这不仅是个技术概念的问题,也给整个社区带来一个阴影:容器技术的标准到底是什么?由谁来决定?
很多人可能觉得 docker 已经成为了容器的事实标准,那我们以它作为标准问题就解决了。事情并没有那么简单,首先是否表示容器完全等同于 docker,不允许存在其他的容器运行时(比如 coreOS 推出的 rkt);其次容器上层抽象(容器集群调度,比如 kubernetes、mesos 等)和 docker 紧密耦合,docker 接口的变化将会导致它们无法使用。
总的来说,如果容器以 docker 作为标准,那么 docker 接口的变化将导致社区中所有相关工具都要更新,不然就无法使用;如果没有标准,这将导致容器实现的碎片化,出现大量的冲突和冗余。这两种情况都是社区不愿意看到的事情,OCI(Open Container Initiative) 就是在这个背景下出现的,它的使命就是推动容器标准化,容器能运行在任何的硬件和系统上,相关的组件也不必绑定在任何的容器运行时上。
官网上对 OCI 的说明如下:
An open governance structure for the express purpose of creating open industry standards around container formats and runtime.
– Open Containers Official Site
OCI 由 docker、coreos 以及其他容器相关公司创建于 2015 年,目前主要有两个标准文档:容器运行时标准 (runtime spec)和 容器镜像标准(image spec)。
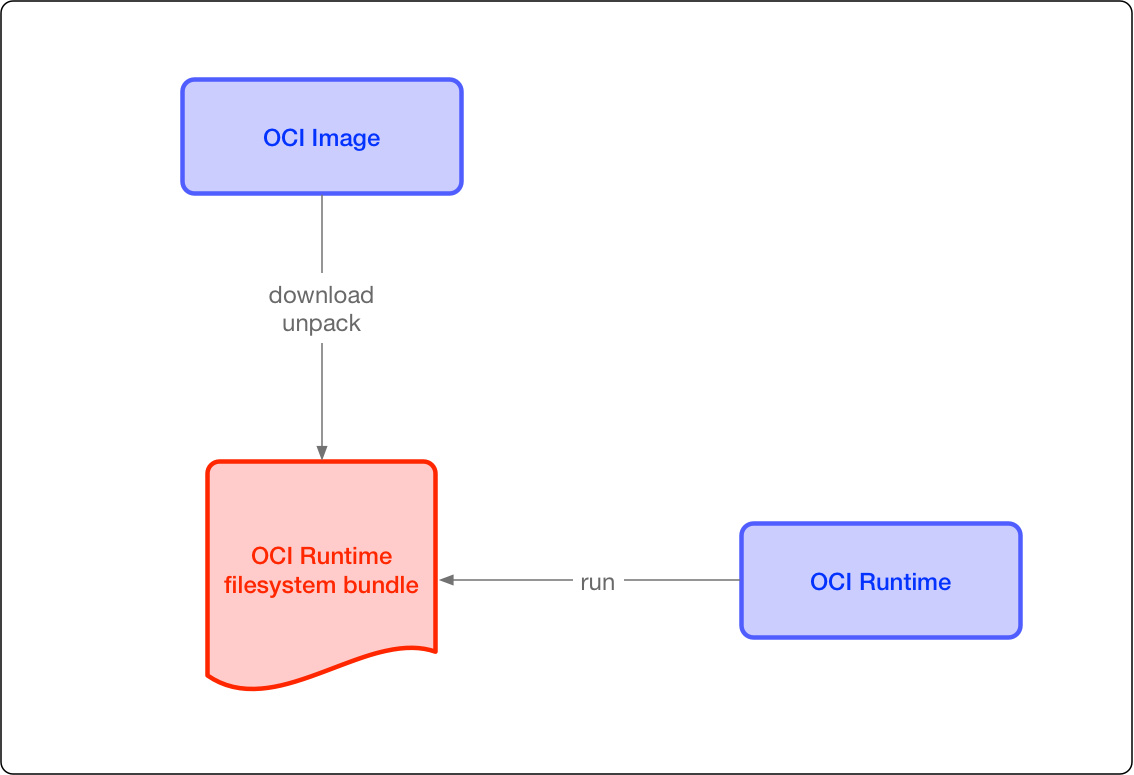
这两个协议通过 OCI runtime filesytem bundle 的标准格式连接在一起,OCI 镜像可以通过工具转换成 bundle,然后 OCI 容器引擎能够识别这个 bundle 来运行容器。
下面,我们来介绍这两个 OCI 标准。因为标准本身细节很多,而且还在不断维护和更新,如果不是容器的实现者,没有必须对每个细节都掌握。所以我以介绍概要为主,给大家有个主观的认知。
OCI 容器镜像主要包括几块内容:
- 文件系统:以 layer 保存的文件系统,每个 layer 保存了和上层之间变化的部分,layer 应该保存哪些文件,怎么表示增加、修改和删除的文件等
- config 文件:保存了文件系统的层级信息(每个层级的 hash 值,以及历史信息),以及容器运行时需要的一些信息(比如环境变量、工作目录、命令参数、mount 列表),指定了镜像在某个特定平台和系统的配置。比较接近我们使用
docker inspect <image_id>看到的内容 - manifest 文件:镜像的 config 文件索引,有哪些 layer,额外的 annotation 信息,manifest 文件中保存了很多和当前平台有关的信息
- index 文件:可选的文件,指向不同平台的 manifest 文件,这个文件能保证一个镜像可以跨平台使用,每个平台拥有不同的 manifest 文件,使用 index 作为索引
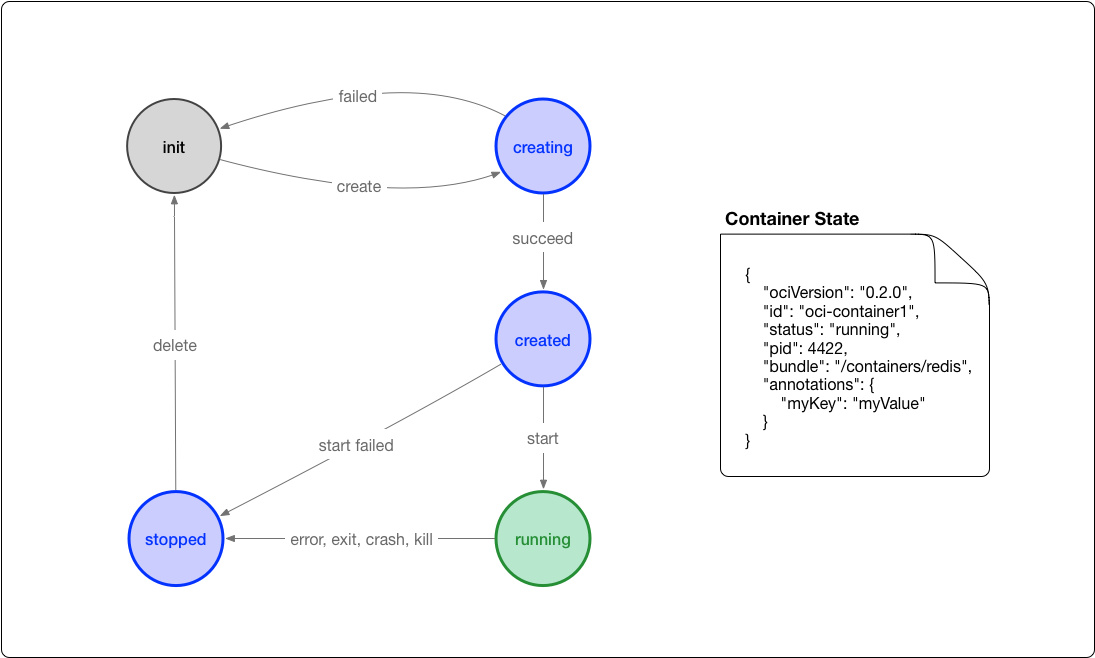
OCI 对容器 runtime 的标准主要是指定容器的运行状态,和 runtime 需要提供的命令。下图可以是容器状态转换图:
- init 状态:这个是我自己添加的状态,并不在标准中,表示没有容器存在的初始状态
- creating:使用
create命令创建容器,这个过程称为创建中 - created:容器创建出来,但是还没有运行,表示镜像和配置没有错误,容器能够运行在当前平台
- running:容器的运行状态,里面的进程处于 up 状态,正在执行用户设定的任务
- stopped:容器运行完成,或者运行出错,或者
stop命令之后,容器处于暂停状态。这个状态,容器还有很多信息保存在平台中,并没有完全被删除
runc 是 docker 捐赠给 OCI 的一个符合标准的 runtime 实现,目前 docker 引擎内部也是基于 runc 构建的。这部分我们就分析 runc 这个项目,加深对 OCI 的理解。
先来准备一个工作目录,下面所有的操作都是在这个目录下执行的,比如 mycontainer:
# mkdir mycontainer
接下来,准备容器镜像的文件系统,我们选择从 docker 镜像中提取:
# mkdir rootfs
# docker export $(docker create busybox) | tar -C rootfs -xvf -
# ls rootfs
bin  dev  etc  home  proc  root  sys  tmp  usr  var
有了 rootfs 之后,我们还要按照 OCI 标准有一个配置文件 config.json 说明如何运行容器,包括要运行的命令、权限、环境变量等等内容,runc 提供了一个命令可以自动帮我们生成:
# runc spec
# ls
config.json  rootfs
这样就构成了一个 OCI runtime bundle 的内容,这个 bundle 非常简单,就上面两个内容:config.json 文件和 rootfs 文件系统。config.json 里面的内容很长,这里就不贴出来了,我们也不会对其进行修改,直接使用这个默认生成的文件。有了这些信息,runc 就能知道怎么怎么运行容器了,我们先来看看简单的方法 runc run(这个命令需要 root 权限),这个命令类似于 docker run,它会创建并启动一个容器:
➜  runc run simplebusybox
/ # ls
bin   dev   etc   home  proc  root  sys   tmp   usr   var
/ # hostname
runc
/ # whoami
root
/ # pwd
/
/ # ip addr
1: lo: <LOOPBACK,UP,LOWER_UP> mtu 65536 qdisc noqueue qlen 1000
    link/loopback 00:00:00:00:00:00 brd 00:00:00:00:00:00
    inet 127.0.0.1/8 scope host lo
       valid_lft forever preferred_lft forever
    inet6 ::1/128 scope host
       valid_lft forever preferred_lft forever
/ # ps aux
PID   USER     TIME   COMMAND
    1 root       0:00 sh
   11 root       0:00 ps aux
最后一个参数是容器的名字,需要在主机上保证唯一性。运行之后直接进入到了容器的 sh 交互界面,和通过 docker run 看到的效果非常类似。但是这个容器并没有配置网络方面的内容,只是有一个默认的 lo 接口,因此无法和外部通信,但其他功能都正常。
此时,另开一个终端,可以查看运行的容器信息:
➜ runc list
ID              PID         STATUS      BUNDLE                                    CREATED                          OWNER
simplebusybox   18073       running     /home/cizixs/Workspace/runc/mycontainer   2017-11-02T06:54:52.023379345Z   root
目前,在我的机器上,runc 会把容器的运行信息保存在 /run/runc 目录下:
➜ tree /run/runc/
/run/runc/
└── simplebusybox
    └── state.json

1 directory, 1 file
除了 run 命令之外,我们也能通过create、start、stop、kill 等命令对容器状态进行更精准的控制。继续实验,因为接下来要在后台模式运行容器,所以需要对 config.json 进行修改。改动有两处,把 terminal 的值改成 false,修改 args 命令行参数为 sleep 20:
"process": {
        "terminal": false,
        "user": {
            "uid": 0,
            "gid": 0
        },
        "args": [
            "sleep", "20"
        ],
        ...
}
接着,用 runc 子命令来控制容器的运行,实现各个容器状态的转换:
// 使用 create 创建出容器,此时容器并没有运行,只是准备好了所有的运行环境
// 通过 list 命令可以查看此时容器的状态为 `created`
➜  runc create mycontainerid
➜  runc list
ID              PID         STATUS      BUNDLE                                    CREATED                          OWNER
mycontainerid   15871       created     /home/cizixs/Workspace/runc/mycontainer   2017-11-02T08:05:50.658423519Z   root


// 运行容器,此时容器会在后台运行,状态变成了 `running`
➜  runc start mycontainerid
➜  runc list
ID              PID         STATUS      BUNDLE                                    CREATED                          OWNER
mycontainerid   15871       running     /home/cizixs/Workspace/runc/mycontainer   2017-11-02T08:05:50.658423519Z   root

// 等待一段时间(20s)容器退出后,可以看到容器状态变成了 `stopped`
➜  runc list
ID              PID         STATUS      BUNDLE                                    CREATED                          OWNER
mycontainerid   0           stopped     /home/cizixs/Workspace/runc/mycontainer   2017-11-02T08:05:50.658423519Z   root

// 删除容器,容器的信息就不存在了
➜  runc delete mycontainerid
➜  runc list
ID          PID         STATUS      BUNDLE      CREATED     OWNER
把以上命令分开来虽然让事情变得复杂了,但是也有很多好处。可以类比 unix 系统 fork-exec 模式,在两者动作之间,用户可以做很多工作。比如把 create 和 start 分开,在创建出来容器之后,可以使用插件为容器配置多主机网络,或者准备存储设置等。
看完了 runc 命令演示,这部分来深入分析 runc 的代码实现。要想理解 runc 是怎么创建 linux 容器的,需要熟悉 namespace 和 cgroup、 go 语言 、常见的系统调用。
分析的代码对应的 commit id 如下,这个代码是非常接近 v1.0.0 版本的:
➜  runc git:(master) git rev-parse HEAD
0232e38342a8d230c2745b67c17050b2be70c6bc
runc 的代码结构如下(略去了部分内容):
➜  runc git:(master) tree -L 1 -F --dirsfirst
.
├── contrib/
├── libcontainer/
├── man/
├── script/
├── tests/
├── vendor/
├── checkpoint.go
├── create.go
├── delete.go
├── Dockerfile
├── events.go
├── exec.go
├── init.go
├── kill.go
├── LICENSE
├── list.go
├── main.go
├── Makefile
├── notify_socket.go
├── pause.go
├── PRINCIPLES.md
├── ps.go
├── README.md
├── restore.go
├── rlimit_linux.go
├── run.go
├── signalmap.go
├── signalmap_mipsx.go
├── signals.go
├── spec.go
├── start.go
├── state.go
├── tty.go
├── update.go
├── utils.go
└── utils_linux.go
main.go 是入口文件,根目录下很多 .go 文件是对应的命令(比如 run.go 对应 runc run 命令的实现),其他是一些功能性文件。
最核心的目录是 libcontainer,它是启动容器进程的最终执行者,runc 可以理解为对 libcontainer 的封装,以符合 OCI 的方式读取配置和文件,调用 libcontainer 完成真正的工作。如果熟悉 docker 的话,可能会知道 libcontainer 本来是 docker 引擎的核心代码,用以取代之前 lxc driver。
我们会追寻 runc run 命令的执行过程,看看代码的调用和实现。
main.go 使用 github.com/urfave/cli 库进行命令行解析,主要的思路是先声明各种参数解析、命令执行函数,运行的时候 cli 会解析命令行传过来的参数,把它们变成定义好的变量,调用指定的命令来运行。
func main() {
    app := cli.NewApp()
    app.Name = "runc"
    ...

    app.Commands = []cli.Command{
        checkpointCommand,
        createCommand,
        deleteCommand,
        eventsCommand,
        execCommand,
        initCommand,
        killCommand,
        listCommand,
        pauseCommand,
        psCommand,
        restoreCommand,
        resumeCommand,
        runCommand,
        specCommand,
        startCommand,
        stateCommand,
        updateCommand,
    }
    ...

    if err := app.Run(os.Args); err != nil {
        fatal(err)
    }
}
从上面可以看到命令函数列表,也就是 runc 支持的所有命令,命令行会实现命令的转发,我们关心的 runCommand 定义在 run.go 文件,它的执行逻辑是:
Action: func(context *cli.Context) error {
    if err := checkArgs(context, 1, exactArgs); err != nil {
        return err
    }
    if err := revisePidFile(context); err != nil {
        return err
    }
    spec, err := setupSpec(context)

    status, err := startContainer(context, spec, CT_ACT_RUN, nil)
    if err == nil {
        os.Exit(status)
    }
    return err
},
可以看到整个过程分为了四步:
- 检查参数个数是否符合要求
- 如果指定了 pid-file,把路径转换为绝对路径
- 根据配置读取
config.json文件中的内容,转换成 spec 结构对象 - 然后根据配置启动容器
其中 spec 的定义在 github.com/opencontainers/runtime-spec/specs-go/config.go#Spec,其实就是对应了 OCI bundle 中 config.json 的字段,最重要的内容在 startContainer 函数中:
utils_linux.go#startContainer
func startContainer(context *cli.Context, spec *specs.Spec, action CtAct, criuOpts *libcontainer.CriuOpts) (int, error) {
    id := context.Args().First()
    if id == "" {
        return -1, errEmptyID
    }
    ......

    container, err := createContainer(context, id, spec)
    if err != nil {
        return -1, err
    }
    ......

    r := &runner{
        enableSubreaper: !context.Bool("no-subreaper"),
        shouldDestroy:   true,
        container:       container,
        listenFDs:       listenFDs,
        notifySocket:    notifySocket,
        consoleSocket:   context.String("console-socket"),
        detach:          context.Bool("detach"),
        pidFile:         context.String("pid-file"),
        preserveFDs:     context.Int("preserve-fds"),
        action:          action,
        criuOpts:        criuOpts,
    }
    return r.run(spec.Process)
}
这个函数的内容也不多,主要分成两部分:
- 调用
createContainer创建出来容器,这个容器只是一个逻辑上的概念,保存了 namespace、cgroups、mounts、capabilities 等所有 Linux 容器需要的配置 - 然后创建
runner对象,调用r.run运行容器。这才是运行最终容器进程的地方,它会启动一个新进程,把进程放到配置的 namespaces 中,设置好 cgroups 参数以及其他内容
我们先来看 utils_linux.go#createContainer:
func createContainer(context *cli.Context, id string, spec *specs.Spec) (libcontainer.Container, error) {
    config, err := specconv.CreateLibcontainerConfig(&specconv.CreateOpts{
        CgroupName:       id,
        UseSystemdCgroup: context.GlobalBool("systemd-cgroup"),
        NoPivotRoot:      context.Bool("no-pivot"),
        NoNewKeyring:     context.Bool("no-new-keyring"),
        Spec:             spec,
        Rootless:         isRootless(),
    })
    ....

    factory, err := loadFactory(context)
    ....
    return factory.Create(id, config)
}
它最终会返回一个 libcontainer.Container 对象,上面提到,这并不是一个运行的容器,而是逻辑上的容器概念,包含了 linux 上运行一个容器需要的所有配置信息。
函数的内容分为两部分:
- 创建 config 对象,这个配置对象的定义在
libcontainer/configs/config.go#Config,包含了容器运行需要的所有参数。specconv.CreateLibcontainerConfig这一个函数就是把 spec 转换成 libcontainer 内部的 config 对象。这个 config 对象是平台无关的,从逻辑上定义了容器应该是什么样的配置 - 通过 libcontainer 提供的 factory,创建满足
libcontainer.Container接口的对象
libcontainer.Container 是个接口,定义在 libcontainer/container_linux.go 文件中:
type Container interface {
    BaseContainer

    // 下面这些接口是平台相关的,也就是 linux 平台提供的特殊功能

    // 使用 criu 把容器状态保存到磁盘
    Checkpoint(criuOpts *CriuOpts) error

    // 利用 criu 从磁盘中重新 load 容器
    Restore(process *Process, criuOpts *CriuOpts) error

    // 暂停容器的执行
    Pause() error

    // 继续容器的执行
    Resume() error

    // 返回一个 channel,可以从里面读取容器的 OOM 事件
    NotifyOOM() (<-chan struct{}, error)

    // 返回一个  channel,可以从里面读取容器内存压力事件
    NotifyMemoryPressure(level PressureLevel) (<-chan struct{}, error)
}
里面包含了 Linux 平台特有的功能,基础容器接口为 BaseContainer,定义在 libcontainer/container.go 文件中,它定义了容器通用的方法:
type BaseContainer interface {
    // 返回容器 ID
    ID() string

    // 返回容器运行状态
    Status() (Status, error)

    // 返回容器详细状态信息
    State() (*State, error)

    // 返回容器的配置
    Config() configs.Config

    // 返回运行在容器里所有进程的 PID
    Processes() ([]int, error)

    // 返回容器的统计信息,主要是网络接口信息和 cgroup 中能收集的统计数据
    Stats() (*Stats, error)

    // 设置容器的配置内容,可以动态调整容器
    Set(config configs.Config) error

    // 在容器中启动一个进程
    Start(process *Process) (err error)

    // 运行容器
    Run(process *Process) (err error)

    // 销毁容器,就是删除容器
    Destroy() error

    // 给容器的 init 进程发送信号
    Signal(s os.Signal, all bool) error

    // 告诉容器在 init 结束后执行用户进程
    Exec() error
}
可以看到,上面是容器应该支持的命令,包含了查询状态和创建、销毁、运行等。
这里使用 factory 模式是为了支持不同平台的容器,每个平台实现自己的 factory ,根据运行平台调用不同的实现就行。不过 runc 目前只支持 linux 平台,所以我们看 libcontainer/factory_linux.go 中的实现:
func New(root string, options ...func(*LinuxFactory) error) (Factory, error) {
    if root != "" {
        if err := os.MkdirAll(root, 0700); err != nil {
            return nil, newGenericError(err, SystemError)
        }
    }
    l := &LinuxFactory{
        Root:      root,
        InitPath:  "/proc/self/exe",
        InitArgs:  []string{os.Args[0], "init"},
        Validator: validate.New(),
        CriuPath:  "criu",
    }
    Cgroupfs(l)
    for _, opt := range options {
        if opt == nil {
            continue
        }
        if err := opt(l); err != nil {
            return nil, err
        }
    }
    return l, nil
}

func (l *LinuxFactory) Create(id string, config *configs.Config) (Container, error) {
    ......
    containerRoot := filepath.Join(l.Root, id)
    if err := os.MkdirAll(containerRoot, 0711); err != nil {
        return nil, newGenericError(err, SystemError)
    }
    ......

    c := &linuxContainer{
        id:            id,
        root:          containerRoot,
        config:        config,
        initPath:      l.InitPath,
        initArgs:      l.InitArgs,
        criuPath:      l.CriuPath,
        newuidmapPath: l.NewuidmapPath,
        newgidmapPath: l.NewgidmapPath,
        cgroupManager: l.NewCgroupsManager(config.Cgroups, nil),
    }
    ......
    c.state = &stoppedState{c: c}
    return c, nil
}
New 创建了一个 linux 平台的 factory,从 LinuxFactory 的 fields 可以看到,它里面保存了和 linux 平台相关的信息。
Create 返回的是 linuxContainer 对象,它是 libcontainer.Container 接口的实现。有了 libcontainer.Container 对象之后,回到 utils_linux.go#Runner 中看它是如何运行容器的:
func (r *runner) run(config *specs.Process) (int, error) {

    // 根据 OCI specs.Process 生成 libcontainer.Process 对象
    // 如果出错,运行 destroy 清理产生的中间文件
    process, err := newProcess(*config)
    if err != nil {
        r.destroy()
        return -1, err
    }

    ......
    var (
        detach = r.detach || (r.action == CT_ACT_CREATE)
    )
    handler := newSignalHandler(r.enableSubreaper, r.notifySocket)

    // 根据是否进入到容器终端来配置 tty,标准输入、标准输出和标准错误输出
    tty, err := setupIO(process, rootuid, rootgid, config.Terminal, detach, r.consoleSocket)
    defer tty.Close()

    switch r.action {
    case CT_ACT_CREATE:
        err = r.container.Start(process)
    case CT_ACT_RESTORE:
        err = r.container.Restore(process, r.criuOpts)
    case CT_ACT_RUN:
        err = r.container.Run(process)
    default:
        panic("Unknown action")
    }

    ......
    status, err := handler.forward(process, tty, detach)
    if detach {
        return 0, nil
    }
    r.destroy()
    return status, err
}
runner 是一层封装,主要工作是配置容器的 IO,根据命令去调用响应的方法。newProcess(*config) 将 OCI spec 中的 process 对象转换成 libcontainer 中的 process,process 的定义在 libcontainer/process.go#Process,包括进程的命令、参数、环境变量、用户、标准输入输出等。
有了 process,下一步就是运行这个进程 r.container.Run(process),Run 会调用内部的 libcontainer/container_linux.go#start() 方法:
func (c *linuxContainer) start(process *Process, isInit bool) error {
    parent, err := c.newParentProcess(process, isInit)

    if err := parent.start(); err != nil {
        return newSystemErrorWithCause(err, "starting container process")
    }

    c.created = time.Now().UTC()
    if isInit {
        ......
        for i, hook := range c.config.Hooks.Poststart {
            if err := hook.Run(s); err != nil {
                return newSystemErrorWithCausef(err, "running poststart hook %d", i)
            }
        }
    }
    return nil
}
运行容器进程,在容器进程完全起来之前,需要利用父进程和容器进程进行通信,因此这里封装了一个 paerentProcess 的概念,
func (c *linuxContainer) newParentProcess(p *Process, doInit bool) (parentProcess, error) {
    parentPipe, childPipe, err := utils.NewSockPair("init")
    cmd, err := c.commandTemplate(p, childPipe)
    ......
    return c.newInitProcess(p, cmd, parentPipe, childPipe)
}
parentPipe 和 childPipe 就是父进程和创建出来的容器 init 进程通信的管道,这个管道用于在 init 容器进程启动之后做一些配置工作,非常重要,后面会看到它们的使用。
最终创建的 parentProcess 是 libcontainer/process_linux.go#initProcess 对象,
type initProcess struct {
    cmd             *exec.Cmd
    parentPipe      *os.File
    childPipe       *os.File
    config          *initConfig
    manager         cgroups.Manager
    intelRdtManager intelrdt.Manager
    container       *linuxContainer
    fds             []string
    process         *Process
    bootstrapData   io.Reader
    sharePidns      bool
}
cmd是 init 程序,也就是说启动的容器子进程是runc init,后面我们会说明它的作用paerentPipe和childPipe是父子进程通信的管道bootstrapDta中保存了容器 init 初始化需要的数据process会保存容器 init 进程,用于父进程获取容器进程信息和与之交互
有了 parentProcess,接下来它的 start() 方法会被调用:
func (p *initProcess) start() error {
    defer p.parentPipe.Close()
    err := p.cmd.Start()
    p.process.ops = p
    p.childPipe.Close()

    // 把容器 pid 加入到 cgroup 中
    if err := p.manager.Apply(p.pid()); err != nil {
        return newSystemErrorWithCause(err, "applying cgroup configuration for process")
    }

    // 给容器进程发送初始化需要的数据
    if _, err := io.Copy(p.parentPipe, p.bootstrapData); err != nil {
        return newSystemErrorWithCause(err, "copying bootstrap data to pipe")
    }

    // 等待容器进程完成 namespace 的配置
    if err := p.execSetns(); err != nil {
        return newSystemErrorWithCause(err, "running exec setns process for init")
    }

    // 创建网络 interface
    if err := p.createNetworkInterfaces(); err != nil {
        return newSystemErrorWithCause(err, "creating network interfaces")
    }

    // 给容器进程发送进程配置信息
    if err := p.sendConfig(); err != nil {
        return newSystemErrorWithCause(err, "sending config to init process")
    }

    // 和容器进程进行同步
    // 容器 init 进程已经准备好环境,准备运行容器中的用户进程
    // 所以这里会运行 prestart 的钩子函数
    ierr := parseSync(p.parentPipe, func(sync *syncT) error {
        ......
        return nil
    })

    // Must be done after Shutdown so the child will exit and we can wait for it.
    if ierr != nil {
        p.wait()
        return ierr
    }
    return nil
}
这里可以看到管道的用处:父进程把 bootstrapData 发送给子进程,子进程根据这些数据配置 namespace、cgroups,apparmor 等参数;等待子进程完成配置,进行同步。
容器子进程会做哪些事情呢?用同样的方法,可以找到 runc init 程序运行的逻辑代码在 libcontainer/standard_init_linux.go#Init(),它做的事情包括:
- 配置 namespace
- 配置网络和路由规则
- 准备 rootfs
- 配置 console
- 配置 hostname
- 配置 apparmor profile
- 配置 sysctl 参数
- 初始化 seccomp 配置
- 配置 user namespace
上面这些就是 linux 容器的大部分配置,完成这些之后,它就调用 Exec 执行用户程序:
if err := syscall.Exec(name, l.config.Args[0:], os.Environ()); err != nil {
    return newSystemErrorWithCause(err, "exec user process")
}
NOTE:其实,init 在执行自身的逻辑之前,会被 libcontainer/nsenter 劫持,nsenter 是 C 语言编写的代码,目的是为容器配置 namespace,它会从 init pipe 中读取 namespace 的信息,调用setns 把当前进程加入到指定的 namespace 中。
之后,它会调用 clone 创建一个新的进程,初始化完成之后,把子进程的进程号发送到管道中,nsenter 完成任务退出,子进程会返回,让 init 接管,对容器进行初始化。
至此,容器的所有内容都 ok,而且容器里的用户进程也启动了。
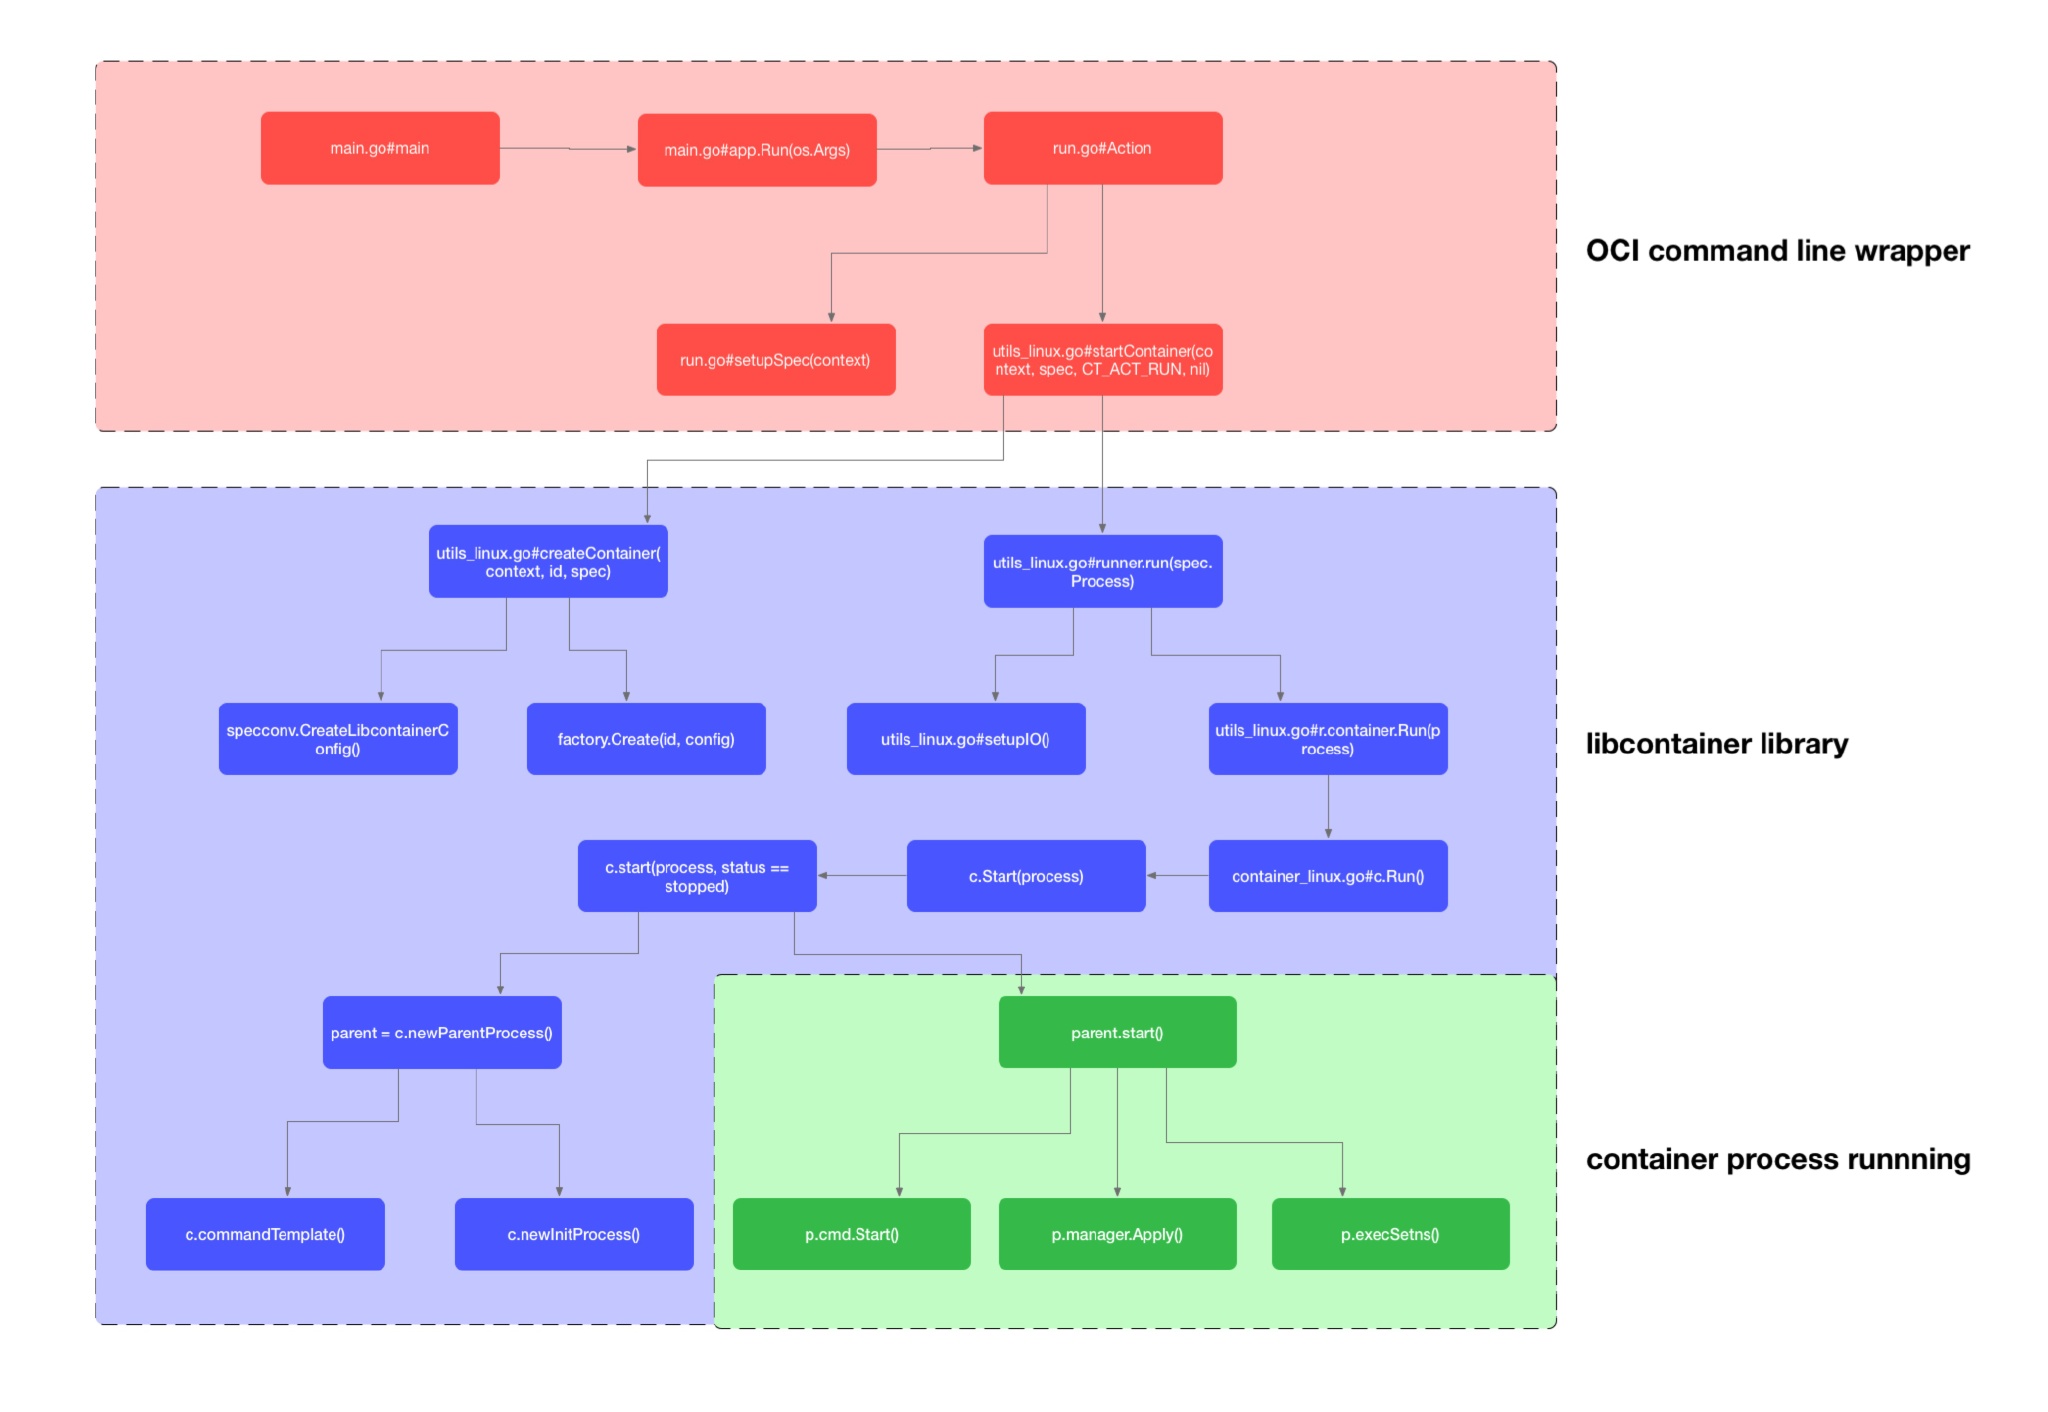
runc 的代码调用关系如上图所示,可以在新页面打开查看大图。主要逻辑分成三块:
- 最上面的红色是命令行封装,这是根据 OCI 标准实现的接口,它能读取 OCI 标准的容器 bundle,并实现了 OCI 指定 run、start、create 等命令
- 中间的紫色部分就是 libcontainer,它是 runc 的核心内容,是对 linux namespace、cgroups 技术的封装
- 右下角的绿色部分是真正的创建容器子进程的部分


