在之前,我们已经在静态的场景里创建了主角和一些敌人,有点无聊了,是时候加强一下背景和场景了。在前15年里,你会发现每个单机2D游戏都是“parallax scrolling (视差卷轴)”。
简单的说,思路就是以不同的速度移动背景层(即,较远的层,移动得慢)。如果工作正常,它会有一个纵深视觉错觉,非常酷且容易做的效果。
此外,很多shmups(横版卷动游戏)使用一个或多个轴的卷动(除了最初的那个,Space Invaders)
让我们在Unity里实现它。
关于如何将卷动轴添加到游戏中,我们需要花一点时间思考。这是一件在编码前非常好的事情。:)
我们有下面的想法:
- 第一个选择:主角和镜头移动,剩下对象固定不动。
- 第二个选择:主角和镜头静止,level层做跑步机式运动。
如果有透视镜头,第一个选择非常容易,视差很明显:背景元素有更高的景深,因此,它们在后面且看上去移动得更慢。
但是在Unity的标准2D游戏里,我们使用正交镜头,并没有景深补尝。
关于镜头:在我们的游戏中,记得将镜头对象的“Projection”属性设置为
Orthographic.
Perspective(透视)是拥有景深的经典3D镜头
Orthographic(正交)表示所有东西都在同一面,它在GUI和2D游戏里特别有用
在我们的游戏里添加视差卷动效果,最好的方法是混合使用两种方法,我们有两种卷动方式:
- 主角和镜头向前移动
- 除开镜头的移动,背景元素还要以不同的速度移动
注:你可能会问:“为什么不把镜头设置为主角对象的子对象呢?”。确实,在Unity里,如果将一个对象(镜头或其它)设置为一个对象的子对象,那么这个对象将处于其父对象的相对位置。所以,如果镜头是主角的子对象且在它的中心,它将会跟随主角移动。这样也许是可行的,但它并不是本次游戏的玩法。
在*shmup(横版卷轴游戏)*里,镜头会限制主角的移动,如果镜头随着主角在水平和垂直轴间移动,那主角可以移动到任何地方,而我们想让主角呆在一个限制区域里。
在2D游戏里,我们建议保持镜头的独立性,甚至在平台类游戏里,镜头同样不是始终跟随着主角:它在一定限制里跟随着。Super Mario World大概是镜头运用最好的平台类游戏。你可以看看它是怎么样的。
添加卷动会对我们的游戏产生影响,尤其是敌人们。现在,游戏一开始,它们会移动,射击。然而,我们希望它们听话的等着,直到该它们出现时。
如何生成敌人?这肯定依赖游戏,你可以在触发事件时产出敌人,产生数量,预定义地点等。
看看我们将该怎么做:我们直接将敌人(Poulpies)放置到场景里(通过拖拽Prefab到场景里)。默认情况下,它们是静止的,直到镜头触达,激活它们。
好事情是你可以使用Unity编辑器设置敌人们,不用做任何事情,你已经拥有了一个关卡编辑器。
它是一个选择,但并不科学。:)
注:一个大的项目,你最好有一个专用的关卡编辑器,像"Tiled"或者自已自定义一个。你的关卡可以是文本文件(plain text, XML, JSON等),像你在Unity示例里看的那样。
首先,we must define what our planes are and for each, if it's a loop or not. 一个循环的背景关卡进行期间将不停的重复。如:像天空就特别的适用。
添加一个新层到场景里,做为背景元素,我们将得到:
| 层 | 循环 |
|---|---|
| Background with the sky(天空背景) | Yes |
| Background(第一组悬浮平台) | No |
| Middleground(第二组悬浮平台) | No |
| Foreground with players and enemies(主角和敌人的前景) | No |
只要我们想,我们可添加很多层的背景。
小心:如果添加的层在foreground层之前,小心可见性。很多游戏不会这样做,因为它会降低游戏的清晰度,尤其在shmup(横向卷轴游戏)里,游戏玩素需要清晰可见。
现在,我们知道如何将parallax scrolling(视差卷轴)来应用于我们的游戏。
不知道? “Scrolling shooters” 是shmups的另一个名字
思考完了,是时候练习了!
Unity的标准包里有些parallax scrolling脚本(可以在Asset Store看看2D platformer demo)。你当然可以使用它们,但是我们认为,第一次从头开始构建一个会比较有趣。
标准包:它们非常实用,但小心不要滥用它们。使用标准包会禁锢你的思想,还会使你的游戏没有个性。它会让你的游戏有Unity式的感觉。
还记得所有flash游戏都是一个模子吗?
我们将从容易的部分开始:不循环的滚动背景。
还记得我们之前用到的“MoveScript”吗?基本是相同的:a speed and a direction applied over time.
创建新的脚本"ScrollingScript":
using UnityEngine;

/// <summary>
/// Parallax scrolling script that should be assigned to a layer
/// </summary>
public class ScrollingScript : MonoBehaviour
{
  /// <summary>
  /// Scrolling speed
  /// </summary>
  public Vector2 speed = new Vector2(2, 2);

  /// <summary>
  /// Moving direction
  /// </summary>
  public Vector2 direction = new Vector2(-1, 0);

  /// <summary>
  /// Movement should be applied to camera
  /// </summary>
  public bool isLinkedToCamera = false;

  void Update()
  {
    // Movement
    Vector3 movement = new Vector3(
      speed.x * direction.x,
      speed.y * direction.y,
      0);

    movement *= Time.deltaTime;
    transform.Translate(movement);

    // Move the camera
    if (isLinkedToCamera)
    {
      Camera.main.transform.Translate(movement);
    }
  }
}
将此脚本添加到下面的这些游戏对象上,并设置对应的参数值:
| 层 | 速度SPEED | 方向DIRECTION | 连接到镜头 |
|---|---|---|---|
| Background | (1, 1) | (-1, 0, 0) | No |
| Background elements | (1.5, 1.5) | (-1, 0, 0) | No |
| Middleground | (2.5, 2,5) | (1, 0, 0) | No |
| Foreground | (1, 1) | (1, 0, 0) | Yes |
为了更好的展示,往场景里添加一些元素:
- 添加第三个
background到之前两个的后台 - 在
Background elements层里添加一些小的平台元素 - 在
Middleground里添加平台元素 - 在
Foreground层的右侧添加一些敌人,让它们更加远离镜头一点
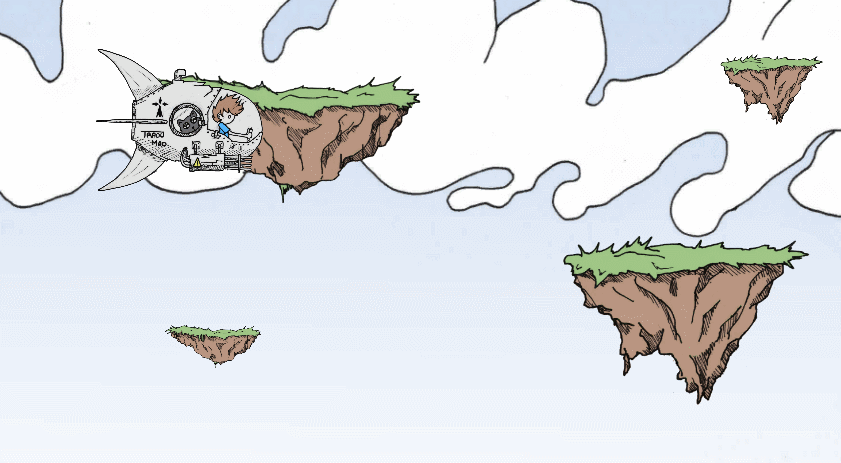
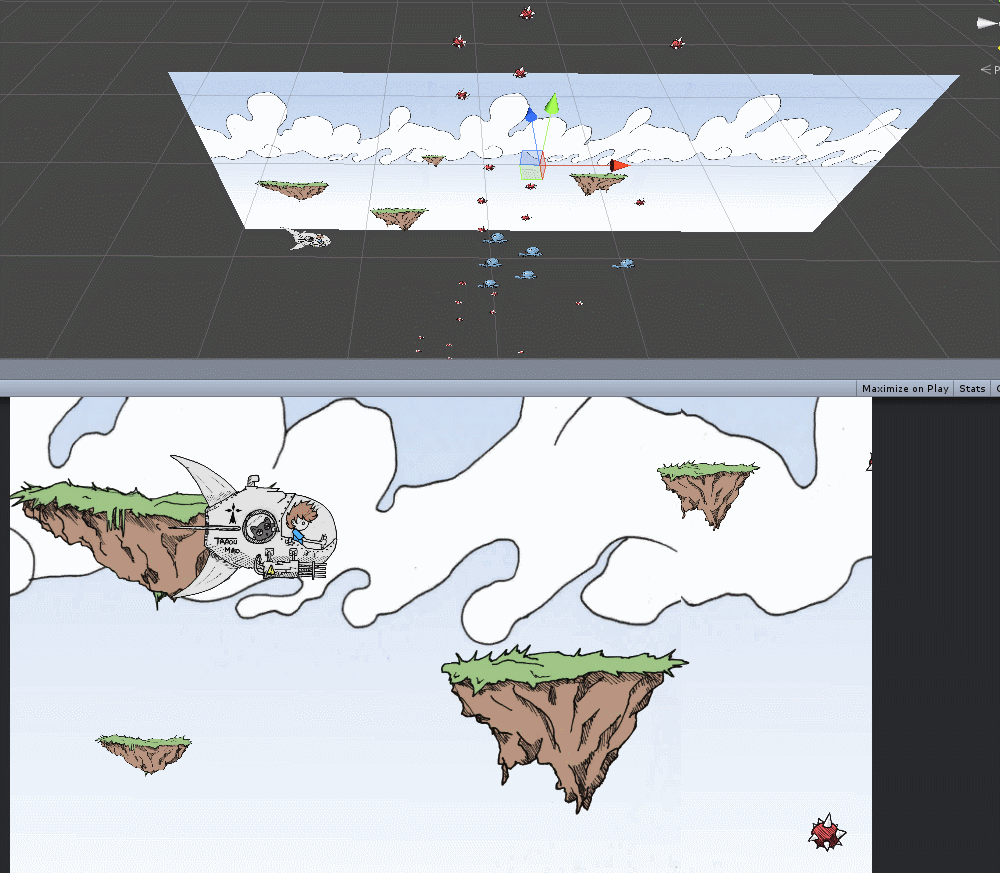
效果如下:
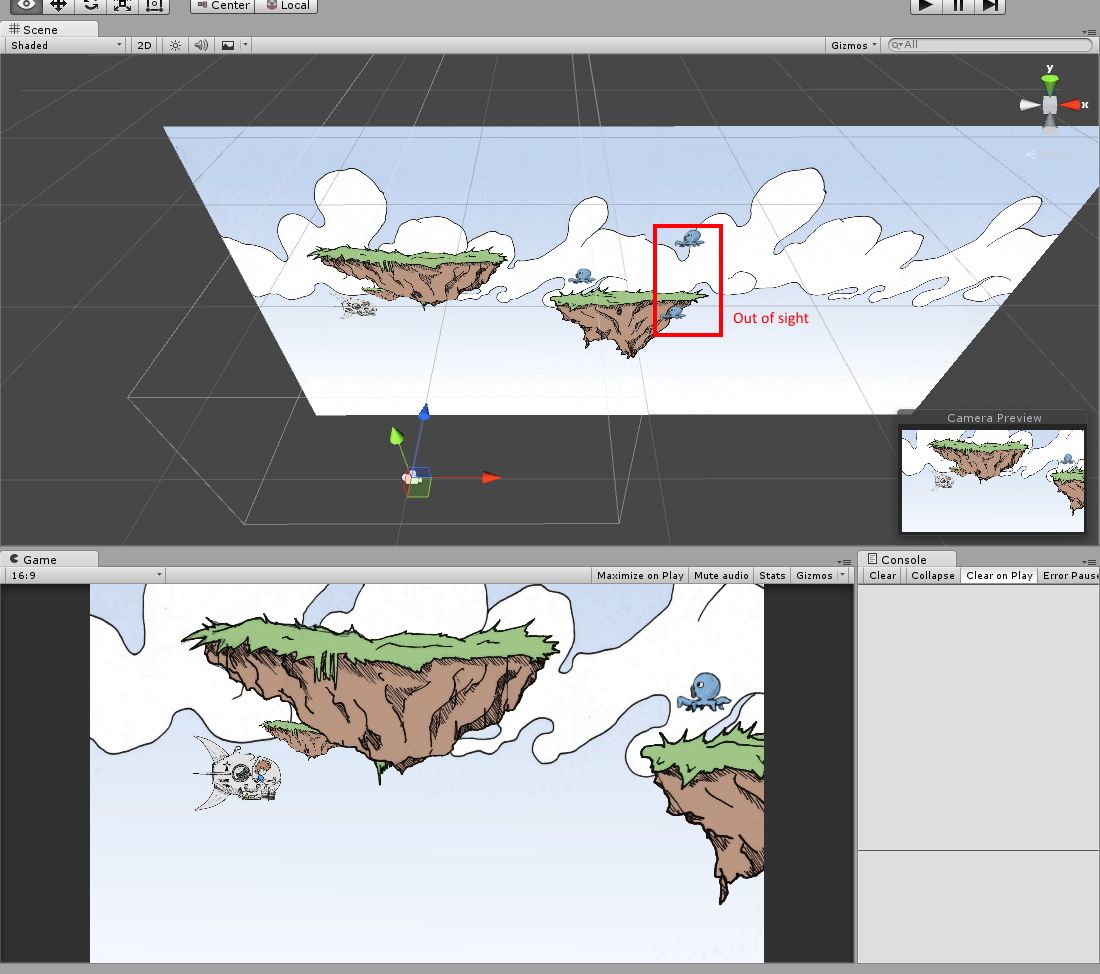
还不错哦!但是敌人还在镜头外的时候,它们已经在移动和射击了,甚至在它们产生前。
而且,当它们穿过主角后也并没有消失(缩小“Scene”视图,看看场景的左边:Poulpies仍然在移动)
注:尝试这些值:)
我们将在后面修正这些问题,首先,我们需要去管理这无穷无尽的背景(天空)
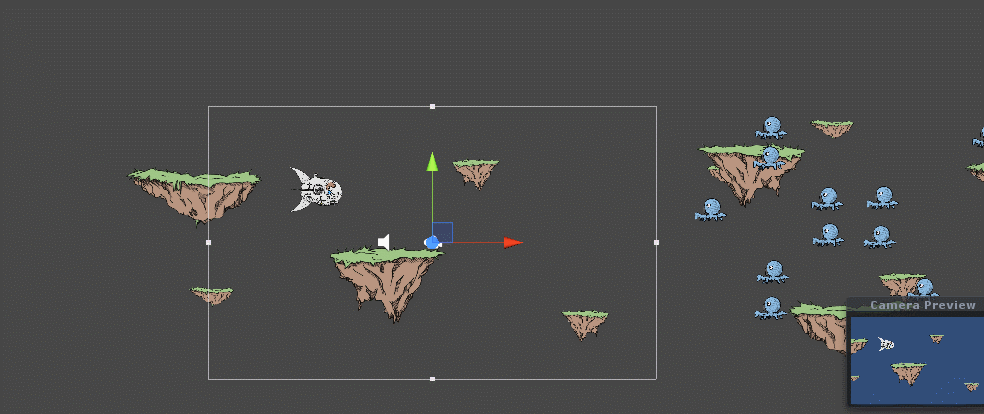
为了获取无限背景,我们仅仅只需要盯着无限层中最左边的子对象,当这个对象超出了镜头的左边缘,我们就将它移动到所在层的最右边。无限循环。
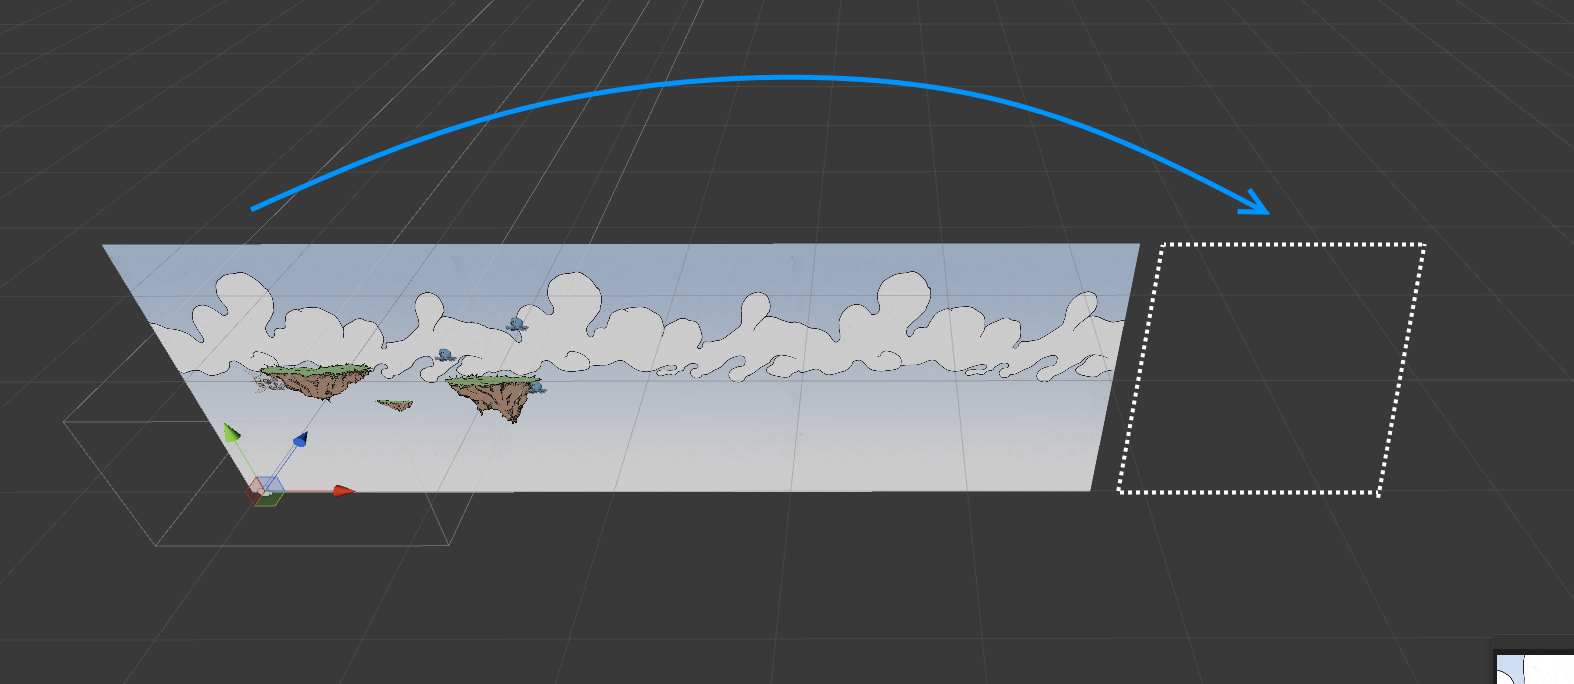
在层填充图片时,注意你需要使用超过整个镜头的范围大小的图片,所以,我们是看不到后面的东西的。这里是天空的3个部分,but it's completely arbitrary.
在你的游戏里,找到资源消耗和灵活性的平衡
在我们的例子里,想法是在层里找到所有的子对象,检查它们的渲染。
关于使用渲染组件的注意事项:它无法作用于不可见对象(如,那些处理脚本)。However, a use case when you need to do this on invisible objects is unlikely.
我们将用一个简单的方法通过镜头来检查一个对象是否可见。我们在the community wiki里发现了它,它即不是一个类也不是脚本,而是一个C#类的扩展。
Extension扩展:C#允许你通过扩展继承一个类,而不需要这个类的源代码。
创建一个静态方法,它的第一个参数像这样:
this Type currentInstance,现在,Type类在你自己的类可用的任何位置都有一个新的方法。在扩展方法的内部,你可以使用
currentInstance替代this来引用当前的实例调用方法。
创建一个新的C#文件,命名为“RendererExtensions.cs”,填入以下内容:
using UnityEngine;

public static class RendererExtensions
{
  public static bool IsVisibleFrom(this Renderer renderer, Camera camera)
  {
    Plane[] planes = GeometryUtility.CalculateFrustumPlanes(camera);
    return GeometryUtility.TestPlanesAABB(planes, renderer.bounds);
  }
}
是不是很简单?
命名空间:你可能已经注意到,当你通过“Project”视图创建脚本的时候,Unity在
MonoBehaviour脚本的范围里并没有添加命名空间,And yet Unity does handle namespaces...在本教程里,我们不会使用命名空间,然而在你的真实项目里,你或许应该考虑使用。不然,给你的类加前缀以避免和第三方库产生冲突(像NGUI)
不使用命名空间背后真正的原因是,在Unity 4的日子里(本教程最初使用Unity 4.3编写),命名空间会阻止使用默认参数,这已经不再是一个问题了,所以:使用命名空间吧!
我们会在无限层最左边的对象调用该方法。
完整的“ScrollingScript” (解释在下面):
using System.Collections.Generic;
using System.Linq;
using UnityEngine;

/// <summary>
/// Parallax scrolling script that should be assigned to a layer
/// </summary>
public class ScrollingScript : MonoBehaviour
{
    /// <summary>
    /// Scrolling speed
    /// </summary>
    public Vector2 speed = new Vector2(10, 10);

    /// <summary>
    /// Moving direction
    /// </summary>
    public Vector2 direction = new Vector2(-1, 0);

    /// <summary>
    /// Movement should be applied to camera
    /// </summary>
    public bool isLinkedToCamera = false;

    /// <summary>
    /// 1 - Background is infinite
    /// </summary>
    public bool isLooping = false;

    /// <summary>
    /// 2 - List of children with a renderer.
    /// </summary>
    private List<SpriteRenderer> backgroundPart;

    // 3 - Get all the children
    void Start()
    {
        // For infinite background only
        if (isLooping)
        {
            // Get all the children of the layer with a renderer
            backgroundPart = new List<SpriteRenderer>();

            for (int i = 0; i < transform.childCount; i++)
            {
                Transform child = transform.GetChild(i);
                SpriteRenderer r = child.GetComponent<SpriteRenderer>();

                // Add only the visible children
                if (r != null)
                {
                    backgroundPart.Add(r);
                }
            }

            // Sort by position.
            // Note: Get the children from left to right.
            // We would need to add a few conditions to handle
            // all the possible scrolling directions.
            backgroundPart = backgroundPart.OrderBy(
              t => t.transform.position.x
            ).ToList();
        }
    }

    void Update()
    {
        // Movement
        Vector3 movement = new Vector3(
          speed.x * direction.x,
          speed.y * direction.y,
          0);

        movement *= Time.deltaTime;
        transform.Translate(movement);

        // Move the camera
        if (isLinkedToCamera)
        {
            Camera.main.transform.Translate(movement);
        }

        // 4 - Loop
        if (isLooping)
        {
            // Get the first object.
            // The list is ordered from left (x position) to right.
            SpriteRenderer firstChild = backgroundPart.FirstOrDefault();

            if (firstChild != null)
            {
                // Check if the child is already (partly) before the camera.
                // We test the position first because the IsVisibleFrom
                // method is a bit heavier to execute.
                if (firstChild.transform.position.x < Camera.main.transform.position.x)
                {
                    // If the child is already on the left of the camera,
                    // we test if it's completely outside and needs to be
                    // recycled.
                    if (firstChild.IsVisibleFrom(Camera.main) == false)
                    {
                        // Get the last child position.
                        SpriteRenderer lastChild = backgroundPart.LastOrDefault();

                        Vector3 lastPosition = lastChild.transform.position;
                        Vector3 lastSize = (lastChild.bounds.max - lastChild.bounds.min);

                        // Set the position of the recyled one to be AFTER
                        // the last child.
                        // Note: Only work for horizontal scrolling currently.
                        firstChild.transform.position = new Vector3(lastPosition.x + lastSize.x, firstChild.transform.position.y, firstChild.transform.position.z);

                        // Set the recycled child to the last position
                        // of the backgroundPart list.
                        backgroundPart.Remove(firstChild);
                        backgroundPart.Add(firstChild);
                    }
                }
            }
        }
    }
}
(注释里的数字,对应下面的解释)
- 我们需要一个公有变量,可以在“Inspector”视图上打开“looping”
- 我们同样需要一个私有变量来存储层的子对象
- 在
Start()方法里,我们将渲染的children添加到backgroundPart数组里。谢谢LINQ,我们利用x坐标排序,将最左边对象放到数组的第一个位置 - 在
Update()方法里,如果isLooping是true,我们将存储在backgroundPart数组的第一个child取出,检查它是否已经完全在在镜头范围之外,如果是,将它移动到最右边的child后面,最后,我们将它添加到backgroundPart数组最后的位置上。
的确,backgroundPart在场景里表现得非常的精确。
记住在0 - Background的“ScrollingScript”里的“Inspector”,勾选中"Is Looping"属性,否则,它不会(可预见的)正常工作。
(点击图片查看动画)
成啦!我们终于有一个功能性的“parallax scrolling”应用。
注意:我们为什么没有使用
OnBecameVisible()和OnBecameInvisible()方法?因为它们坏了。这些方法的基本思想是在对象渲染的时候执行代码片段(or vice-versa)。它们就像
Start()或Stop()方法 (如果你需要,在MonoBehaviour里添加方法,Unity会使用它)问题是这些方法同样会在Unity编辑器的“Scene”视图渲染的时候执行,意思是,我们无法从Unity编辑器和编译时得到同样的表现 (无论什么平台)。这非常的危险和不合理。我们强烈建议避免使用这些方法
让我们更新一下之前的脚本
我们之前说明,enemies应该是不可用的,直到它们出现在镜头里。
一旦它们完全的离开屏幕,它们也应该被消除。
我们需要更新“EnemyScript”,它就这样:
- 禁止移动,碰撞和自动开火 (初始化的时候)
- 确认渲染时对象已经在镜头的视界里
- 激活它
- 当它在镜头外时,销毁它
(编号引用到代码里的注释)
using UnityEngine;

/// <summary>
/// Enemy generic behavior
/// </summary>
public class EnemyScript : MonoBehaviour
{
    private bool hasSpawn;
    private MoveScript moveScript;
    private WeaponScript[] weapons;
    private Collider2D coliderComponent;
    private SpriteRenderer rendererComponent;

    void Awake()
    {
        // Retrieve the weapon only once
        weapons = GetComponentsInChildren<WeaponScript>();

        // Retrieve scripts to disable when not spawn
        moveScript = GetComponent<MoveScript>();

        coliderComponent = GetComponent<Collider2D>();

        rendererComponent = GetComponent<SpriteRenderer>();
    }

    // 1 - Disable everything
    void Start()
    {
        hasSpawn = false;

        // Disable everything
        // -- collider
        coliderComponent.enabled = false;
        // -- Moving
        moveScript.enabled = false;
        // -- Shooting
        foreach (WeaponScript weapon in weapons)
        {
            weapon.enabled = false;
        }
    }

    void Update()
    {
        // 2 - Check if the enemy has spawned.
        if (hasSpawn == false)
        {
            if (rendererComponent.IsVisibleFrom(Camera.main))
            {
                Spawn();
            }
        }
        else
        {
            // Auto-fire
            foreach (WeaponScript weapon in weapons)
            {
                if (weapon != null && weapon.enabled && weapon.CanAttack)
                {
                    weapon.Attack(true);
                }
            }

            // 4 - Out of the camera ? Destroy the game object.
            if (rendererComponent.IsVisibleFrom(Camera.main) == false)
            {
                Destroy(gameObject);
            }
        }
    }

    // 3 - Activate itself.
    private void Spawn()
    {
        hasSpawn = true;

        // Enable everything
        // -- Collider
        coliderComponent.enabled = true;
        // -- Moving
        moveScript.enabled = true;
        // -- Shooting
        foreach (WeaponScript weapon in weapons)
        {
            weapon.enabled = true;
        }
    }
}
运行游戏,啊,这里有个bug。
“MoveScript”并没有产生正常的效果:Player永远无法触达enemies,因为它们都跟着Foreground层在滚动:
记得我们往这一层添加过“ScrollingScript”吗?并且将镜头跟随player移动!
这里有个简单的解决方法:把“ScrollingScript”从Foreground层移动到player身上!
为什么不呢?在这一层中唯一移动的对象是它,且脚本不是特定于某种对象。
按下“Play”按钮,观察:成啦
- Enemies在它们产生前都是禁止的 (直到镜头到达它们的位置)
- 当它们离开镜头时,它们消失了

(点击图片,看看是怎么样的)
你可能已经注意到player并没有被限制在镜头的区域里。"Play"游戏,按下“左方向键”,看它会离开镜头。
我们将修复这个问题。
打开“PlayerScript”,在“Update()”方法的最后面,添加如下代码:
void Update()
  {
    // ...

    // 6 - Make sure we are not outside the camera bounds
    var dist = (transform.position - Camera.main.transform.position).z;

    var leftBorder = Camera.main.ViewportToWorldPoint(
      new Vector3(0, 0, dist)
    ).x;

    var rightBorder = Camera.main.ViewportToWorldPoint(
      new Vector3(1, 0, dist)
    ).x;

    var topBorder = Camera.main.ViewportToWorldPoint(
      new Vector3(0, 0, dist)
    ).y;

    var bottomBorder = Camera.main.ViewportToWorldPoint(
      new Vector3(0, 1, dist)
    ).y;

    transform.position = new Vector3(
      Mathf.Clamp(transform.position.x, leftBorder, rightBorder),
      Mathf.Clamp(transform.position.y, topBorder, bottomBorder),
      transform.position.z
    );

    // End of the update method
  }
一点不复杂,只是有点长。
我们获得了镜头的边界,确保了player的位置(sprite的中间)在区域边界内。
微调代码,可以更好的搞清楚它做了什么。
我们有一个横向卷轴射击游戏!
我们刚刚学习了如何向我们的游戏添加滚动机制,以及背景层的视差效果。然后,现在的代码仅仅只能从右向左滚动,但是,以你现在的知识,应该可以强化它,并且让它向任何方向滚动。(bonus: We did it as someone was stuck on the subject, click to see the code and an animation)
游戏仍然需要一些调整才能玩,如:
- 减小sprite(精灵)的大小
- 调整速度
- 增加更多的enemies
- 更有趣
关于调整,我们将把这些点放到我们即将到来的章节里(不幸的是,还没有发布),目前,你可以自己尝试。
在下一章里,我们将把注意力放到如何让游戏更...flashy。使用粒子!