In this lab, you'll deploy a CloudFormation template that creates multiple AWS resources, then explore what was created and how these resources interact. This hands-on exercise will (A) help you understand how infrastructure is provisioned and connected in AWS; and (B) have a concrete example as we discuss cloud primitives such as compute resources, storage, networking, security, etc.
By the end of this lab, you will be able to:
- Deploy a CloudFormation stack from a template file
- Navigate the AWS Console to locate created resources
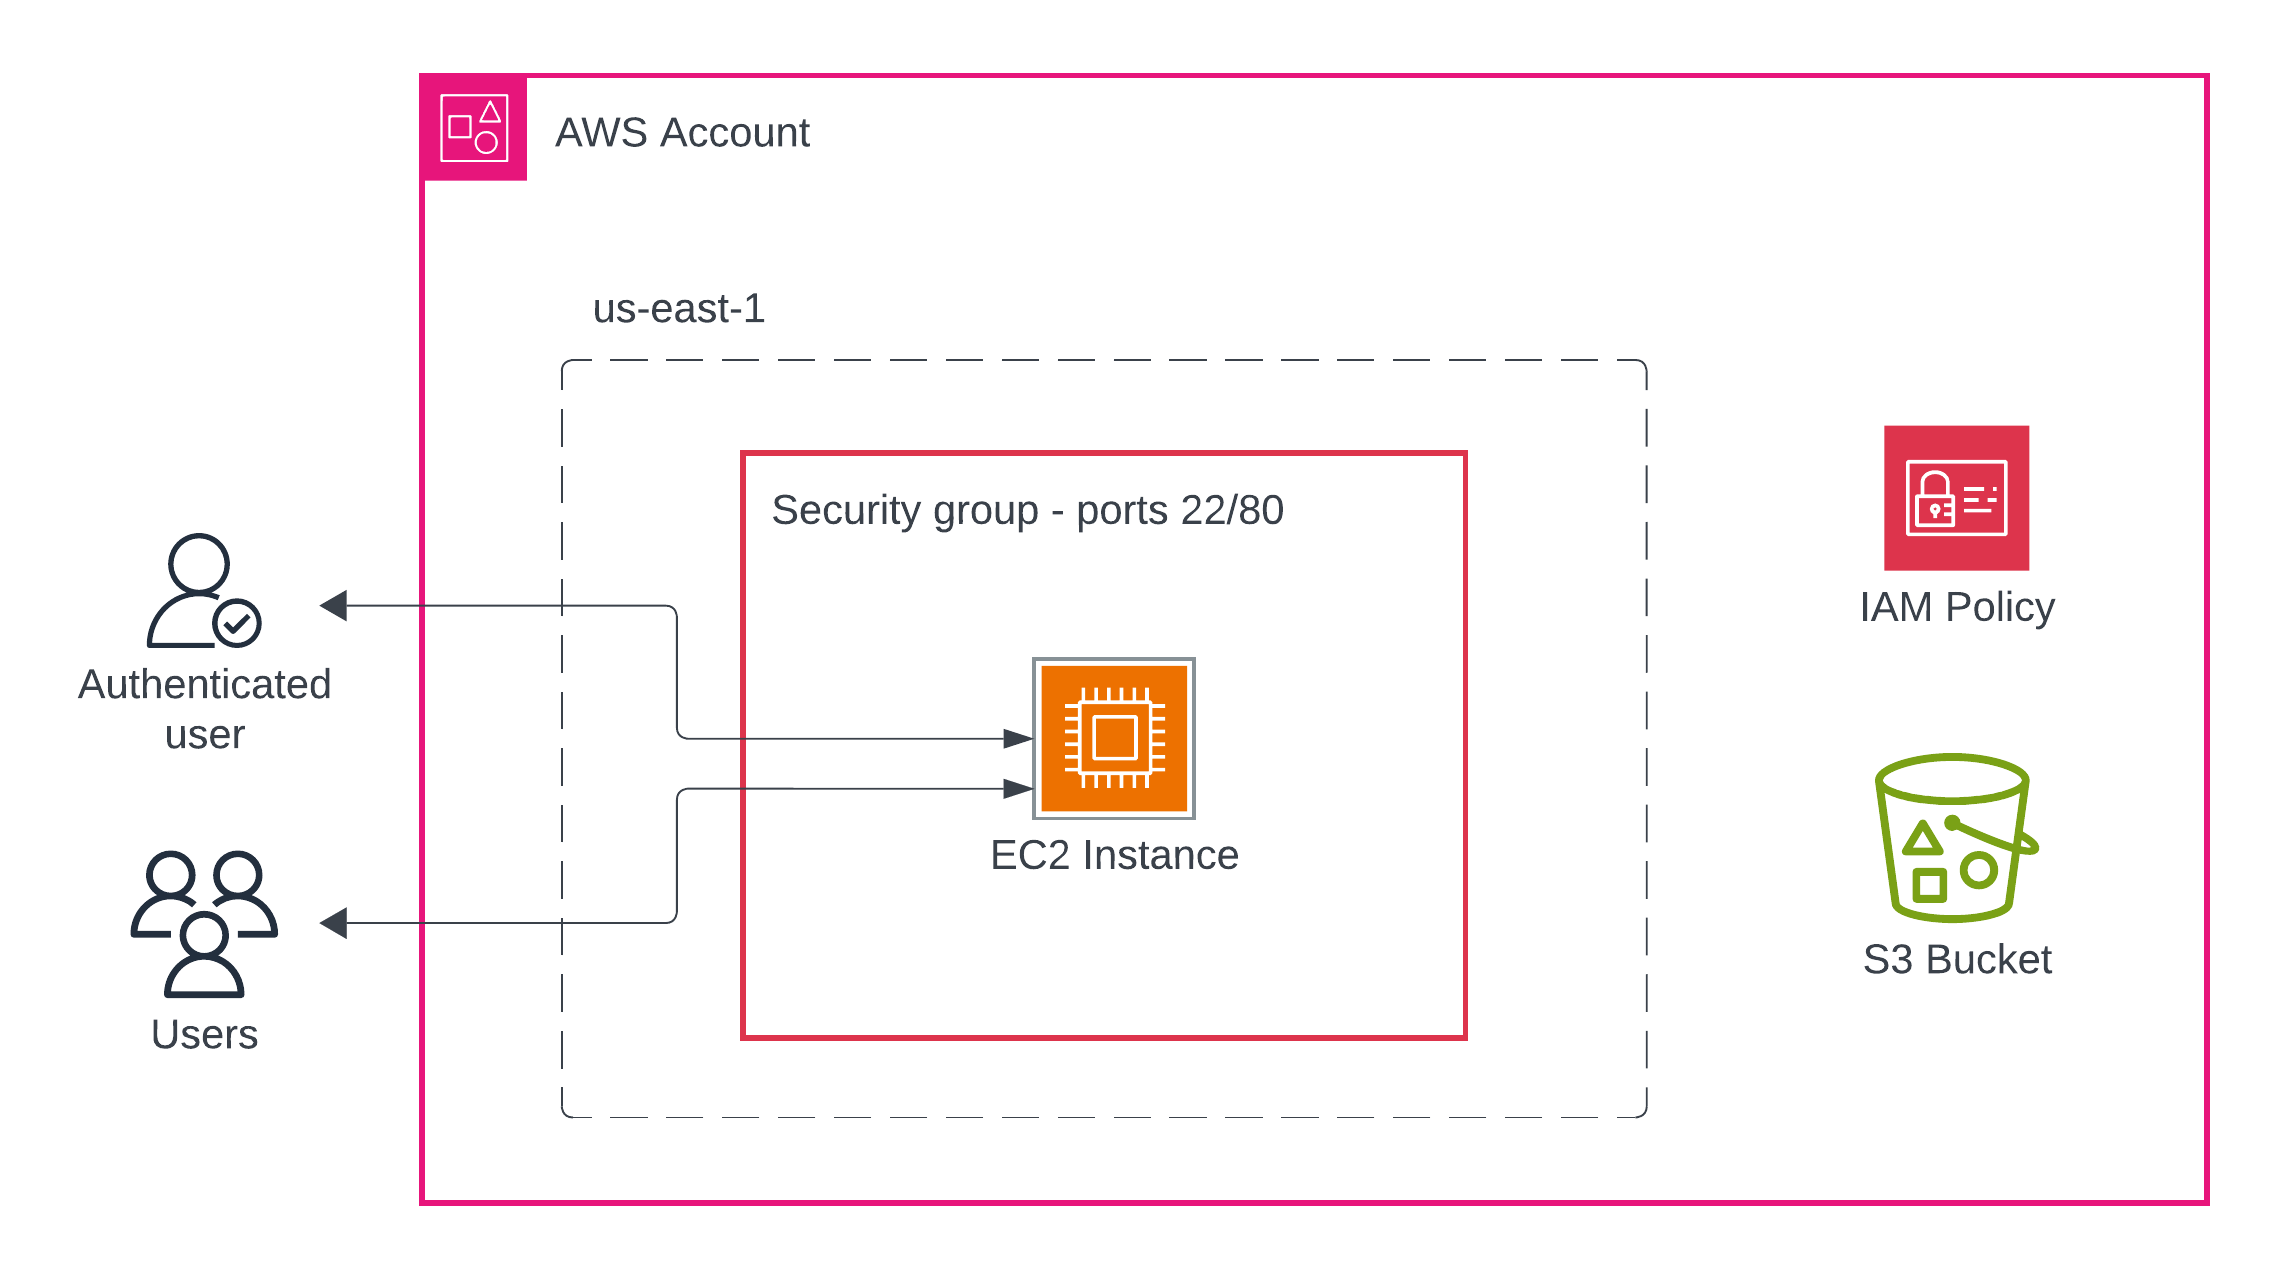
- Begin to understand the relationships between EC2, IAM, S3, and Security Groups
- Verify resource functionality through testing
- Access to an AWS account (AWS Academy or personal account)
- An existing EC2 key pair in your AWS region (
us-east-1) - Your UVA computing ID
- Basic familiarity with the AWS Console
- A default VPC. From within the AWS Console, be sure to select the N. Virginia region in the upper-right corner, go to the VPC service, and verify that you have at least one (1) VPC already created.
Download the Word document and use it to enter your resource details.
- Browse the YAML template manually
- Open the AWS Console and be sure you are signed in.
- Open the instructor's Launch Template.
- Stack name: Leave the default value for this,
refarch1. - Fill in the parameters:
- InstanceType: Leave as
t3.micro(default) - KeyName: Select an existing key pair from the dropdown
- UvaId: Enter your computing ID (e.g.,
abc3def) - SSHLocation: Leave as
0.0.0.0/0(or restrict to your IP for security) - SubnetId: Select any public subnet from the dropdown
- VPC: Select the VPC that contains your chosen subnet
- InstanceType: Leave as
- Scroll to the bottom and check the box: "I acknowledge that AWS CloudFormation might create IAM resources"
- Click Submit
- You'll be taken to the stack details page
- Watch the Events tab to see resources being created in real-time
- Wait until the stack status shows CREATE_COMPLETE (this takes 3-5 minutes)
- If any errors occur, check the Events tab for details
Now that your stack is deployed, let's find and examine each resource it created.
- Navigate to EC2 → Instances
- Find the instance with the Name tag matching your stack name (e.g.,
lab-infrastructure-ec2-instance) - Record the following information:
- Instance ID:
i-xxxxxxxxxxxxxxxxx - Public IP address:
x.x.x.x - Private IP address:
x.x.x.x - Instance type: Should be
t3.micro
- Instance ID:
Test the instance:
- Copy the public IP address
- Open a browser and navigate to
http://[PUBLIC-IP] - You should see a welcome page with your UVA ID and bucket name
- From the EC2 console, go to Security Groups (left sidebar under "Network & Security")
- Find the security group with your stack name (e.g.,
lab-infrastructure-ec2-sg) - Click on the security group and examine the Inbound rules tab
- Within the inbound rules, what ports are allowed?
Questions to consider:
- What traffic is allowed into the EC2 instance?
- Why are these specific ports open?
- Navigate to S3 service
- Find your bucket (should be named
[your-uva-id]-[stack-name]) - Click on the bucket name to explore it.
- Check the following tabs:
- Properties: Is versioning enabled?
- Permissions: What public access settings are configured?
Test S3 access from EC2:
# SSH into your instance (replace with your key and IP)
# Before you use your key, move it to your home directory
# within the `.ssh` directory and then limit its permissions:
# chmod 600 ~/.ssh/your-key.pem
ssh -i your-key.pem ec2-user@[PUBLIC-IP]

# List bucket contents from within the instance
aws s3 ls s3://[your-bucket-name]/

# Create a test file
echo "Hello from EC2" > test.txt

# Upload to S3
aws s3 cp test.txt s3://[your-bucket-name]/

# Verify upload
aws s3 ls s3://[your-bucket-name]/

# Download the file
aws s3 cp s3://[your-bucket-name]/test.txt downloaded.txt

# View contents
cat downloaded.txt

# Delete the file in S3
aws s3 rm s3://[your-bucket-name]/test.txt- Navigate to IAM → Roles
- Search for your stack name to find the role (e.g.,
lab-infrastructure-ec2-role) - Click on the role name
- Examine the Permissions tab:
- How many policies are attached?
- What are their names?
- Click on the
S3BucketAccessPolicyto view it - Record what S3 actions are allowed:
-
- Still in IAM, go to Roles and view your EC2 role
- Look for the "Instance profiles" section
- Note: This is what actually attaches the IAM role to the EC2 instance
Verify the connection:
- Go back to EC2 → Instances
- Select your instance
- Go to the Security tab
- Confirm the IAM role name matches what you found earlier
- Return to CloudFormation → Stacks
- Click on your stack name
- Go to the Outputs tab
- Record the output values and identify any remaining resources on the worksheet.
Question: Why might these outputs be useful if you were building a larger infrastructure?
- In CloudFormation, click the Resources tab
- Count how many resources were created: _____
- List each resource type and its logical name from the template.
- Take a screenshot of the Resources tab for submission and insert it into the reference architecture document.
This tab shows the complete inventory of what CloudFormation created for you.
Important: To avoid charges, delete your stack when finished.
- Go to CloudFormation → Stacks
- Select your stack
- Click Delete
- Confirm the deletion
- Monitor the Events tab as resources are deleted
- Verify in S3 that your bucket was deleted (it should be empty first)
Note: If deletion fails, check the Events tab for errors. S3 buckets must be empty to delete.
- Insert the screenshot of the Resources tab output from your CloudFormation stack into the reference architecture.
- Answer the following questions within the reference architecture. Note that how you answer each question is likely to change in the coming weeks.
- Submit a PDF version of your reference architecture in Canvas to complete the lab.
- What advantages does CloudFormation provide compared to manually creating these resources through the console?
- Can you identify the created resources that have to do with computational resources? network security? various types of storage?
- How does the IAM role enable the EC2 instance to access S3 without storing credentials?
- What would happen if you deleted the S3 bucket manually before deleting the CloudFormation stack?
- Why is the security group configured to allow only ports 22 and 80? What are those ports used for?