[译] [306] 借助 Copilot 创建优秀函数的几个例子 #41
Description
3.6 Examples of creating good functions with Copilot
3.6 借助 Copilot 创建优秀函数的几个例子
In this section, we’re going to write a bunch of functions with Copilot. We’ll code them entirely in Copilot to help you see the cycle of function design we just described. Although our goal in this chapter isn’t to help you read code just yet, we will see programming features (sometimes called constructs) in the solutions that are very common in code (e.g., if statements, loops), so we’ll point those out when we see them. Then, in chapter 4, we’ll say more about how to read this code in more detail.
在本节中,我们将借助 Copilot 来编写一系列函数。我们会全程利用 Copilot 进行编程,以便你更好地理解我们在上一节提到的函数设计循环流程。尽管本章的目标并不是立刻教会你阅读代码,但我们还是会在解决方案中看到各种编程特性(有时也称作“编程结构”),这些特性在代码中相当常见(例如 if 语句、循环),因此我们会在看到它们时指出。在稍后的第四章里,我们将更详细地讲解如何读懂这些代码。
Many of the functions we’re about to work on are unrelated to each other. For example, we’ll start with a function about stock share prices and move to functions about strong passwords. You typically wouldn’t store unrelated stuff like this in the same Python file. Because we’re just exploring different examples of good functions, feel free to store all functions in the same Python file, perhaps named function_practice.py or ch3.py.
我们接下来要编写的函数,大多数是彼此不相关的。比如,我们会先编写一个关于股票价格的函数,接着是关于密码强度的函数。通常,你不会把这些风马牛不相及的代码放在同一个 Python 文件里。不过,既然我们现在只是在探索如何编写优秀函数的各种示例,那么就请随意把所有的函数都放在一个 Python 文件里,可以命名为 function_practice.py 或者 ch3.py。
3.6.1 Dan’s stock pick
3.6.1 阿丹的股票收益
Dan is an investor in a stock called AAAPL. He purchased 10 shares for $15 each. Now, each of those shares is worth $17. Dan would like to know how much money he has made on the stock.
阿丹投资了一支名为 AAAPL 的股票。他曾以每股15美元的价格购入了10股。如今,这些股票的每股价值已经上升到17美元。阿丹渴望了解他在这项投资中究竟获利多少。
Remember that we want to make our function as general as possible. If the only thing our function does is calculate this exact AAAPL situation, it wouldn’t be that useful in general. Sure, it would help Dan right now, but what about when AAAPL’s share price changes again or when he is interested in another stock entirely?
要记住,我们希望函数具有尽可能广泛的通用性。倘若我们的函数仅适用于计算 AAAPL 此刻的涨跌情况,那么它的实用性就大打折扣了。诚然,这在当下对阿丹有所帮助,但如果 AAAPL 的股价再次波动,或者他开始关注其他股票,那怎么办?
A useful general function here would take three parameters, all of which are numbers. The first parameter is the number of shares purchased, the second is the share price when the shares were purchased, and the third is the current share price. Let’s call this function money_made, since it’s going to determine how much money we’ve made or lost on the stock. In general, you want to name your function as an action word or words that describe what your function is doing. With that, we have enough to write the function header:
一个实用的通用函数应当接收三个参数,这三个参数均为数字类型。首个参数代表购买的股票数量,第二个参数代表购买时每股的股价,而第三个参数则是当前每股的股价。我们将这个函数命名为 money_made,因为它的作用是计算我们在股票投资上的盈亏。在命名函数时,通常会选用一个动词或短语来描述函数的功能。如此,我们就可以撰写函数的声明部分了:
def money_made(num_shares, purchase_share_price, current_share_price):Now we need a docstring. In the docstring, we need to explain what each parameter is for by using its name in a sentence. We also need to include what the function is supposed to do.
接下来,我们要撰写一段文档字符串。在文档字符串里,我们需要为每个参数写一句话来解释其作用,并在其中提及参数的名称。同时,我们也需要把整个参数的功能描述清楚。
Adding our docstring, here is the full prompt we provide to Copilot:
在添加了文档字符串之后,我们向 Copilot 提供的完整提示词如下:
def money_made(num_shares, purchase_share_price, current_share_price):
    """
    num_shares is the number of shares of a stock that we purchased.
    purchase_share_price is the price of each of those shares.
    current_share_price is the current share price.
    Return the amount of money we have earned on the stock.
    """
After typing that prompt, go to the next line and press the Tab key. Copilot will fill in the code for the function. Don’t worry that the code gets indented: the code of functions is supposed to be indented, and, in fact, it’s an error if it isn’t!
输入完这段提示词后,按回车键进入下一行,然后按Tab键缩进(译者注:在 VS Code 中,如果当前行是缩进状态,在按回车换行后,新行会自动缩进,并不需要手动按Tab键缩进。原文疑似笔误)。Copilot会自动填充函数的代码。你可能注意到 Copilot 生成的代码是缩进的——函数内部的代码是需要缩进的,如果没有正确缩进,那将是一个错误!
Here’s what we got from Copilot:
以下是我们通过Copilot生成的代码:
return num_shares * (current_share_price - purchase_share_price)This code seems sensible. In the parentheses, it figures out the difference between the current price and the purchase price (the - is used for subtraction), and then it multiplies that by the number of shares that we have (the * is used for multiplication). Inspecting code like this is a useful skill, and we’ll get serious about it in the next chapter. Another useful skill is testing the function.
这段代码看起来合情合理。它利用括号计算出当前股价与购买时股价的差价(使用 - 表示减法),再将这个差价乘以我们所持有的股票数量(使用 * 表示乘法)。细致地检查此类代码可以锻炼我们的编程能力,我们将在接下来的章节中深入探讨。同时,对函数进行测试也是一项重要的技能。
To test the function, we call it using various inputs and observe the output in each case. We could do this by asking Copilot to call the function and then running our program, much as we did with our “larger” function. We could then ask Copilot to change the function call by asking it to call the function with a different input and run our program again, repeating as many times as needed. However, we find it easier and more convenient to call the function ourselves from an interactive window.
要测试这个函数,我们可以采用不同的输入来调用它,并观察各种情况下的输出结果。我们可以要求Copilot按照这个思路来生成测试代码,然后运行整个程序,正如我们之前测试那个 larger 的函数一样。之后,我们可以请Copilot改变输入参数来重新调用函数,并再次运行程序,这样的测试过程可以根据需要重复多次。除此以外,我们还可以通过交互式窗口来手动调用函数,这种测试方式会更加轻松便捷。
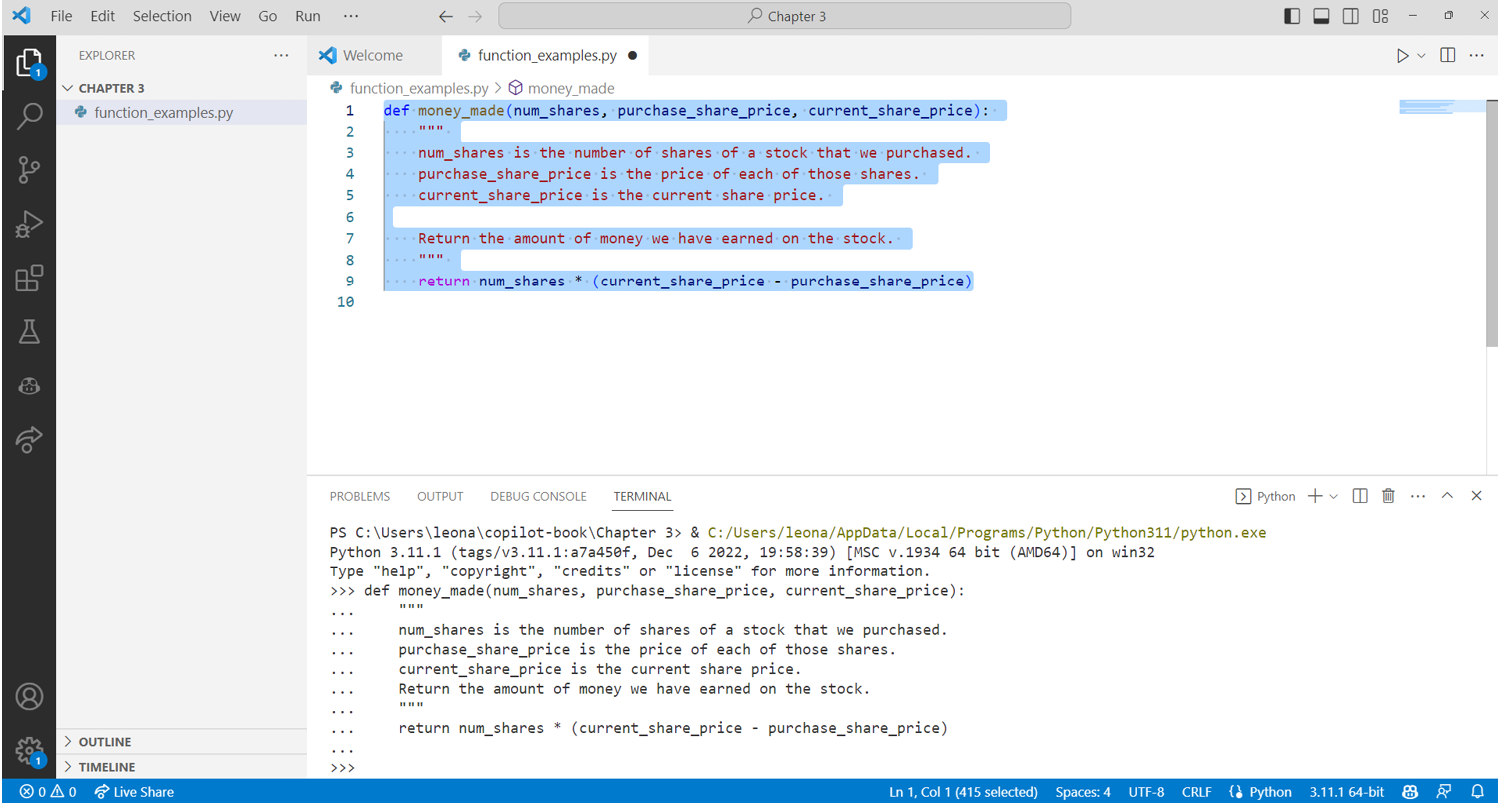
This way, we can call the function as many times as we like without going through Copilot at all and without cluttering up our program with stuff we’re going to delete anyway. To try this interactive approach, select/highlight all the code of the function and then press Shift–Enter (you can access a similar interactive session by selecting the text, right-clicking, and choosing Run Selection/Line in the Python window, but the guidance here is if you use Shift–Enter). Figure 3.4 shows what this looks like if you select the text of the function and press Shift–Enter.
通过这种方式,我们就可以任意调用函数,完全不需要借助Copilot来生成代码,也避免了在程序里填满冗余的测试代码。要尝试这种交互方式,选中/高亮函数的所有代码,然后按下 “Shift+Enter”(此外,选中代码后点击右键并选择“运行Python→在 Python 终端中运行选择/行”,也能进入这种的交互式会话,但此处建议使用 “Shift+Enter”)。图 3.4 展示了选中函数代码并按下 “Shift+Enter” 会是什么样子。
Figure 3.4 Running Python in an interactive session in the Terminal of VS Code. Note the >>> at the bottom of the terminal.
图 3.4 在 VS Code 终端里运行 Python 交互式会话。请注意终端底部的 >>> 提示符。
At the bottom of the resulting window, you will see three greater-than symbols >>>. This is called a prompt, and you’re allowed to type Python code here. (This prompt has nothing to do with the kind of prompt that we use when interacting with Copilot.) It will show us right away the result of the code that we type, which is convenient and fast.
在结果窗口底部,你会看到三个大于号 >>>。它叫做 “提示符”,你可以直接在这里编写 Python 代码并运行。(注意,这个提示符和我们驾驭 Copilot 时所用的提示词是两码事。)它会立刻展示我们输入代码的执行结果,非常方便和迅速。
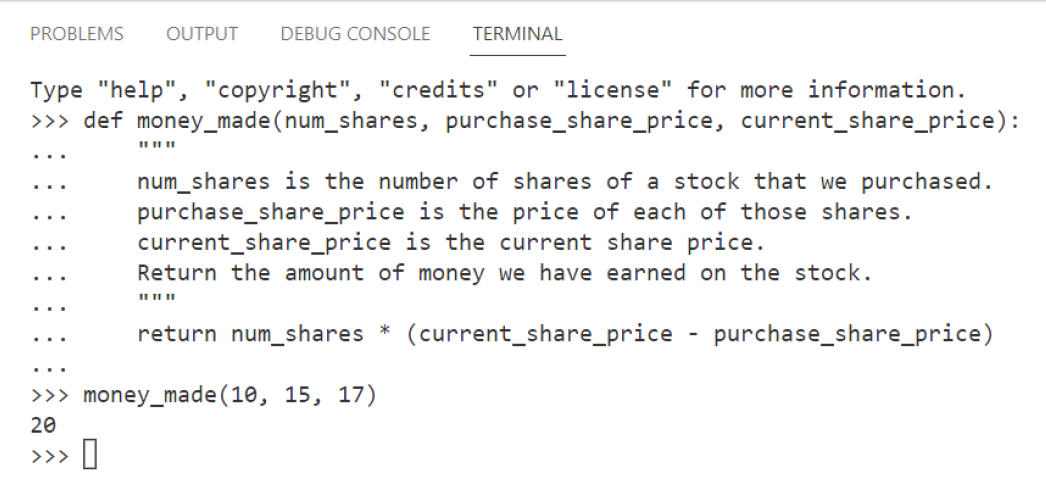
To call our money_made function, we need to provide three arguments, and they will be assigned left to right to the parameters. Whatever we put first will be assigned to num_shares, whatever we put second will be assigned to purchase_share_price, and whatever we put third will be assigned to current_share_price.
要调用我们的 money_made 函数,我们需要提供三个值,它们将按顺序分别传递给函数的参数。我们给出的第一个数值将赋值给 num_shares,第二个数值将赋值给 purchase_share_price,而第三个数值将赋值给 current_share_price。
Let’s try this! At the prompt, type the following and press Enter (or Shift–Enter). Don’t type the >>> as that’s already there; we are including it throughout the book to make it clear where we are typing. Please see figure 3.5 for an example of running the function in the terminal at the Python prompt:
来试试吧!在提示符处输入如下内容,然后按回车(或 shift+Enter)。无需输入>>>,它已经显示在那里了;在全书中我们都会保留这个标记,以便清晰指示输入点。图 3.5 展示了在终端窗口的 Python 提示符下运行函数的实际效果。
>>> money_made(10, 15, 17)You’ll see the output:
你将看到输出结果如下:
20
Is 20 correct? Well, we bought 10 shares, and each of them went up $2 (from $15 to $17), so we did make $20. Looks good!
20 这个答案正确吗?嗯,我们买了 10 股,每股涨了 2 美元(从 15 美元涨到 17 美元),所以我们确实赚了 20 美元。看起来不错!
Figure 3.5 Calling the money_made function from Python prompt in the VS Code terminal
图 3.5 在 VS Code 终端窗口的 Python 提示符下调用 money_made 函数
We’re not done testing, though. When testing a function, you want to test it in various ways, not just once. All one test case tells you is that it happened to work with the particular input values that you provided. The more test cases we try, each testing the function in a different way, the more confident we are that our function is correct.
但测试工作尚未结束。对函数进行测试时,应该采用多种方法,而不仅仅局限于一次。单一的测试用例仅能说明函数在你给出的特定输入值下有效。我们进行的测试用例越多样化,每种用例都从不同角度检验函数,我们对该函数正确性的把握就越大。
How do we test this function in a different way? We’re looking for inputs that are somehow a different category of input. One not-so-good test right now would be to say, “What if our stock went from $15 to $18, instead of $15 to $17?” This is pretty much the same test as before, and chances are that it will work just fine.
我们怎样才能用另一种方法来测试这个函数呢?我们希望找到的另外一种输入,应该是另一种不同“类别”的数据。举个例子,我们把刚才股价从15美元涨到17美元的情况,换成15美元涨到18美元,这就不算是一个太好的测试。这样的测试和之前的太相似了,很可能函数同样能够很好地处理。
A good idea is to test what happens when the stock actually loses money. We expect to get a negative return value in this case. And it appears that our function works just fine with this category of test. Here’s our function call and the output returned to us:
测试一下股票实际发生亏损的情形是个不错的主意。我们预期在这种情况下会得到一个负收益。结果表明,我们的函数对这种类别的测试也能够很好地应对。以下是我们进行的函数调用及其返回结果:
>>> money_made(10, 17, 15)
-20
What other tests can we do? Well, sometimes a stock price doesn’t change at all. We expect 0 in this case. Let’s verify it:
我们还能做些什么其他的测试吗?比如说,有时候股票的价格可能完全没有变化。在这种情况下,我们预期收益应该是0。让我们来验证这一点:
>>> money_made(10, 15, 15)
0
Looks good!
看起来不错!
Testing is a combination of science and art. How many categories of things are there to test? Are these two calls really two different categories? Have we missed any categories? You will improve your testing ability through practice, and we’ll spend all of chapter 6 talking about testing. For now, it looks like our money_made function is doing its job.
测试既是一门科学,也是一门艺术。我们究竟需要测试哪些种类的问题?后面这两次函数调用真的代表了两个截然不同的测试类别吗?我们是否遗漏了某些类别?通过不断的实践,你的测试技巧将得到提升,而且在第六章中,我们将全面探讨有关测试的话题。就目前而言,我们的money_made函数看起来可以有效地履行其职责。
It’s possible for a function to use variables (rather than just its parameters) in its code, and we want to show you an example of that now so that you’re ready when you see Copilot doing it.
函数在其内部代码中可以使用变量(而不仅仅是它自己的参数),我们现在就给你展示一个例子,以便将来遇到 Copilot 这样做时你能够应对自如。
Here’s an equivalent way to write the code for our money_made function:
这里展示了另一种等效的实现 money_made 函数的方式:
    price_difference = current_share_price - purchase_share_price
    return num_shares * price_difference
This code may even be easier to read for you: it first figures out the difference in share price, and then it multiplies that by the number of shares. We encourage you to test this version to help convince yourself that it is still correct.
这种表达方式或许更加清晰:先计算出每股的差价,再将其与持股数量相乘。建议你同样对这个版本进行测试,确保它也是正确的。
3.6.2 Leo’s password
3.6.2 小李子的密码
Leo is signing up for a new social network website called ProgrammerBook. He wants to make sure that his password is strong.
小李子正在注册一个名为 ProgrammerBook 的新兴社交网络,他希望确保自己的密码足够安全。
Leo starts with a modest definition of what it means for a password to be strong: it’s strong if it’s not the word password and not the word qwerty. (Those are terrible passwords, for sure, but in reality, we have to do way better than this definition to ensure that our password is strong!) A helpful function would be one that takes a proposed password and tells us whether it is strong or not.
小李子一开始对 “强密码” 的定义颇为低调:他觉得只要密码不是 “password” 或 “qwerty”,就算是一个强密码了。(这两个密码无疑是极差的,然而实际上,若真想确保密码安全,我们还需做到比这好得多的水平!)这里我们需要一个实用的函数,它能够接收一个拟定的密码,并判断其强度是否达标。
Unlike our previous functions in this chapter, we’re not dealing with numbers here. The parameter, the password to check, is text. And the return value is supposed to indicate some yes/no result. We need new types!
不同于本章前面介绍的函数,本次我们处理的不是数字,而是文本类型的密码。同时,返回值用于表示一个肯定或否定的结果。这就涉及到了新的数据类型。
The Python type for text is called a string. There are zillions of possible strings because we can use a string to store whatever text we want. And the Python type for a yes/no result is called a Boolean or bool. A bool has only two values: True or False.
在 Python 编程语言中,文本是通过一个名为“字符串”的数据类型来表示的。字符串的表达能力几乎是无穷无尽的,我们可以用它来保存任何我们想要的文本内容。对于表示“是”或“否”的结果,Python 使用了一个特殊的数据类型,我们称之为“布尔值”(“Boolean” 或 “bool”)。布尔值只包含两种状态:True 和 False。
Alright! We’re ready to prompt Copilot. For functions that return bool (True/False) values, we usually name the function as has_x, or is_x, or using some other verb that implies a true/false result:
好的!现在我们可以开始给 Copilot 写提示词了。通常,对于返回布尔值(True/False)的函数,我们会采用 has_x、is_x 这样的命名方式,或者使用其他能够隐含真/假结果的动词。
def is_strong_password(password):
    """
    A strong password is not the word 'password'
    and is not the word 'qwerty'.

    Return True if the password is a strong password, False if not.
    """
In response, here’s what Copilot wrote for us:
作为回应,以下是 Copilot 为我们生成的代码:
return password != 'password' and password != 'qwerty'Look over that code for a moment. That != operator is the “not equal” operator, and each string that doesn’t count as a strong password is in single quotation marks. We’re going to use quotation marks every time we work with a string value. Again, we’ll talk more about how to read code in the next chapter, but for now, we hope that the code makes a fuzzy sort of sense: it looks like it’s checking that the password isn’t password or qwerty, which matches our definition of a strong password.
我们来仔细查看这段代码。!= 是 “不等于” 操作符,每个不符合强密码标准的字符串都用单引号括起来。我们在处理字符串值时,每次都需要加上引号。关于代码阅读的更多细节,我们将在下一章进行深入讨论,但目前希望代码能给你一个大致的印象:它似乎在检查密码不是 password 也不是 qwerty,这正符合我们目前对强密码的定义。
Now let’s make sure that this function does indeed work by making a few test calls. We’ll start by testing the passwords that are not strong. We had better get back False for each of these—and we do!
现在,我们就通过几轮测试来检验这个函数是否真的有效。我们先来测试那些强度不足的密码。对于这些密码,我们期望得到的响应是 False,而结果也确实如此!
>>> is_strong_password('password')
False

>>> is_strong_password('qwerty')
False
Good! Now, let’s try a strong password. We need to see True here:
很好!接下来,我们来测试一个强密码。我们期望这里的结果为 True:
>>> is_strong_password('N3w Y0rk J375')
True
Good stuff! We now see that the function sometimes returns False and other times returns True, so at least it’s not always returning False.
好极了!现在我们看到这个函数有时返回 False,有时返回 True,所以它至少不是一直返回 False。
Let’s try one more:
我们再来尝试一个例子:
>>> is_strong_password('Leo')
True
Well, technically True is correct, but, wow, is Leo a bad password. We should really have done better with our definition of a strong password. Let’s change our prompt to give a more reasonable definition of what it means for a password to be strong.
嗯……虽然返回 True 是附合预期的,但严格来说 “Leo” 算是一个糟糕的密码。看来我们该对所谓的 “强密码” 给出一个更恰当的定义了。让我们调整提示词,给强密码下一个更合理的定义。
Here’s our next prompt and what Copilot gave us:
以下是我们给出的新提示词,以及 Copilot 为我们生成的新代码:
def is_strong_password(password):
    """
    A strong password has at least one uppercase character,
    at least one number, and at least one special symbol.

    Return True if the password is a strong password, False if not.
    """
    return any(char.isupper() for char in password) and \
            any(char.isdigit() for char in password) and \
            any(not char.isalnum() for char in password)
That for char in password that shows up a few times here is a way for Python to consider each character of the password. It enables something called a loop, which is a key topic that we’ll study in chapter 5.
这几处 for char in password 是 Python 用来遍历密码中每个字符的语法。它开启了“循环”这一功能,这是我们在第五章将要详细学习的核心概念。
Of course, it’s possible that you didn’t get the same code from Copilot as we did. But based on the code that we got, it looks like the first piece is looking for any uppercase character, the second piece is looking for any digit, and the third is looking for something that’s not an isalnum.
当然,你从 Copilot 那里得到的代码可能和我们的不一样。不过,就我们所获得的代码来看,第一部分似乎是在检查是否有任何大写字母,第二部分在寻找任意数字,而第三部分则在寻找那些不符合 isalnum 的字符。
Maybe isalnum means “is alphanumeric.” Does that include special symbols and, if so, which ones? Let’s test this function to see how well we’re doing:
也许 isalnum 的意思是 “is alphanumeric(是字母或数字)”。那么它是否包含特殊符号呢?如果包含的话,又是哪些符号呢?我们来测试这个函数,验证一下它的效果如何。
>>> is_strong_password('Leo')
False

>>> is_strong_password('N3w Y0rk J37$')
True

>>> is_strong_password('N3w Y0rk J375')
True
Uh oh! We got the wrong answer for that third password. It looks pretty strong, but it’s not, because it lacks a special symbol. Our function returned True, but that’s the wrong return value: it was supposed to return False.
哎呀!第三个密码的结果出错了。尽管它看起来很安全,但实际上并不达标,因为它缺少了一个特殊符号。我们的函数给出了 True 的返回值,但这是错误的;它本应该返回 False。
The code that Copilot gave us is wrong. Maybe the code that you got worked fine, but we didn’t get so lucky, and it’s important we know how to identify (like we just did) when the code is wrong and then fix it. It’s not important to know why it’s wrong right now, but if you are curious about why our prompt may have given us the wrong behavior, it’s because we didn’t specify what we meant by a special character, and the code it gave us counts spaces as special characters.
Copilot 提供的代码存在问题。或许你得到的代码运行得很好,但我们却没那么幸运,因此识别并修复代码错误至关重要。目前,我们不必深究错误的原因,但如果你对于我们的提示词为何导致这个错误感到好奇,那是因为我们没有具体说明特殊字符的定义,而代码却错误地将空格当作了特殊字符。
At this point, with our wrong code, we have two options. One option is to hit Ctrl–Enter and look through the other suggestions that Copilot gives us. Maybe one of those suggestions will have something to do with special symbols that looks different from the one that didn’t work?
此时,我们的代码存在错误,我们面临两种选择。第一种选择是按下 “Ctrl+Enter”,浏览 Copilot 提供的其他建议。说不定其中会有关于特殊符号的不同方案?
Indeed, on our computer here, we see such options, including this one:
确实,在我们这台电脑上,我们看到了另外一些方案,比如这一条:
    num_upper = 0
    num_num = 0
    num_special = 0
    for char in password:
        if char.isupper():
            num_upper += 1
        elif char.isnumeric():
            num_num += 1
        elif char in '!@#$%^&*':     #1
            num_special += 1
    if num_upper >= 1 and num_num >= 1 and num_special >= 1:
        return True
    else:
return False| 原文 | 译文 | 备注 |
|---|---|---|
| Specific choice of special symbols | 这一行确定了特殊符号的范围 |
Test this function with strings like Leo, N3w Y0rk J375, and N3w Y0rk J375$ and you should see that the function works well.
采用 Leo、N3w Y0rk J375 以及 N3w Y0rk J375$ 这些字符串对函数进行测试,你应该能观察到其运行效果相当不错。
Our second option is to do some prompt engineering, which means adjusting our prompt to influence what Copilot gives us. In our original prompt, we talked about special symbols. This, in retrospect, is vague. We probably meant something more specific, like punctuation. If we specifically talk about punctuation in our prompt, we get this interaction with Copilot:
而我们的第二种选择是进行所谓的提示工程,也就是优化我们的提示词,以此来改变 Copilot 提供的答案。在我们原先的提示词里,我们提及了“特殊符号”。现在回头来看,这个表述其实相当含糊。我们当时可能更想表达的是“标点符号”。如果在提示词中明确提及标点符号,那我们与 Copilot 的互动可能会变成下面这样:
def is_strong_password(password):
    """
    A strong password has at least one uppercase character,
    at least one number, and at least one punctuation.

    Return True if the password is a strong password, False if not.
    """
    return any(char.isupper() for char in password) and \
            any(char.isdigit() for char in password) and \
            any(char in string.punctuation for char in password)
Looks good! That last line is talking about punctuation, which is hopeful. Let’s test:
看上去不错!最后一句提到了 “标点符号”,令人心怀期待。那我们来试试看吧:
>>> is_strong_password('Leo')
False

>>> is_strong_password('N3w Y0rk J375')
Traceback (most recent call last):
    File "<stdin>", line 1, in <module>
    File "ch2.py", line 44, in is_strong_password
        any(char in string.punctuation for char in password)
    File "ch2.py", line 44, in <genexpr>
        any(char in string.punctuation for char in password)
                    ^^^^^^
NameError: name 'string' is not defined
Look at the bottom of that error message, 'string' is not defined, eh? We’re running into a problem that’s similar to what we saw in chapter 2 with modules. Copilot wants to use a module, called string, but it is a module that needs to be imported before we can use it. There are a lot of modules in Python, but the string module is well known. As you work with Copilot more, you’ll learn which modules are commonly used so you know to import them. You could also do a quick internet search to ask, “Is string a Python module,” and the results would confirm that it is. What we need to do is import the module.
观察一下错误提示的最下方,string 模块未定义,对吧?我们碰到了一个类似第二章介绍过的模块问题。Copilot 试图使用一个叫作 string 的模块,但这个模块在使用前必须先进行导入。Python 世界里有众多模块,其中 string 模块颇为著名。随着你对 Copilot 的使用日益深入,你会逐渐学会辨识哪些模块是频繁使用的,从而知道适时导入它们。你同样可以通过简单的网络搜索来询问 “string 是一个 Python 模块吗”,搜索结果会证实这一点。接下来,我们所要做的,就是导入这个模块。
Note that this is somewhat different from what we encountered in chapter 2. In chapter 2, we saw what happens when the code from Copilot imports modules we didn’t have installed, and we had to install the package containing those modules to fix the problem. In this case, the code from Copilot is using a module that already happens to be installed with Python, but it forgot to import it. So, we don’t need to install string; we just have to import it.
需要注意的是,当前这种情况与第二章提到的场景略有差异。在第二章,我们了解到如果 Copilot 导入了我们尚未安装的模块,我们需要安装相应的包来解决这个问题。然而,当前的情况是,Copilot 使用了 Python 自带的模块,但却遗漏了导入步骤。所以,我们无需安装 string 模块,仅需进行导入操作即可。
Importing modules
There are a number of useful modules available in Python. We saw how powerful matplotlib is in chapter 2. But for Python code to take advantage of a module, we have to import that module. You might ask why we don’t have modules available to us without importing them, but that would massively increase the complexity of the code and what Python has to do to run code behind the scenes. Instead, the model is to include modules if you want to use them, and they aren’t included by default.
导入模块
Python 提供了许多有用的模块。回想第二章,我们感受到 matplotlib 模块的威力。但要让 Python 代码发挥出模块的功能,我们必须先导入这些模块。你可能会好奇,为何不能让我们直接使用模块,而是非要经过导入这一步呢?因为如果模块默认就可用,那将极大增加代码的复杂度,以及 Python 在幕后执行代码时的负担。因此,最终的法则就是我们需要手动导入那些我们确实想要用到的模块,而不是所有模块默认自动导入。
Let’s add import string at the top of our code:
将 import string 添加到代码的最顶部:
import string

def is_strong_password(password):
    """
    A strong password has at least one uppercase character,
    at least one number, and at least one punctuation.

    Return True if the password is a strong password, False if not.
    """
    return any(char.isupper() for char in password) and \
            any(char.isdigit() for char in password) and \
            any(char in string.punctuation for char in password)
Now we’re in good shape:
然后就会得到相当不错的结果:
>>> is_strong_password('Leo')
False

>>> is_strong_password('N3w Y0rk J375')
False

>>> is_strong_password('N3w Y0rk J375$')
True
That last one is True—it’s a strong password!—because it has the $ punctuation added to it.
最后一个结果显示为 True——这个密码很安全!——这得益于它包含了 $ 这个符号。
We hope that you’re now convinced of the value of testing! Sometimes our students don’t test their code. They assume that the code they write is correct because it made sense to them. An interesting difference between novice and experienced programmers is that novices often assume their code is right, whereas experience programmers assume their code is wrong until thoroughly tested and proved otherwise. Beyond this, we find that our students sometimes fail to test well because it’s disheartening to learn that the code is wrong. But it’s better to know now rather than later when others are using your code in a serious application. Finding errors through testing is actually a good thing.
我们希望你现在深刻理解了测试的重要性!有时候,我们的学生在编写代码后不会进行测试。他们倾向于认为代码是正确的,因为在他们看来是合理的。新手程序员与老手程序员之间的一个显著差异在于,新手通常会假设他们编写的代码是正确的,而老手则会假设代码有问题,然后通过全面的测试来验证其正确与否。除此以外,我们还发现学生们有时逃避测试,是因为面对代码中的错误会让他们感到沮丧。但及早发现问题总比等到他人在正式应用中遇到故障要好得多。通过测试来发现并修正错误,其实是件值得庆幸的事情。
3.6.3 Getting a strong password
3.6.3 获得一个强密码
Now that we have a function that tells us whether a password is strong or not, let’s write a function that obtains a strong password from the user. It will ask again and again for a password until the user types a strong one. This is the kind of code that websites use when they tell you, “Sorry, your password is too weak, try again.”
既然我们已经有了一个能够判断密码强度的函数,那么接下来,不妨让我们来编写一个能够从用户那里获得强密码的函数。这个函数会不断询问用户,直到用户输入了一个强密码。这正是很多网站在提示 “抱歉,您的密码太弱了,请重新输入” 时所使用的代码逻辑。
What should the header for such a function look like? Well, it’s going to ask the user for a password, but we won’t have a password parameter. In fact, we won’t have any parameters at all, because the function doesn’t need any information to do its job—it just has to prompt the user and the user is going to type the password at the keyboard. When the function has done its work, it will return the strong password, so it will continue to return a string as the output.
那么,对于这样一个函数来说,它的函数头该如何书写呢?它将会要求用户来输入密码,因此我们不应该设置密码参数。实际上,我们不需要任何参数,因为该函数在执行任务时并不需要额外信息——它仅仅需要向用户发起提示,而用户则会通过键盘输入密码。一旦函数校验通过,便会返回那个强密码,因此它的返回值将是一个字符串。
Let’s try this prompt:
我们来试试下面这段提示词吧:
def get_strong_password():
    """
    Keep asking the user for a password until it is a strong
    password, and return that strong password.
    """
We get the following code from Copilot as a result:
我们得到 Copilot 提供的如下代码:
    password = input("Enter a strong password: ")
    while not is_strong_password(password):           #1
        password = input("Enter a strong password: ")
return password| 原文 | 译文 | 备注 |
|---|---|---|
| It’s calling our earlier is_strong_password function! | 这里调用了我们之前编写的 is_strong_password 函数! |
That while keyword creates another kind of loop, this one continuing as long as the entered password is not strong. Copilot is also smart enough to call our earlier is_strong_password function to determine what counts as a strong password. As we will see in future chapters, using functions as building blocks in this way is precisely how large programs are built. You will often notice Copilot calling your earlier functions to solve later ones, much as we observed here.
这里的 while 关键字构建了另一种循环,它会不断地运行,直到用户输入的密码达到强密码的标准为止。Copilot 展现了它的智能,能够调用我们先前定义的 is_strong_password 函数来确定何为强密码。在未来的章节中,我们将看到,正是像这样把函数作为积木块进行组装,大型程序才得以构建出来。你会发现 Copilot 经常调用你之前编写的函数来解决新的问题,正如我们在这里所看到的。
Let’s test this! Highlight all our password function code and hit Shift–Enter. We’ll call the function that we want to test. Then, try typing passwords, pressing Enter after each one. You’ll notice that it keeps asking you until you finally provide a strong password:
我们来测试一下吧!选中所有与密码相关的函数代码,然后按下 “Shift+Enter”,随后调用我们想要测试的这个新函数。此时,尝试输入不同的密码,每输入一个就按一次回车键。你会发现,除非你输入了一个真正的强密码,否则它会不断地提示你:
>>> get_strong_password()
Enter a strong password: Leo
Enter a strong password: N3w Y0rk J375
Enter a strong password: N3w Y0rk J375$
'N3w Y0rk J375$'
Notice that it stops asking us for a password when we finally provide a strong password. Then, we see the string in quotes that it returned, which is, indeed, our strong password.
请注意,一旦我们提供了一个强密码,它就不再要求我们继续输入了。随后,屏幕上会展示一个被引号括住的字符串,那正是我们输入的强密码。
3.6.4 Scrabble scoring
3.6.4 拼词游戏的计分方法
One of Dan’s favorite board games is Scrabble. Have you played it? If not, all you need to know is that you have some tiles in your hand, each with a letter on it, and your goal is to form a word using any combination of those letters. You don’t need to form the word exclusively with your tiles—you can attach those letters to existing letters on the board to create longer words—but we’re not going to worry about that here. The important thing for us is that different letters are worth different numbers of points. For example, an a is worth only one point, because a is such a common letter. But q and z? Those doozies are each worth 10 points because they’re so tough to use—or should we say puzzling to use. Yeah, that’s better.
在阿丹钟爱的众多桌游中,拼词游戏(Scrabble)不可不提。你有没有体验过这款游戏?如果你还未曾尝试,那么只需了解,你手中握有一些印有字母的卡片,你的任务是利用这些卡片上的字母,通过任意组合来拼出一个单词。你不必完全依靠手中的卡片来拼词——事实上,你完全可以手中的字母与棋盘上已有的字母相结合,构造出更长的单词——但在本例中,我们无需纠结具体玩法。我们关注的是,每个字母都有其对应的分值。比如,“a” 字母仅值一分,因为它实在是太常见了。但 “q” 和 “z” 这两个字母呢?这两个字母各值十分,因为它们真的很难用上……或者说,很难驾驭。对,这样说更准确。
To calculate the score for a word, we add up the scores for each of its letters. For example, the score for zap would be 14. That’s because z is worth 10, a is worth 1, and p is worth 3.
计算单词的得分,就是将其各个字母的分数累加起来。譬如,“zap”这个单词的总分为 14 分。这是因为 “z” 的分数是 10,“a” 是1,而 “p” 则是3。
Dan would like a function that, given a word, tells him how many points that word is worth. OK, so we need a function that takes a word (which is just one parameter). Let’s try this prompt, where we’ve included the number of points that each letter is worth per official Scrabble rules:
阿丹希望有一个函数,传一个单词给它,它能够告诉我们这个单词对应的分数。好的,我们需要设计一个函数,它接受一个单词作为参数(这也是这个函数唯一的参数)。我们可以尝试以下这段提示词,其中包含了拼词游戏官方规则所规定的每个字母的分值:
def num_points(word):
    """
    Each letter is worth the following points:
    a, e, i, o, u, l, n, s, t, r: 1 point
    d, g: 2 points
    b, c, m, p: 3 points
    f, h, v, w, y: 4 points
    k: 5 points
    j, x: 8 points
    q, z: 10 points

    word is a word consisting of lowercase characters.
    Return the sum of points for each letter in word.
    """
For this function, Copilot isn’t filling in the whole body for us with one press of the Tab key. Tab is also used to indent the code, which we also need to do here before Copilot will present us with code. So, we’re having to press Tab (sometimes once for the indentation and then again for Copilot), wait for the code to appear, then press Enter to accept that code, then press Tab again for more code, and repeat the process.
在这个函数中,Copilot 可能不会在我们按了一次 Tab 键之后就帮我们把整个函数的内部代码都填充完毕。Tab 键还可以用来缩进代码,这也是我们在得到 Copilot 的代码建议前必须进行的操作。因此,我们需要按下 Tab 键(有时为了缩进要按一次,然后为了接收 Copilot 的建议再按一次)。等待代码建议显示出来,我们先按 Tab 键确认代码,然后按回车键换行,等待接下来的代码建议。如此循环往复,直至函数完成。(译者注:原文的描述过于繁琐,而且似乎存在错误,译文尽可能做了修正。实际的操作过程应该会流畅很多,读者在动手实践时可以随机应变。)
Getting Copilot to suggest code may require pressing Tab or Enter
要让 Copilot 提供代码建议,可能需按 “Tab”或回车键
We find that Copilot will sometimes pause in giving suggestions until you press a key to help prompt it. As mentioned in table 2.1, if you are giving it comments, it will sometimes just want to give you more comments as suggestions. Pressing Enter another time can often trigger it to start generating code instead. Other times, pressing Tab will cause it to continue providing suggestions. Please refer to table 2.1 if Copilot is not generating code for you.
我们注意到,Copilot 有时会停在那里,此时你需要按下某个键才能提示它继续生成建议。根据表 2.1 的说明,如果你提供的是注释,它有时候只会返回给你更多的注释作为建议。再次按下 Enter 键,往往能够促使它进入生成代码的状态。在其他情况下,按 Tab 键会让它继续给出建议。如果 Copilot 没有为你编写代码,请回顾表 2.1 中的应对方案。
Finally, after doing that a few times, the entire code unfurls, and we get the following:
最终,经过几次尝试,完整的代码终于呈现在我们面前:
    points = 0
    for char in word:
        if char in "aeioulnstr":
            points += 1
        elif char in "dg":
            points += 2
        elif char in "bcmp":
            points += 3
        elif char in "fhvwy":
            points += 4
        elif char == "k":
            points += 5
        elif char in "jx":
            points += 8
        elif char in "qz":
            points += 10
    return points
Notice that all of the letters of the alphabet are accounted for here, and the number of points that each category is worth is on the following line. We’ll discuss this overall kind of decision structure in the next chapter, but, at a high level, it is walking through the word character by character and, for each character, figuring out which letter it is and adding the appropriate number of points for that letter.
请注意,这段代码已经列出了字母表中的所有字母,而且根据字母的不同分值进行了相应的计分处理。在后面的章节中,我们会详细讨论这种决策结构,但简单来说,它通过遍历整个单词,识别每个字符,并为该字符加上相应的分数。
Let’s test this to make sure our code is performing the way we want. We know that the word zap should be worth 14 points. And it is:
我们来测试一下,确认代码的表现是否符合我们的预期。我们知道单词 “zap” 应该值 14 分。函数的返回也确实如此:
>>> num_points('zap')
14
Let’s try a couple more. In each case, calculate by hand what you expect the answer to be—that way you’ll know if the code is doing the right thing:
我们继续尝试几个例子。每次测试前,先心算出预期的答案——这能帮助你确认代码是否得出了正确的结果。
>>> num_points('pack')
12

>>> num_points('quack')
20
There are many ways to write correct code for a function. If you press Ctrl–Enter and look at the Copilot suggestions, you may see different types of code. It doesn’t necessarily mean that one of these types is right and the others are wrong.
一个函数可以有不止一种正确的实现方法。如果你按下“Ctrl+回车”,打开Copilot的建议面板,你会看到各种不同的代码建议。这并不意味着其中只有一种方法是对的,而其他的都是错的。
For example, here’s another solution for num_points that we got from the other Copilot suggestions:
举例来说,我们从 Copilot 的其他建议里得到 num_points 函数的另一种写法:
    points = {'a': 1, 'e': 1, 'i': 1, 'o': 1, 'u': 1, 'l': 1,
            'n': 1, 's': 1, 't': 1, 'r': 1,
            'd': 2, 'g': 2,
            'b': 3, 'c': 3, 'm': 3, 'p': 3,
            'f': 4, 'h': 4, 'v': 4, 'w': 4, 'y': 4,
            'k': 5,
            'j': 8, 'x': 8,
            'q': 10, 'z': 10}
    return sum(points[char] for char in word)
Notice here that each letter is listed individually along with its number of points. This structure with the letters and points is called a dictionary, and again, we’ll learn about dictionaries properly in a later chapter. The point for now is just that there are often multiple, equivalently good ways for Copilot to write the code for a function. Give this one a try with some test cases before you continue!
你会发现每个字母及其对应的分数都一一陈列于此。这种字母与分数的对应结构,我们称之为“字典”。同样,关于字典的详细知识,我们将在后续章节深入探讨。目前你只需要知道,在编写函数代码时,Copilot 往往可以提供同样出色的多条建议可供选择。在你继续探索之前,不妨多多测试这段代码的效果吧!
3.6.5 The best word
3.6.5 最佳单词
Let’s continue with the Scrabble theme. Suppose that Dan has a bunch of words that he can make right now, but he doesn’t know which one will give him the most points. Should he make the word zap, pack, or quack? It would be nice if we had a function that could take a bunch of words and tell us which is the best one.
让我们继续拼词游戏的话题。假设阿丹现在可以组成一堆单词,但他不知道哪个单词能给他带来最多的分数。他应该组成“zap”、“pack”还是“quack”?如果我们有一个函数,能从一堆单词中挑出分值最高的那一个,那就太好了。
How many parameters should we have in such a function? Your first instinct may be 3, one for each of the 3 words in our options. But that wouldn’t be very flexible. After all, what if we want to know the best of five words? Ten words? Fifty? We would like our function to work no matter how many words we are considering.
我们的函数应该设置多少个参数才合适呢?你的直觉可能是 3 个,因为我们刚刚面对的候选单词就是 3 个。但是,这样的设计缺乏灵活性。试想,如果我们想从5个单词中挑选出最优的一个该怎么办?10个呢?50个呢?我们期望无论面对多少个候选单词,函数都能够有效地工作。
The trick is to use a function with one (yes, just one!) parameter, which is a list of words. Just like numbers and strings and dictionaries, a list is a type supported by Python. It’s incredibly useful because it allows us to collect as many values into one place as we like.
这里的诀窍在于把函数的参数设计为一个单词的 “列表”(对,只需要一个参数)。与数字、字符串和字典类似,列表也是 Python 所支持的一种数据类型。它之所以强大,是因为我们可以将任意数量的值汇集于一处。
We can prompt Copilot like this to get the function that we want:
我们可以够通过如下提示词来引导 Copilot生成我们想要的函数:
def best_word(word_list):
    """
    word_list is a list of words.

    Return the word worth the most points.
    """
How will Copilot know how many points each word is worth? Well, it can call that num_points function that we wrote in the previous section!
Copilot 要如何判断每个单词的得分呢?其实很简单,它可以调用我们在上一小节编写的 num_points 函数来实现这一点!
Here’s the code that Copilot gives us.
以下是 Copilot 给出的代码。
    best_word = ""
    best_points = 0
    for word in word_list:
        points = num_points(word)
        if points > best_points:
            best_word = word
            best_points = points
    return best_word
We need to be careful to call this function correctly when testing. This won’t work:
在进行测试时,我们必须注意正确地调用这个函数。以下做法是错误的:
>>> best_word('zap', 'pack', 'quack')Because that’s passing values for three parameters, not one. The right way to call it is to put the words inside square brackets, like this (we’ll see more about lists in the next chapter):
这样做实际上是向函数传入了三个参数,而非一个参数。正确的调用方法应当是把单词放入方括号中,如下所示(关于列表的更多内容,我们将在接下来的章节中详细探讨):
>>> best_word(['zap', 'pack', 'quack'])
'quack'
But, as usual, you shouldn’t be content with just one test case. This function should work in other valid but perhaps strange cases, too, such as when we have only one word in the list:
另外,如前所述,我们不应该仅仅满足于单一的测试场景。一个函数在面对一些稍显奇怪但整体合理的情况时,也应能正常运作。例如,当我们的单词列表中仅有一个单词的情形:
>>> best_word(['zap'])
'zap'
However, we wouldn’t test this function on a list that has no words in it. What would it even make sense to do in that case? Regardless of what the function does, it’d be hard to say one way or the other whether it was doing the correct thing in a situation where there really is no correct behavior!
尽管如此,我们并不会用一个空的单词列表来测试这个函数。在这种情况下,返回什么样的结果才算是附合预期呢?不管函数如何运行,在这种根本没有所谓正确行为的场景下,要界定它是否正确,确实是颇为困难的。
Overall, in this chapter we’ve learned about functions in Python and how we can use Copilot to help us write them. We’ve also learned about the characteristics of good functions and how important it is to make sure our functions are solving tasks that can be managed well by Copilot. Our next steps in this book all revolve around understanding whether the code produced by Copilot is correct and how to fix it when it isn’t. In the next chapter, we’ll start by learning the basics of being able to read the code produced by Copilot because this gives us the first sanity check for whether Copilot is doing what we think it should be. Then, in later chapters, we’ll dig deeper into how to carefully test the code and what to do when it is wrong.
总而言之,在这一章里,我们学习了 Python 中函数的相关知识,并初步掌握了利用 Copilot 来辅助我们编写函数的方法。我们同样了解到,优秀的函数应具备哪些特质,并且可以分辨哪些任务可以交给 Copilot 以编写函数的方式很好地完成,这一点至关重要。本书接下来的目标,就是要教会你如何判断 Copilot 生成的代码是否正确,以及在代码出现问题时如何修复。在下一章里,我们将开始学习如何阅读 Copilot 编写的代码,这将帮助我们初步确认 Copilot 是否按照我们的预期在工作。而在之后的章节里,我们会进一步学习如何对代码进行细致的测试,以及在发现问题时如何解决。